Effective data management is crucial for dealing with personal budgets, project timelines, or customer records. However, sorting in Excel can transform a chaotic spreadsheet into an organized yet easy-to-navigate instrument. By arranging data systematically, you can:
- Quickly locate specific information.
- Identify trends and patterns.
- Present your findings clearly and professionally.
Now imagine easily spotting the highest sales figures, alphabetizing contacts, or grouping tasks by cutoff date. This guide will help you sort your data efficiently and make your Excel experience smoother and more dynamic.
Understanding Sorting Basics in Excel
Yes, sorting data in Excel can save you time and help you see patterns more visibly. See the basic types of sorting:
Excel sorting helps you organize data quickly. Here are the main types:
Ascending/Descending:
- Ascending: Smallest to largest (A-Z, 0-9, earliest dates).
- Descending: Largest to smallest (Z-A, 9-0, latest dates).
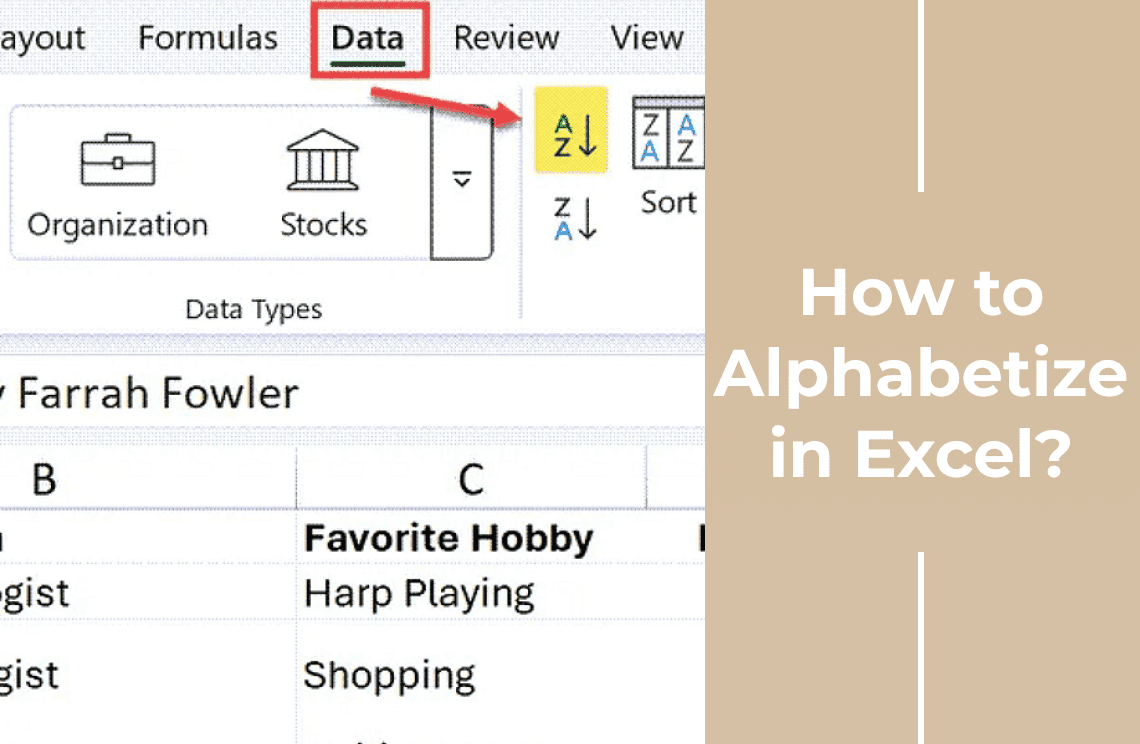
Text Sorting: Alphabetize lists (names, products).
Number Sorting: Rank numbers (high to low, low to high).
Date Sorting: Arrange dates chronologically.
Custom Sorting: Sort by your order (e.g., "High," "Medium," "Low").
Sorting by Multiple Columns for Advanced Data Organization
Why Sort by Multiple Columns?
Sorting by multiple columns can significantly enhance your data organization and analysis. Consider scenarios like:
Sorting by Name: You can sort by last name first and then by first name in a list of employees. It ensures that names are categorized properly.
Sales Data: Sorting a sales report by region and sales amount helps compare performance across different regions.
How to Sort by Multiple Columns (Step-by-Step Guide)
You can layer multiple sorting criteria for greater precision in organizing your data. It means you can sort by more than one column. It allows for a more detailed arrangement of your sheet.
1. Select Data: Click any cell within your data.
2. Open Sort: Go to the "Data" tab and click “Sort.”
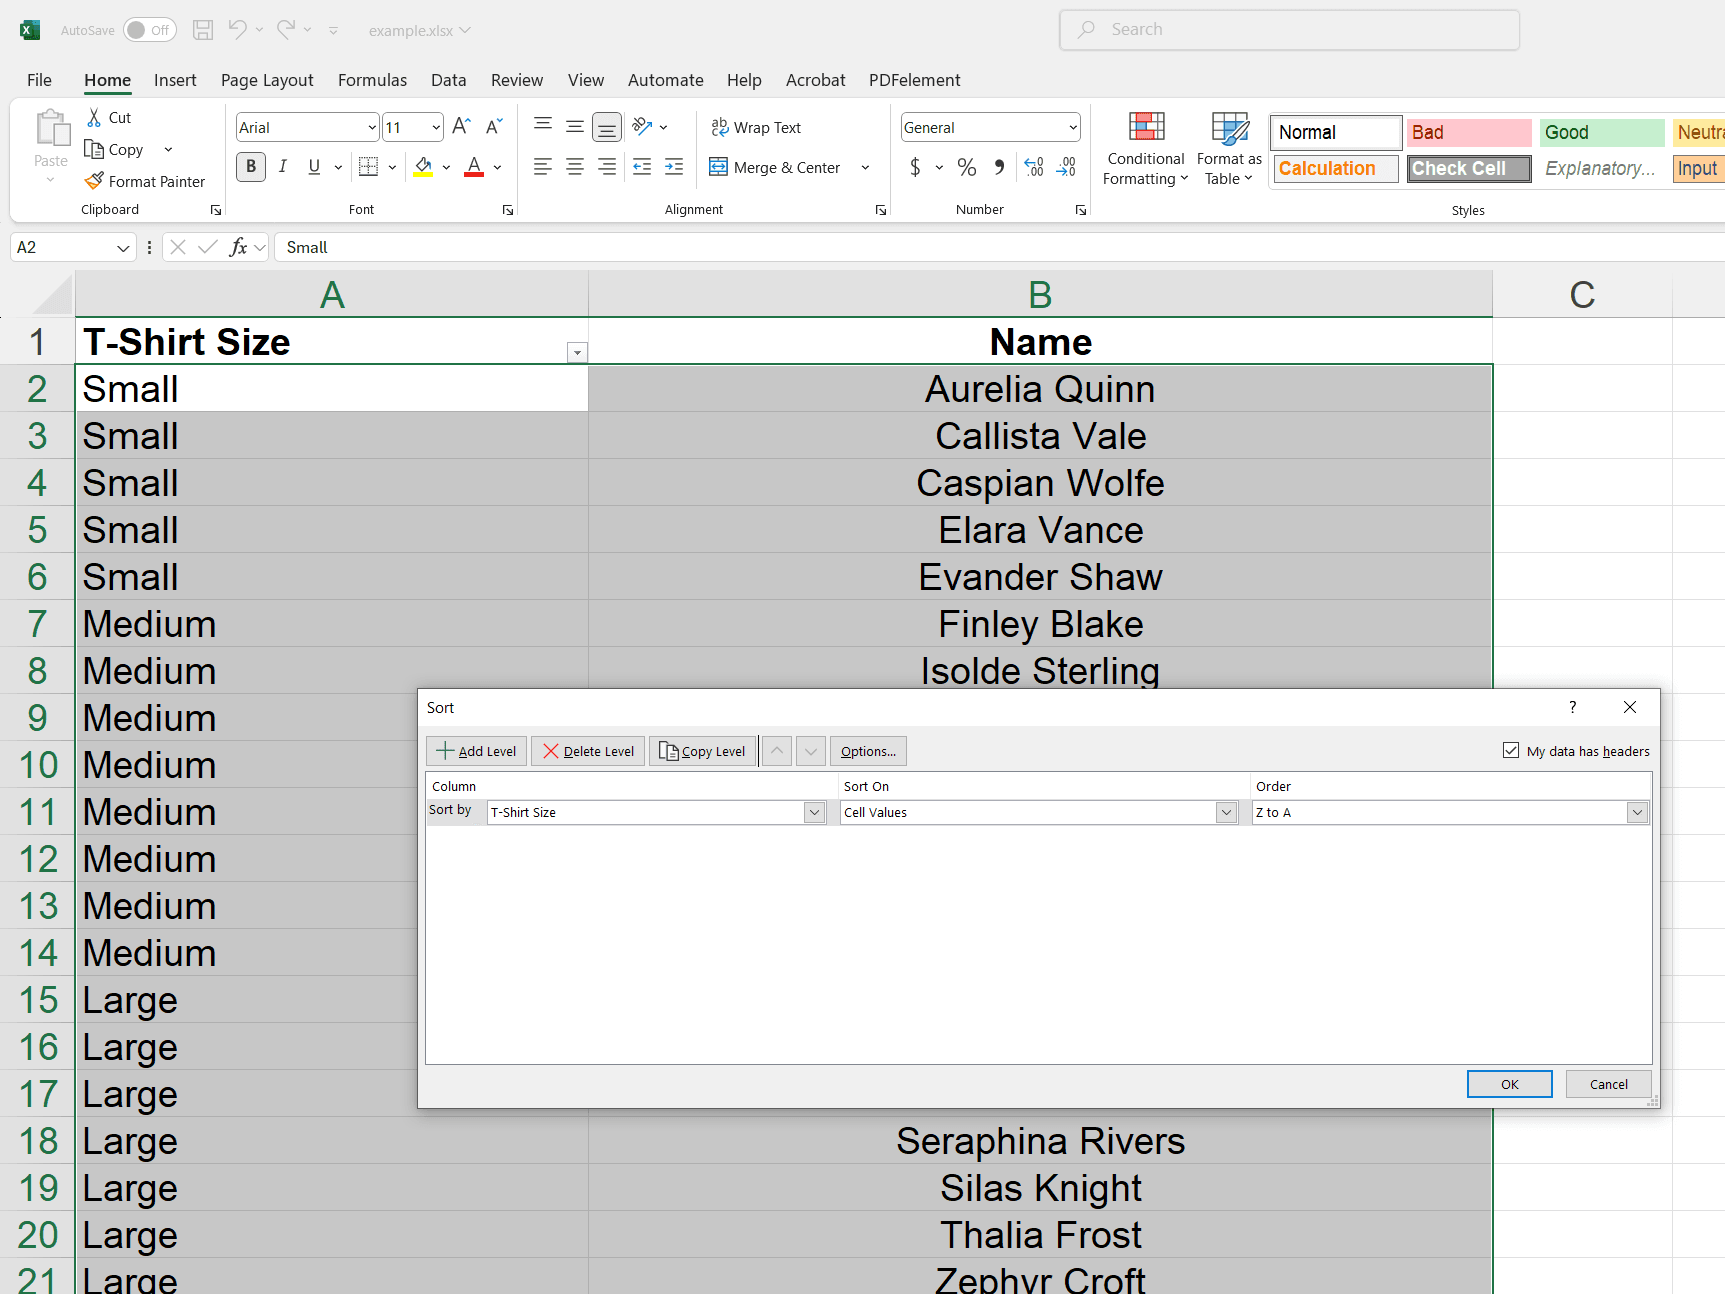
3. Set First Sort: In the "Sort" dialog box, select the first column to sort by (e.g., "T-Shirt Size") and choose your desired sort order.
4. Add Second Sort: Click "Add Level" to add another sorting criteria.
5. Set Second Sort: Select the second column to sort by and choose your desired sort order.
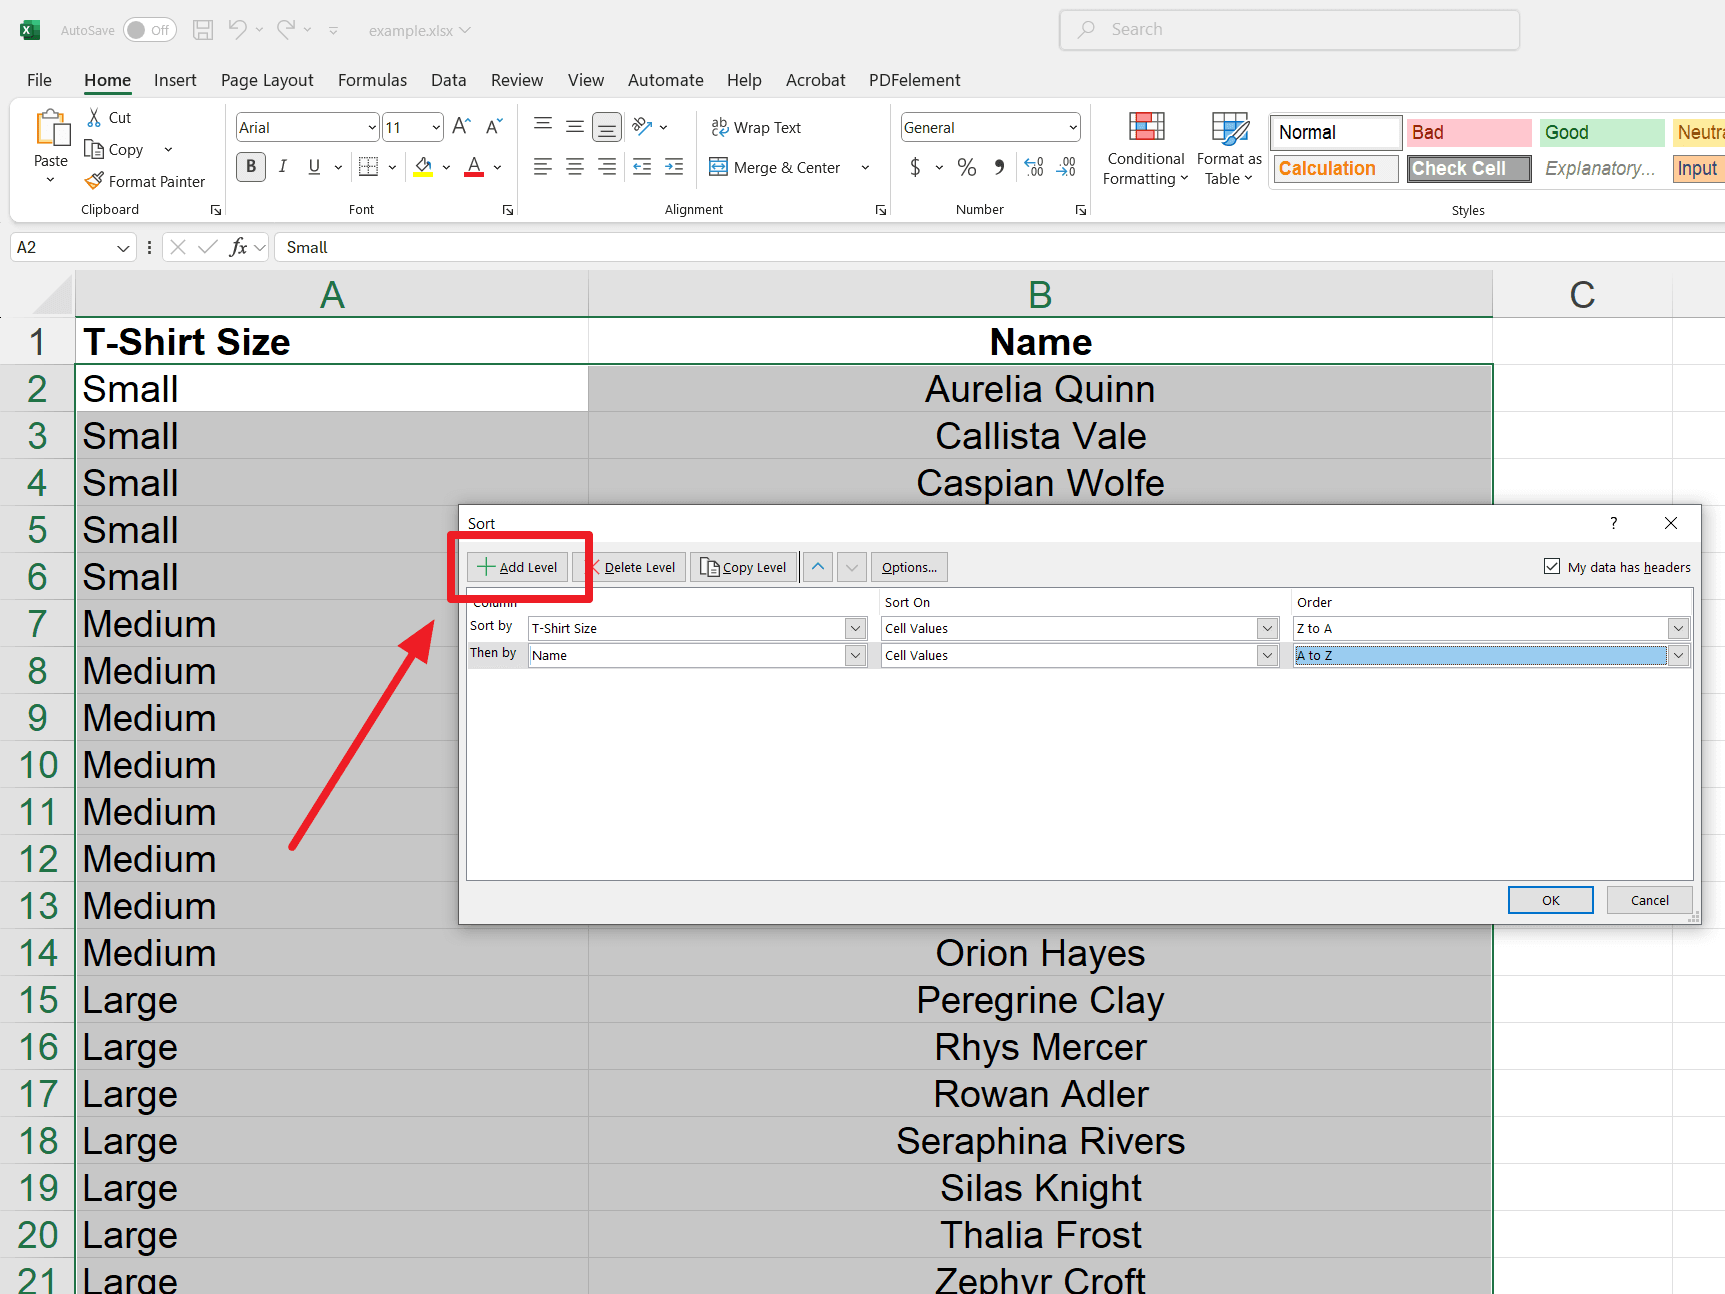
6. Click OK: Click "OK" to apply the multi-column sort.
7. Change Priority (Optional): To change the order of sorting, select a column in the "Sort" dialog box and use the "Move Up" or "Move Down" arrows.
Tips for Efficient Multi-Column Sorting
1. Use the "Sort" feature in your software to arrange columns easily.
2. Prioritize columns by dragging them or using up/down arrows.
3. Utilize keyboard shortcuts for faster navigation.
4. Always double-check the sorting criteria before applying changes.
5. Save your settings as templates for future use.
Custom Sorting: Sorting Based on Custom Order
What is Custom Sorting?
Rather than using default numerical or alphabetical sorting custom sorting allows you to arrange data based on your defined order.
Situations Where Custom Sorting is Needed
- Sort by Days of the Week: Rather than alphabetically, you need data organized from Monday to Sunday.
- Custom Rankings: It is used to prioritize data based on a specific ranking system. For example employee levels junior, mid-level & senior).
- Event Sequences: You can organize events in the order they occur like stages of a project planning, execution & review).
- Product Categories: When products need to be sorted according to a custom-defined sequence, like seasonal availability or sales priorities.
How to Create and Use Custom Sort Lists?
1. Select Data: Click any cell within the column you want to sort (e.g., cell D2 for "T-Shirt Size").
2. Open Sort: Go to the "Data" tab and click “Sort.”
3. Choose Column: In the "Sort" dialog box, select the column you want to sort (e.g., "T-Shirt Size").
4. Access Custom List: In the "Order" dropdown, select "Custom List...".
5. Create a New List: In the "Custom Lists" dialog box, select “NEW LIST.”
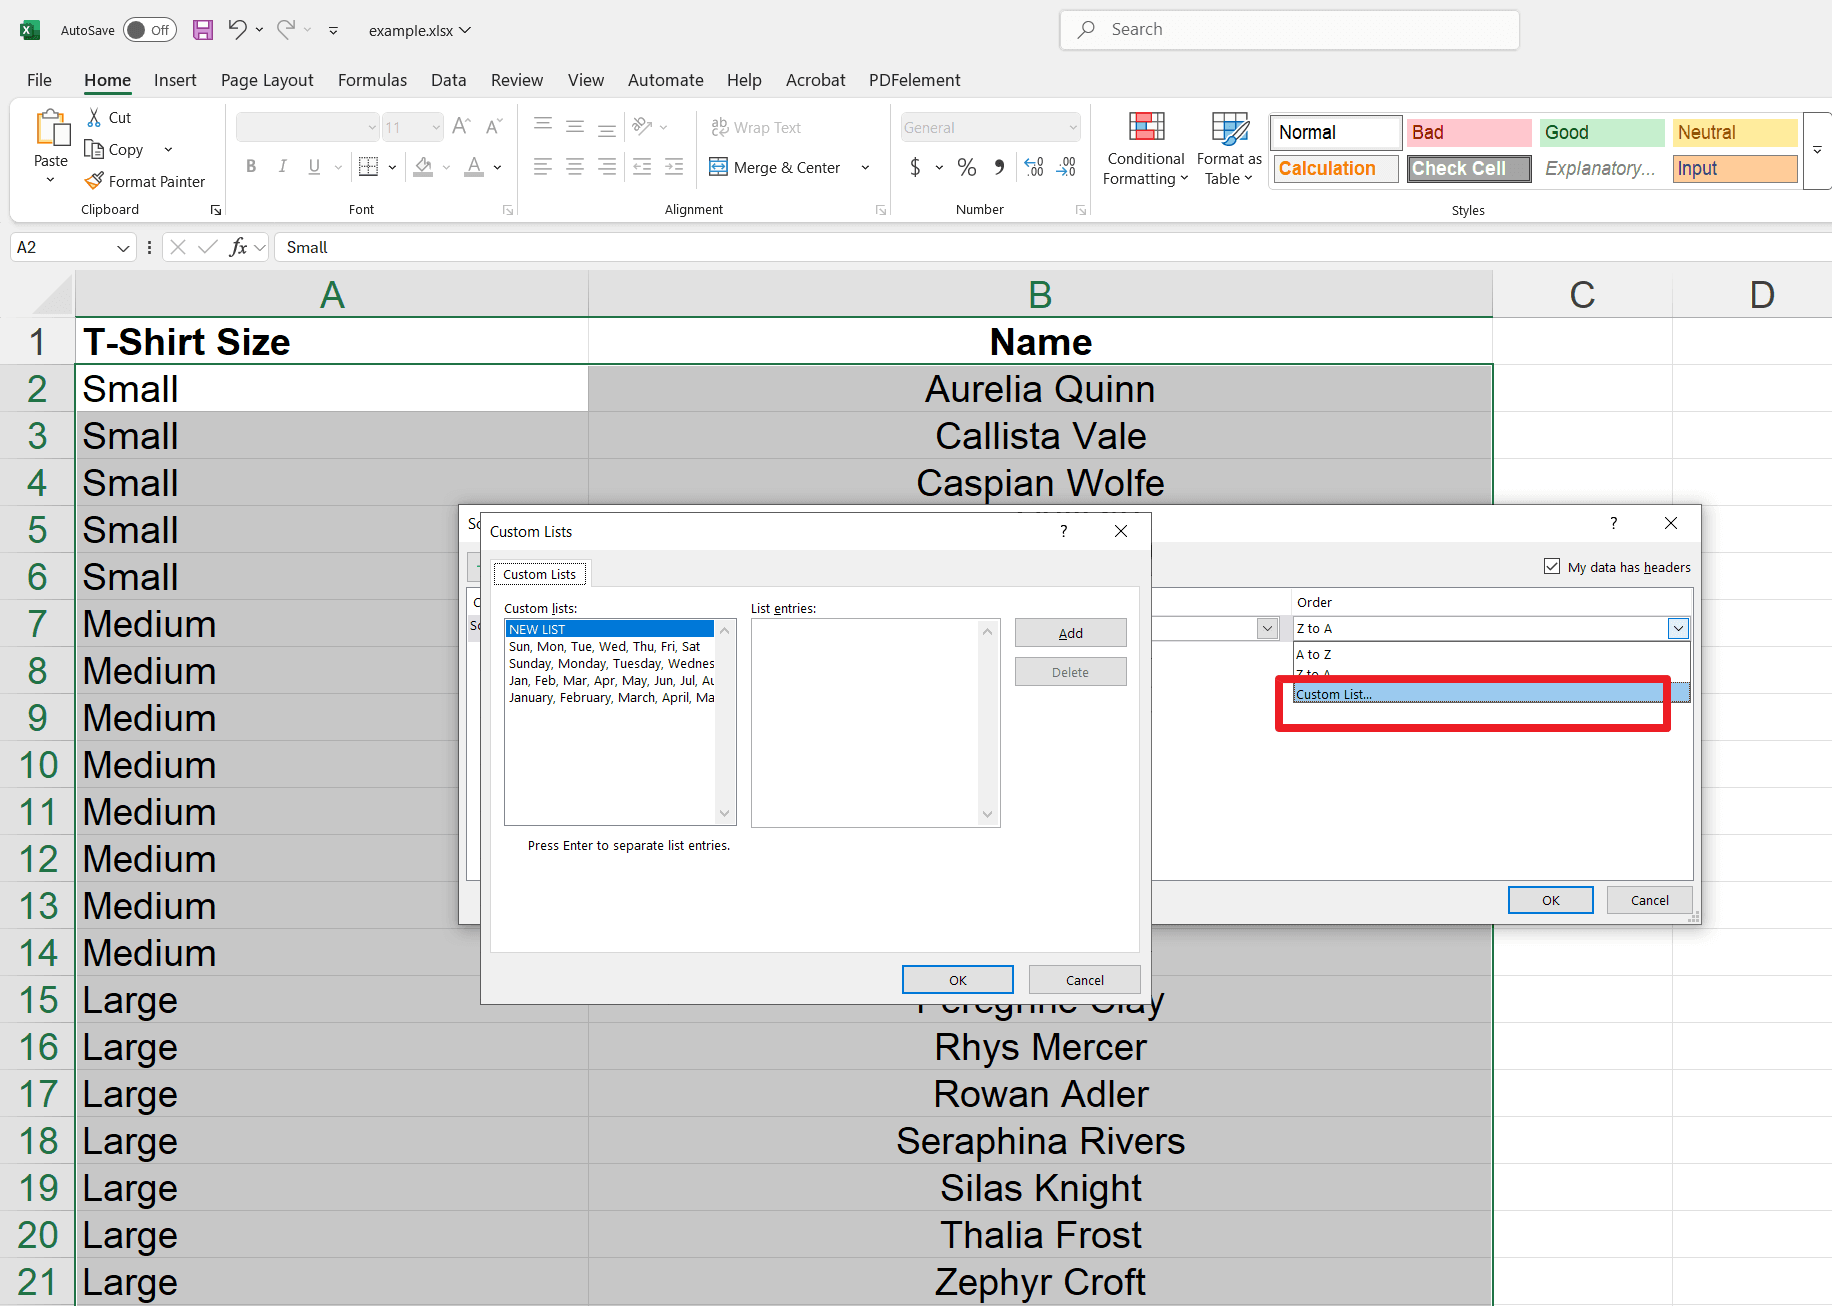
6. Enter Custom Order: In the "List entries" box, type your desired sort order, pressing Enter after each item (e.g., "Small," "Medium," "Large," "X-Large").
7. Add List: Click "Add" to save the custom list.
8. Select and Confirm: Make sure your new list is highlighted, and click "OK" to close the "Custom Lists" dialog box.
9. Apply Sort: Click "OK" in the "Sort" dialog box to apply the custom sort.
Advanced Sorting Tips
- By Color: Use "Sort" under the "Data" tab, and select "Cell Color" to sort by color preference.
- By Icon: Choose "Cell Icon" in the Sort options to arrange rows based on the icons.
- By Value: Select "Values" in the sorting criteria to order data numerically or alphabetically.
- Custom Priority: Adjust the sort order to prioritize specific colors or icons first.
- Multiple Levels: Combine sorting criteria, such as color and value, for more tailored data organization.
Sorting with Filters: How to Sort Only Visible Data?
Why Use Sorting with Filters?
Filtering can isolate specific data subsets while hiding non-relevant entries. By combining filtering with sorting, you can effectively sort only the visible, filtered data, enhancing analysis accuracy and making data management more efficient. This focused sorting ensures you work only with the pertinent information.
1. Add Filters: Select your data (including the header row). Then, go to the "Data" tab and click "Filter" (or "Home" > "Sort & Filter" > "Filter"). Dropdown arrows will appear in your header row.
2. Apply Filter: Click the dropdown arrow for the column you want to filter (e.g., "Type"). Uncheck “Select All.” Then, check the boxes for the items you want to show (e.g., "Laptop," "Projector"). Thereafter, click "OK."
3. Sort Filtered Data: Your data is now filtered. Use the "Sort" function (Data > Sort) as usual. Only the visible filtered data will be sorted.
Tips for Sorting with Filters
- Ensure you select the entire data range.
- Clear filters before sorting to include all rows.
- Use consistent data types in each column.
- Exclude the header row from sorting.
- Reapply filters after sorting to update views.
End Note
Mastering Excel sorting is like having a personal assistant for your data. By following these essential tips, you'll breeze through tables and charts with newfound ease, making smarter decisions without breaking a sweat. So dive in, tweak those spreadsheets, and let Excel's sorting magic streamline your data management tasks. Happy sorting!
For more tips and guidance, check out these helpful resources:


