In academic writing, professional reports, and various other documents, properly citing your sources is crucial for maintaining integrity and credibility. Adding references in Microsoft Word ensures that you give credit where it's due and helps readers locate the original sources. Whether you're a student, researcher, or professional, knowing how to add references efficiently can save you time and enhance the quality of your work.
In this tutorial, we'll guide you through three effective methods to add references in Word, complete with clear visual instructions. By the end of this article, you'll be able to confidently insert citations and generate a bibliography, ensuring your documents are well-referenced and professionally formatted. Let's get started!
Method 1: Using the References Tab
The References tab in Microsoft Word provides a convenient way to insert and manage citations and bibliographies. Follow these steps to add a reference using this method:
Step 1: Open Your Word Document and Navigate to the References Tab
Open your Word document where you want to add the reference. And then, click on the "References" tab in the ribbon at the top of the screen.

Step 2: Insert a Citation
First of all, select the target style of references or citation like APA 6th or IEEE based on your teacher’s demands or assignment requirements. And then, click on "Insert Citation" in the Citations & Bibliography group. Select "Add New Source" from the dropdown menu.
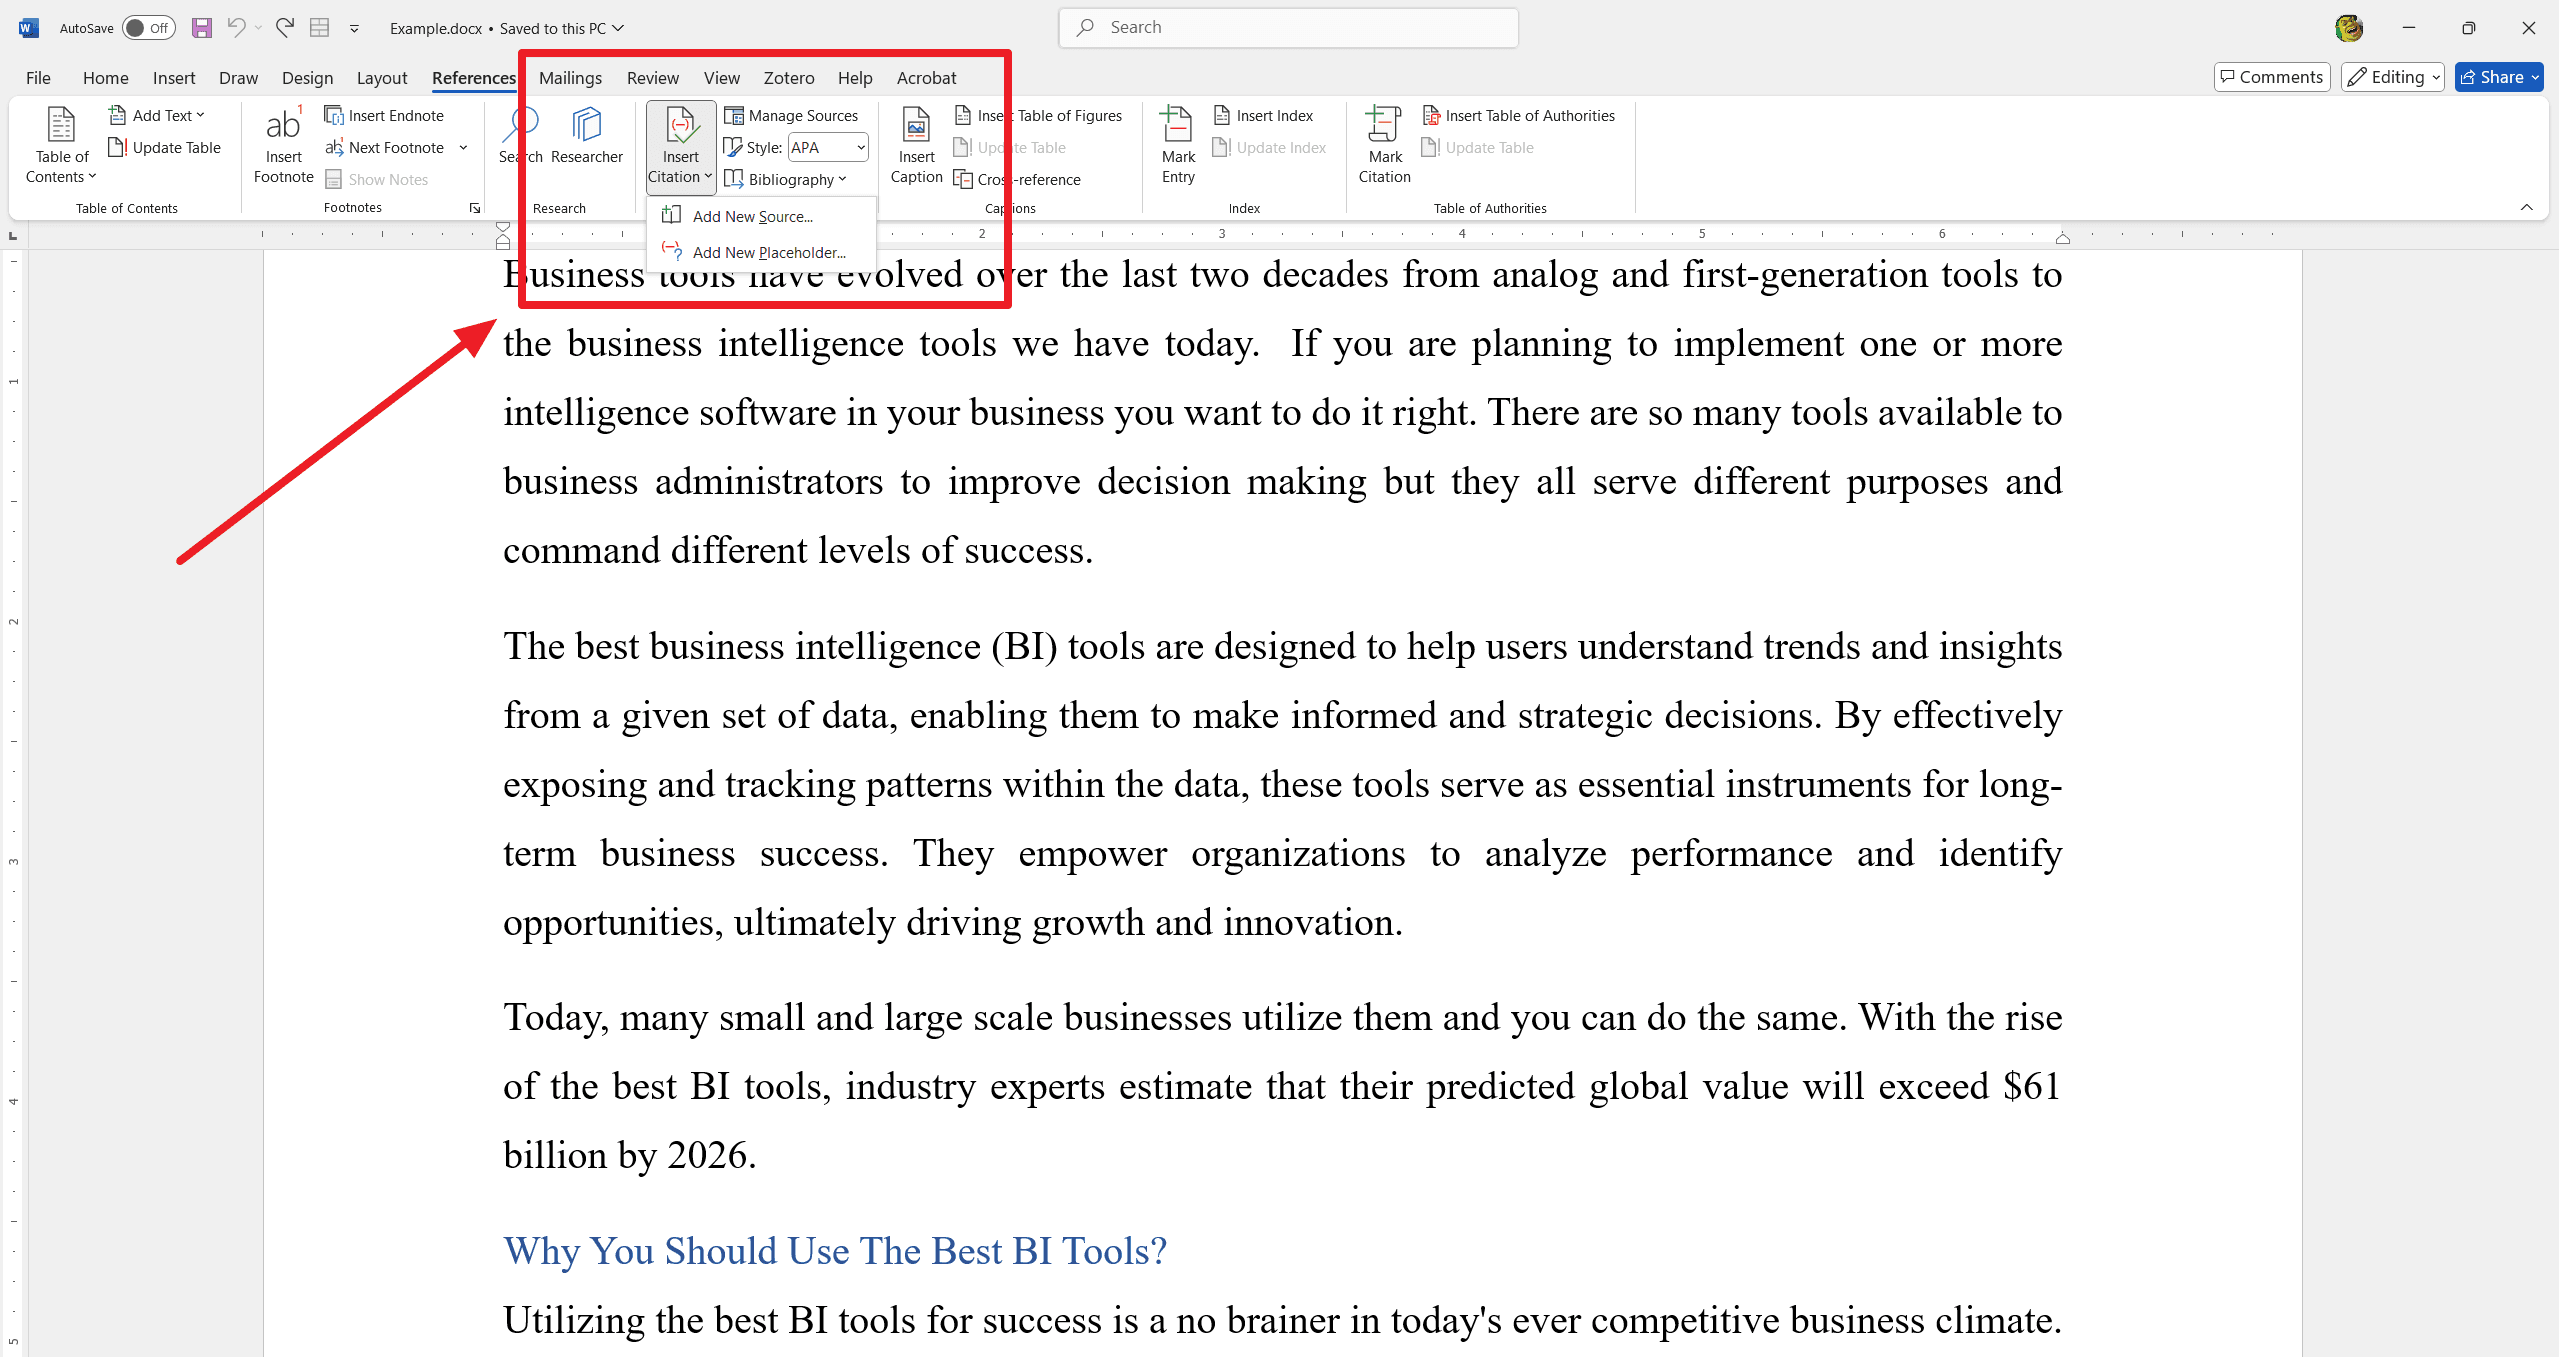
Step 3: Add a New Source
In the "Create Source" dialog box, select the type of source (e.g., Book, Journal Article) from the dropdown menu. And then, fill in the required fields with the source information (e.g., Author, Title, Year). Thereafter, click "OK" to add the source.
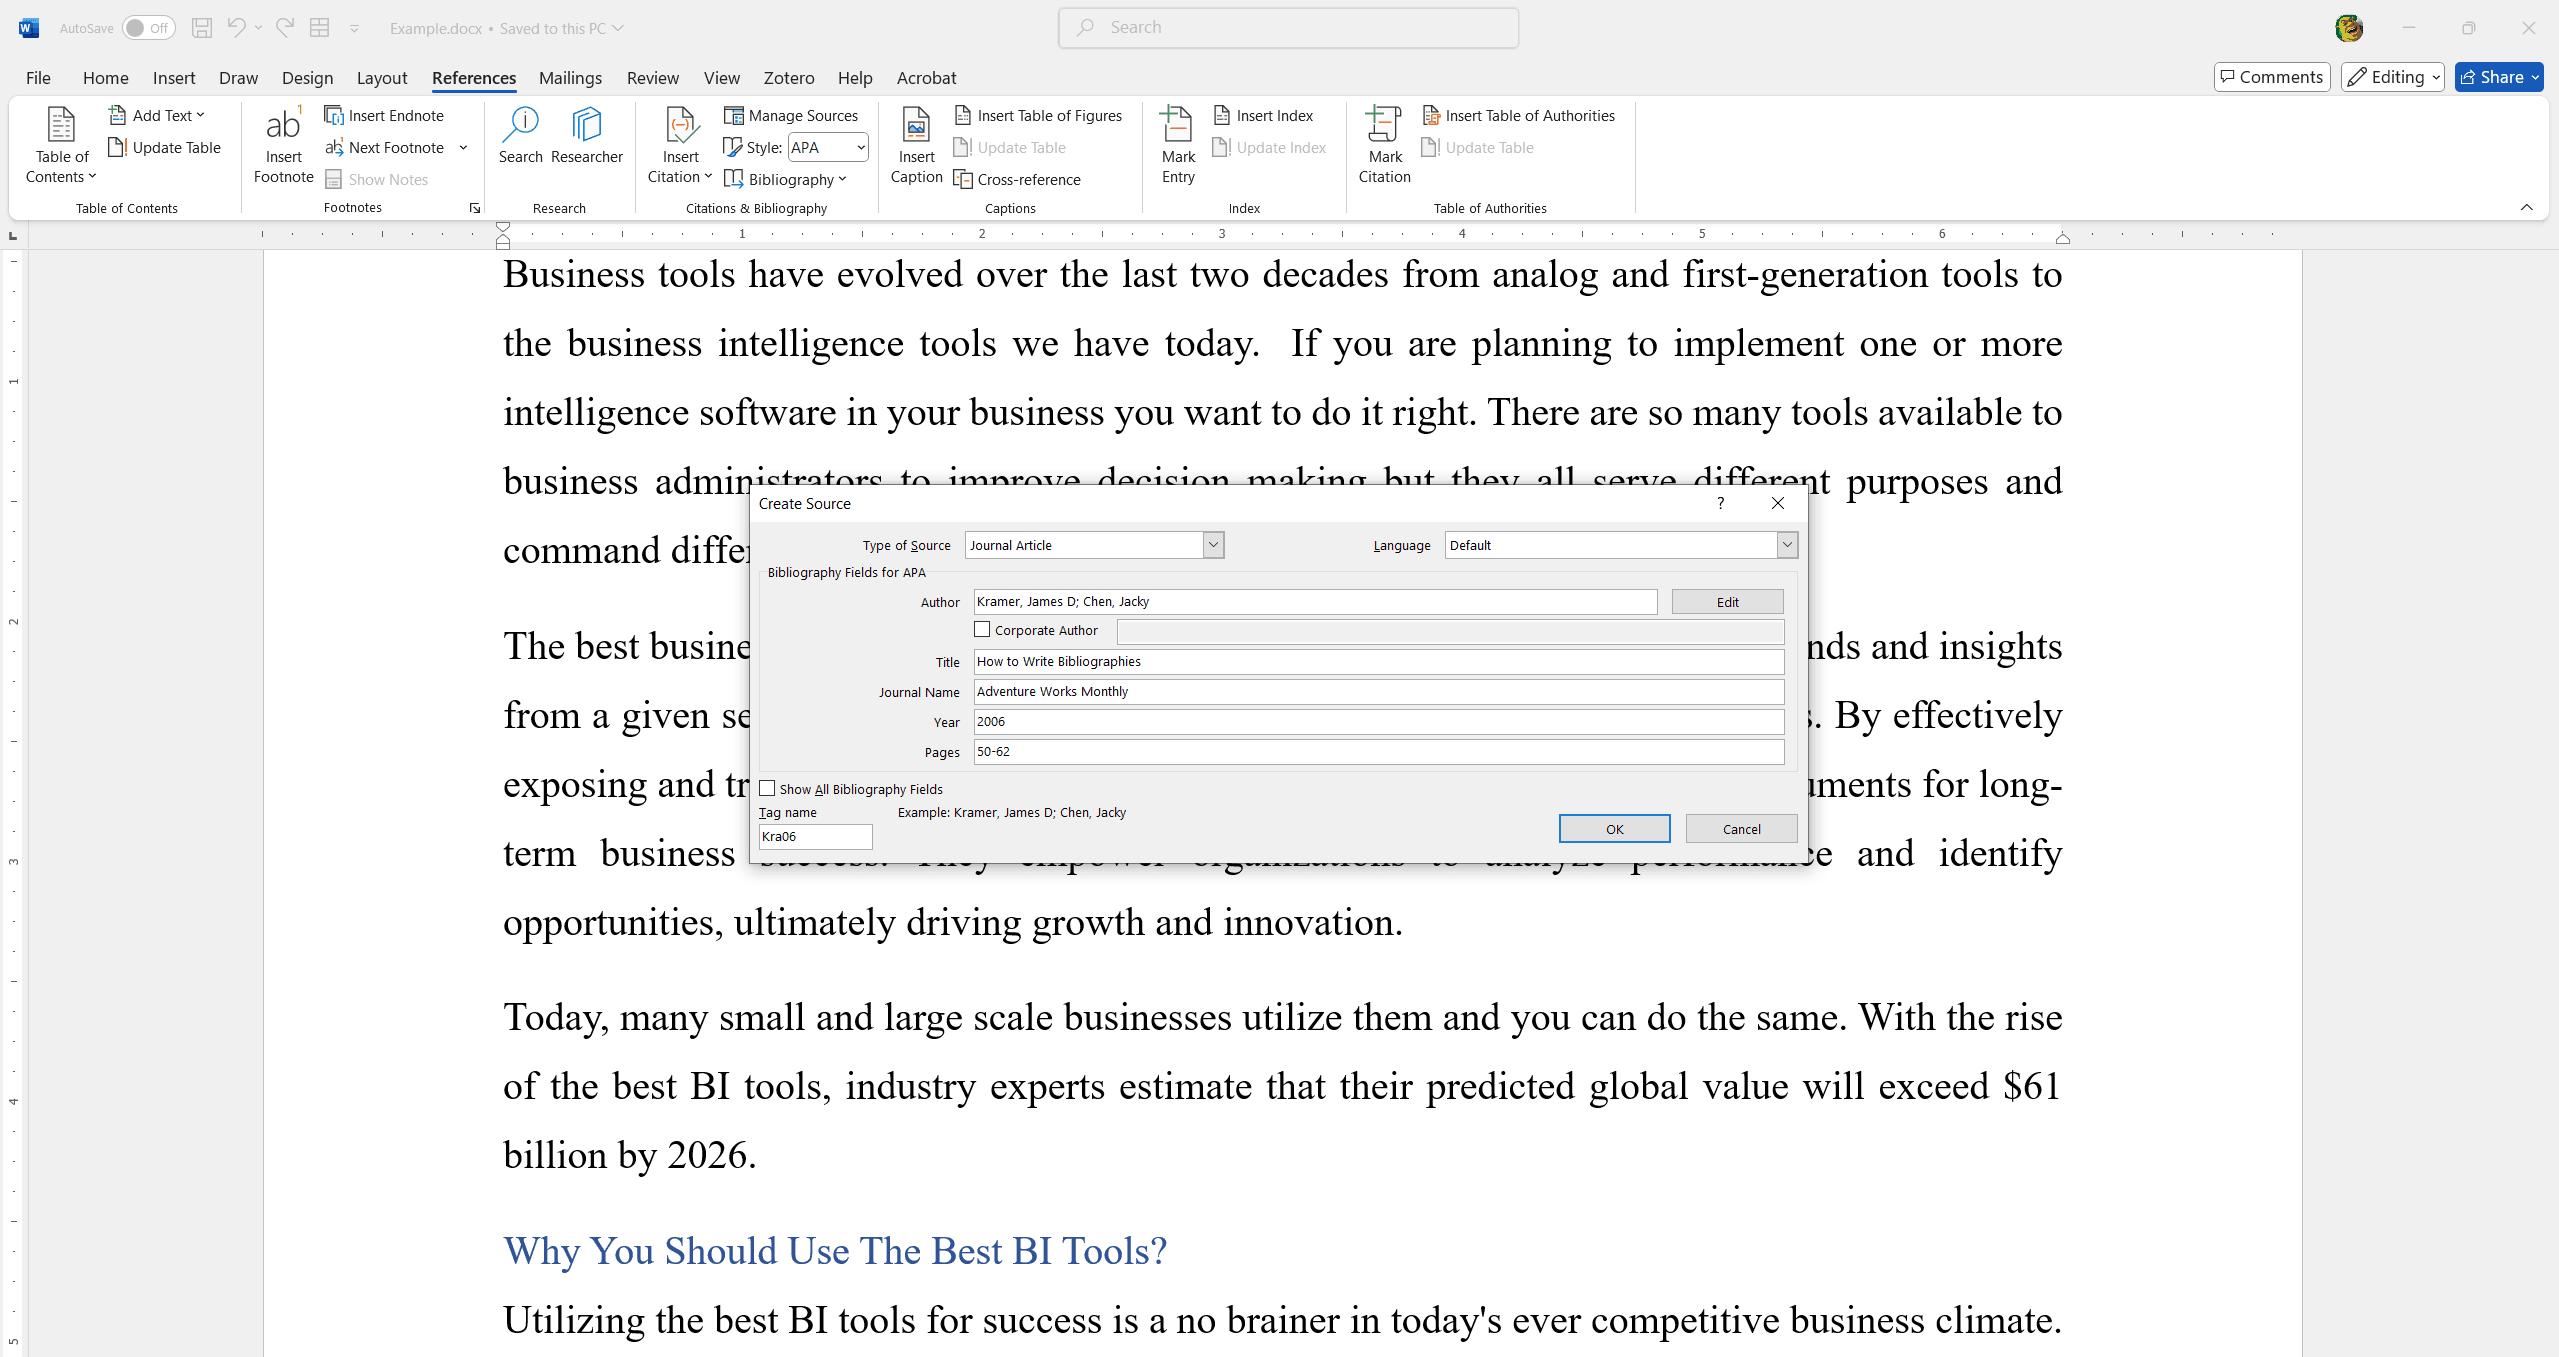
Step 4: Insert the Citation
Place your cursor where you want to insert the citation. And then, click on "Insert Citation" and select the source you just added.

Step 5: Insert the Bibliography
Place your cursor where you want to insert the bibliography (usually at the end of the document). Click on "Bibliography" in the Citations & Bibliography group. Select the bibliography style you prefer.
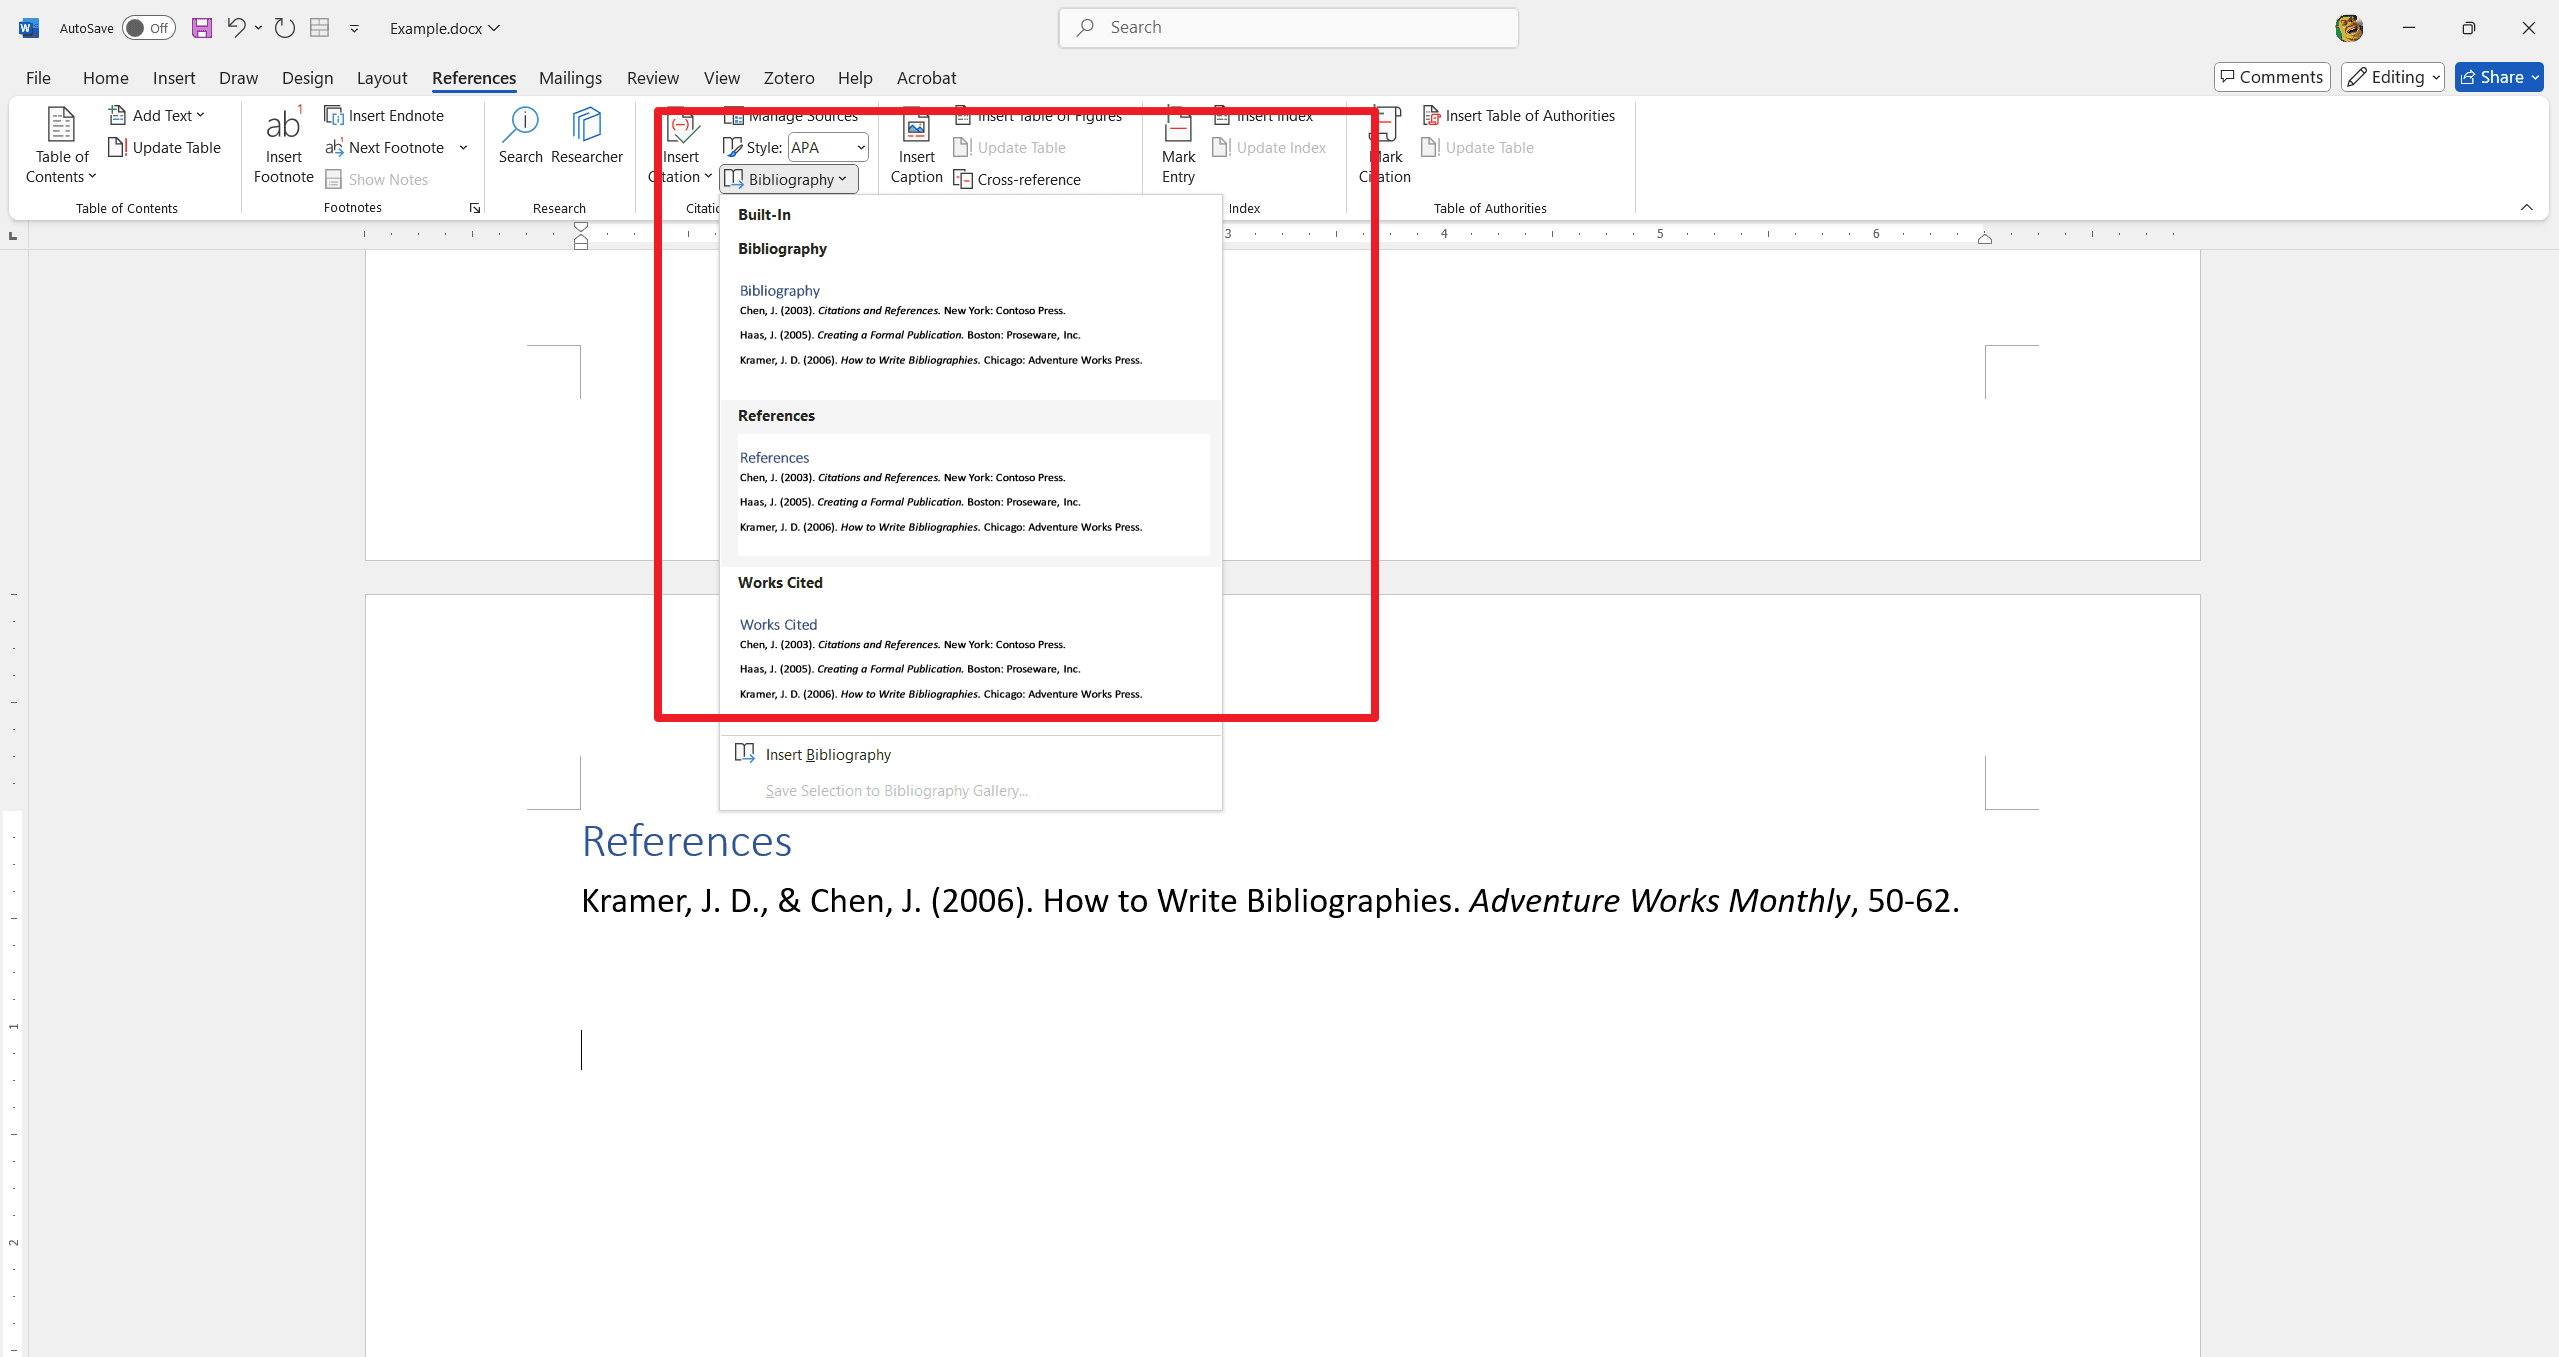
Method 2: Manually Adding References
Manually adding references is a straightforward method that gives you full control over the formatting and content. This approach is particularly useful for documents with a small number of references or when you prefer to avoid using automated tools. Here I strongly recommend a Reference Example Website.
Step 1: Type the Citations Manually
Opening a Word document. Typing the citation at the appropriate location in the text. Rember to use the formatting guidelines provided by your institution or the style guide you are following.
Step 2: Create a Bibliography Manually
Creating a bibliography section at the end of the document. Ensure that the bibliography is alphabetized and formatted consistently with your in-text citations.
Method 3: Using Other Citation Management Software (Using Zotero As Example)
Step 1: Install and Open Zotero
Download and install Zotero from the official website. And then, launch Zotero to access your library.
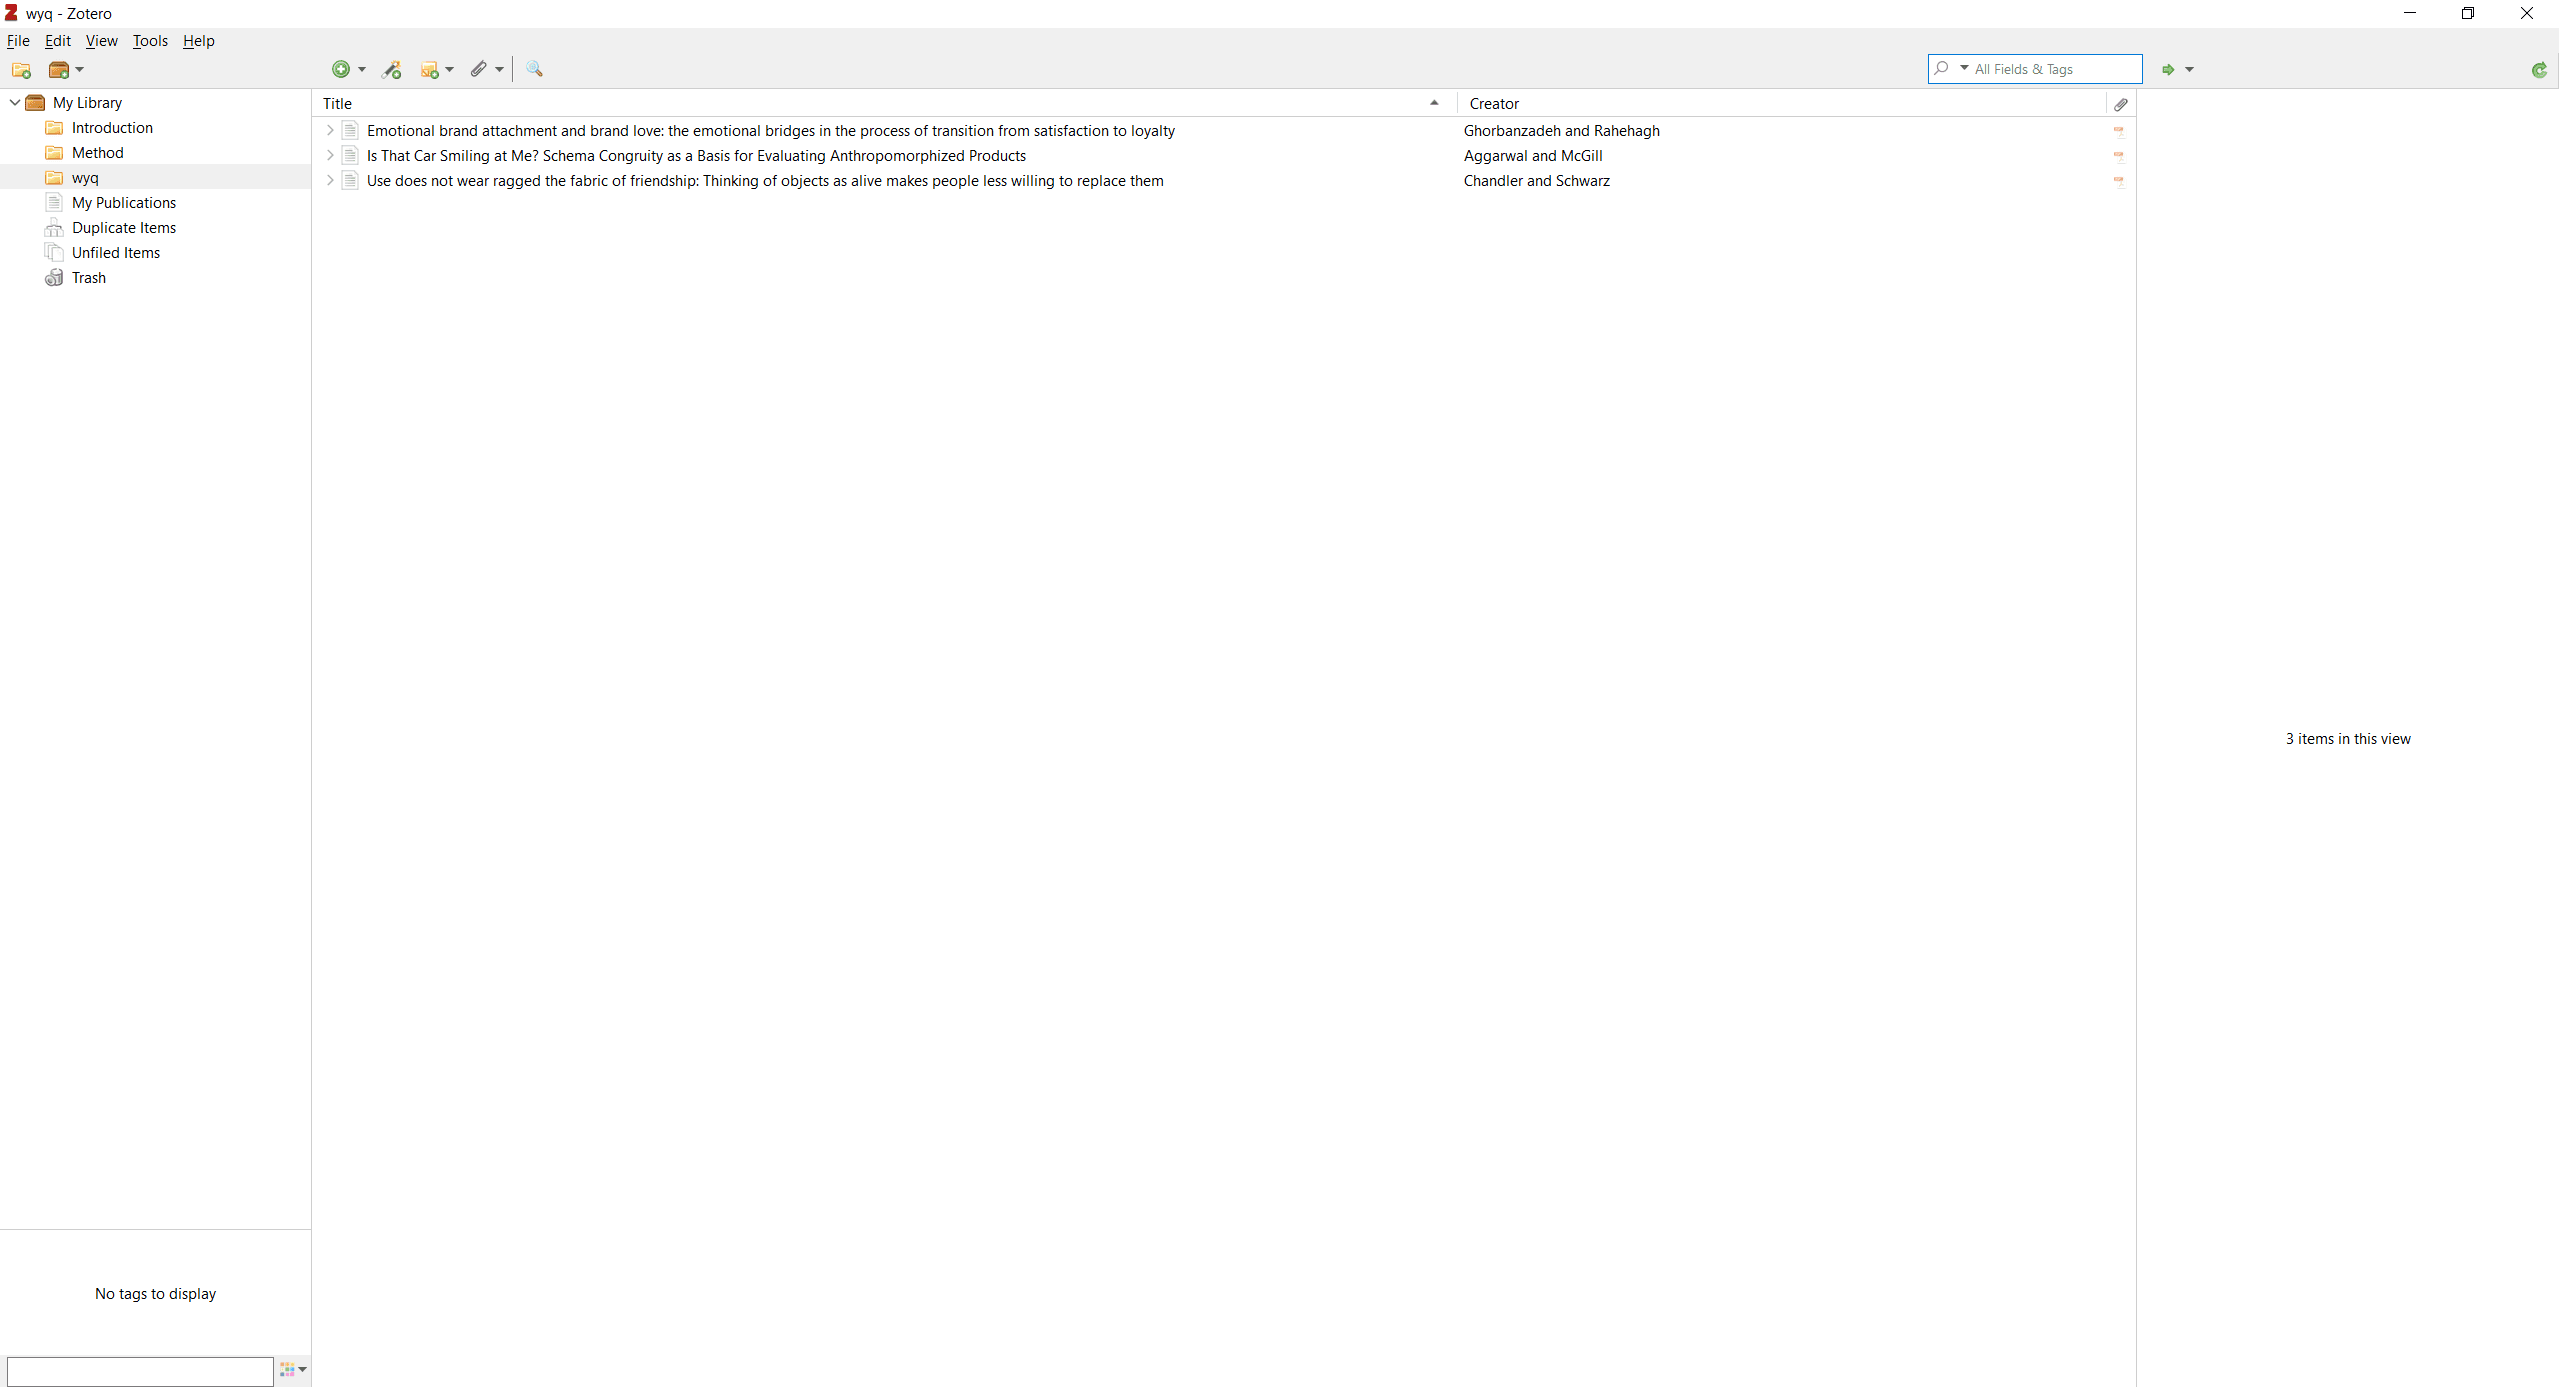
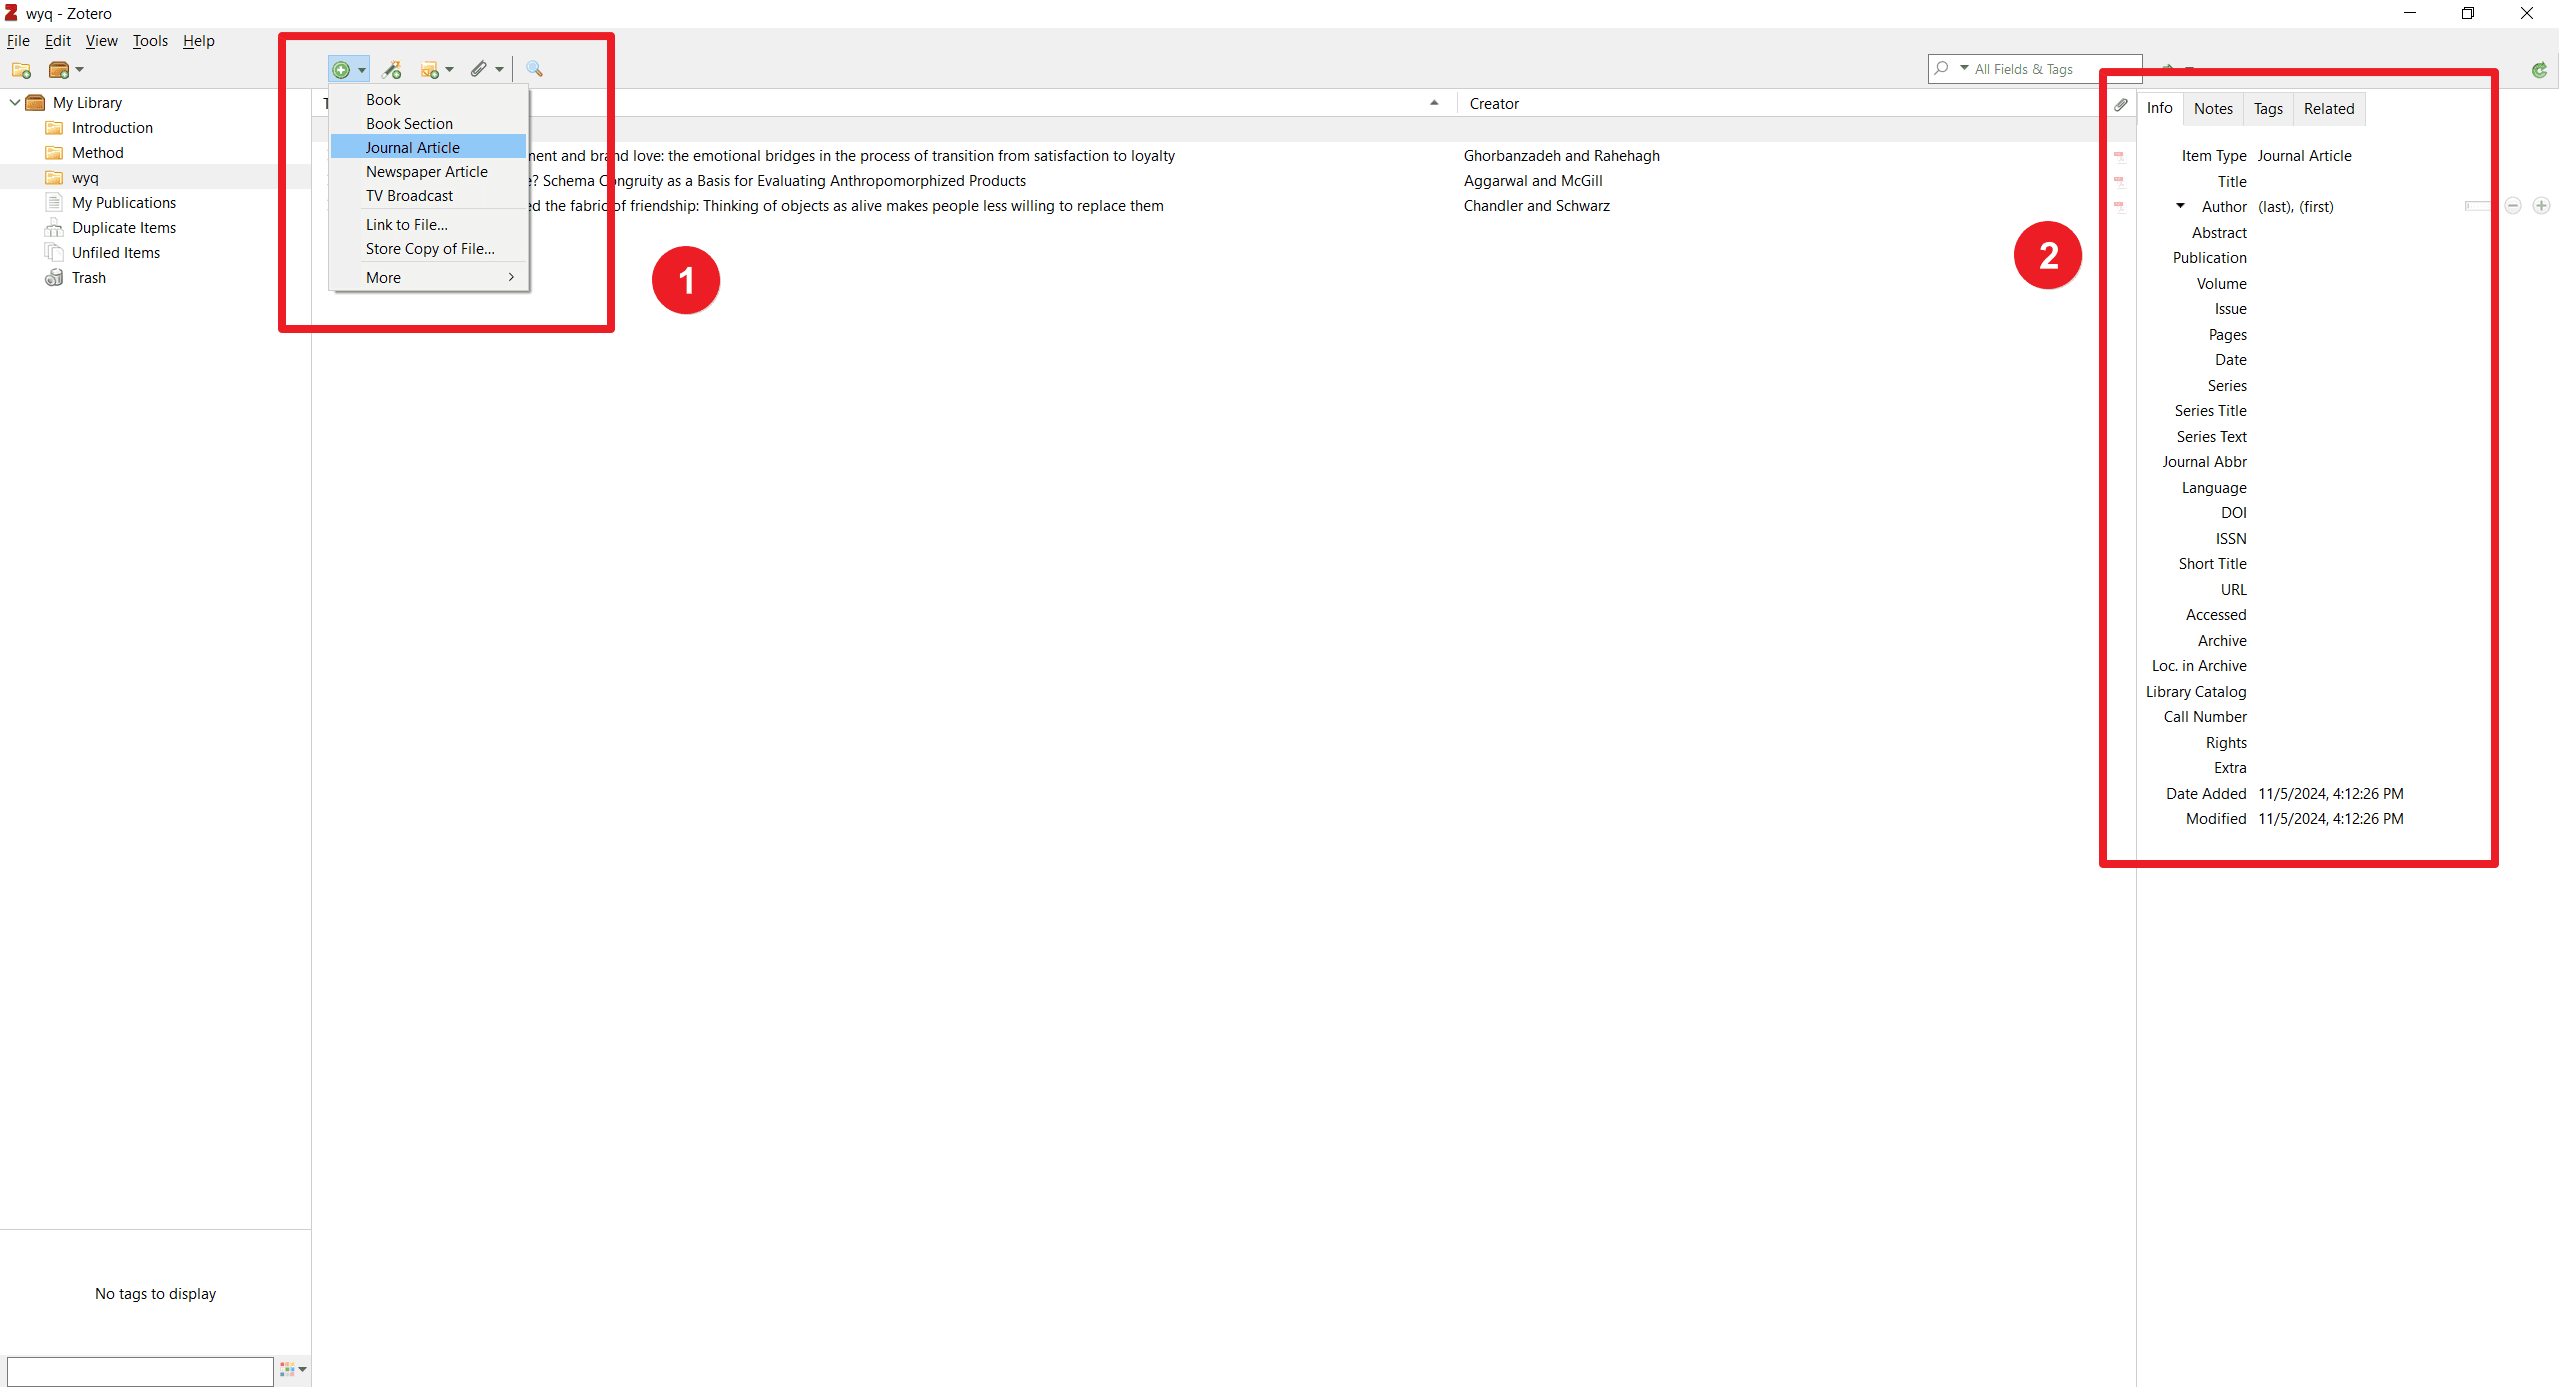
Step 2: Add References to Zotero
Adding References: Use the Zotero browser extension to save references directly from websites, or manually add references by clicking the "New Item" button in Zotero.
Step 3: Install the Zotero Plugin for Word
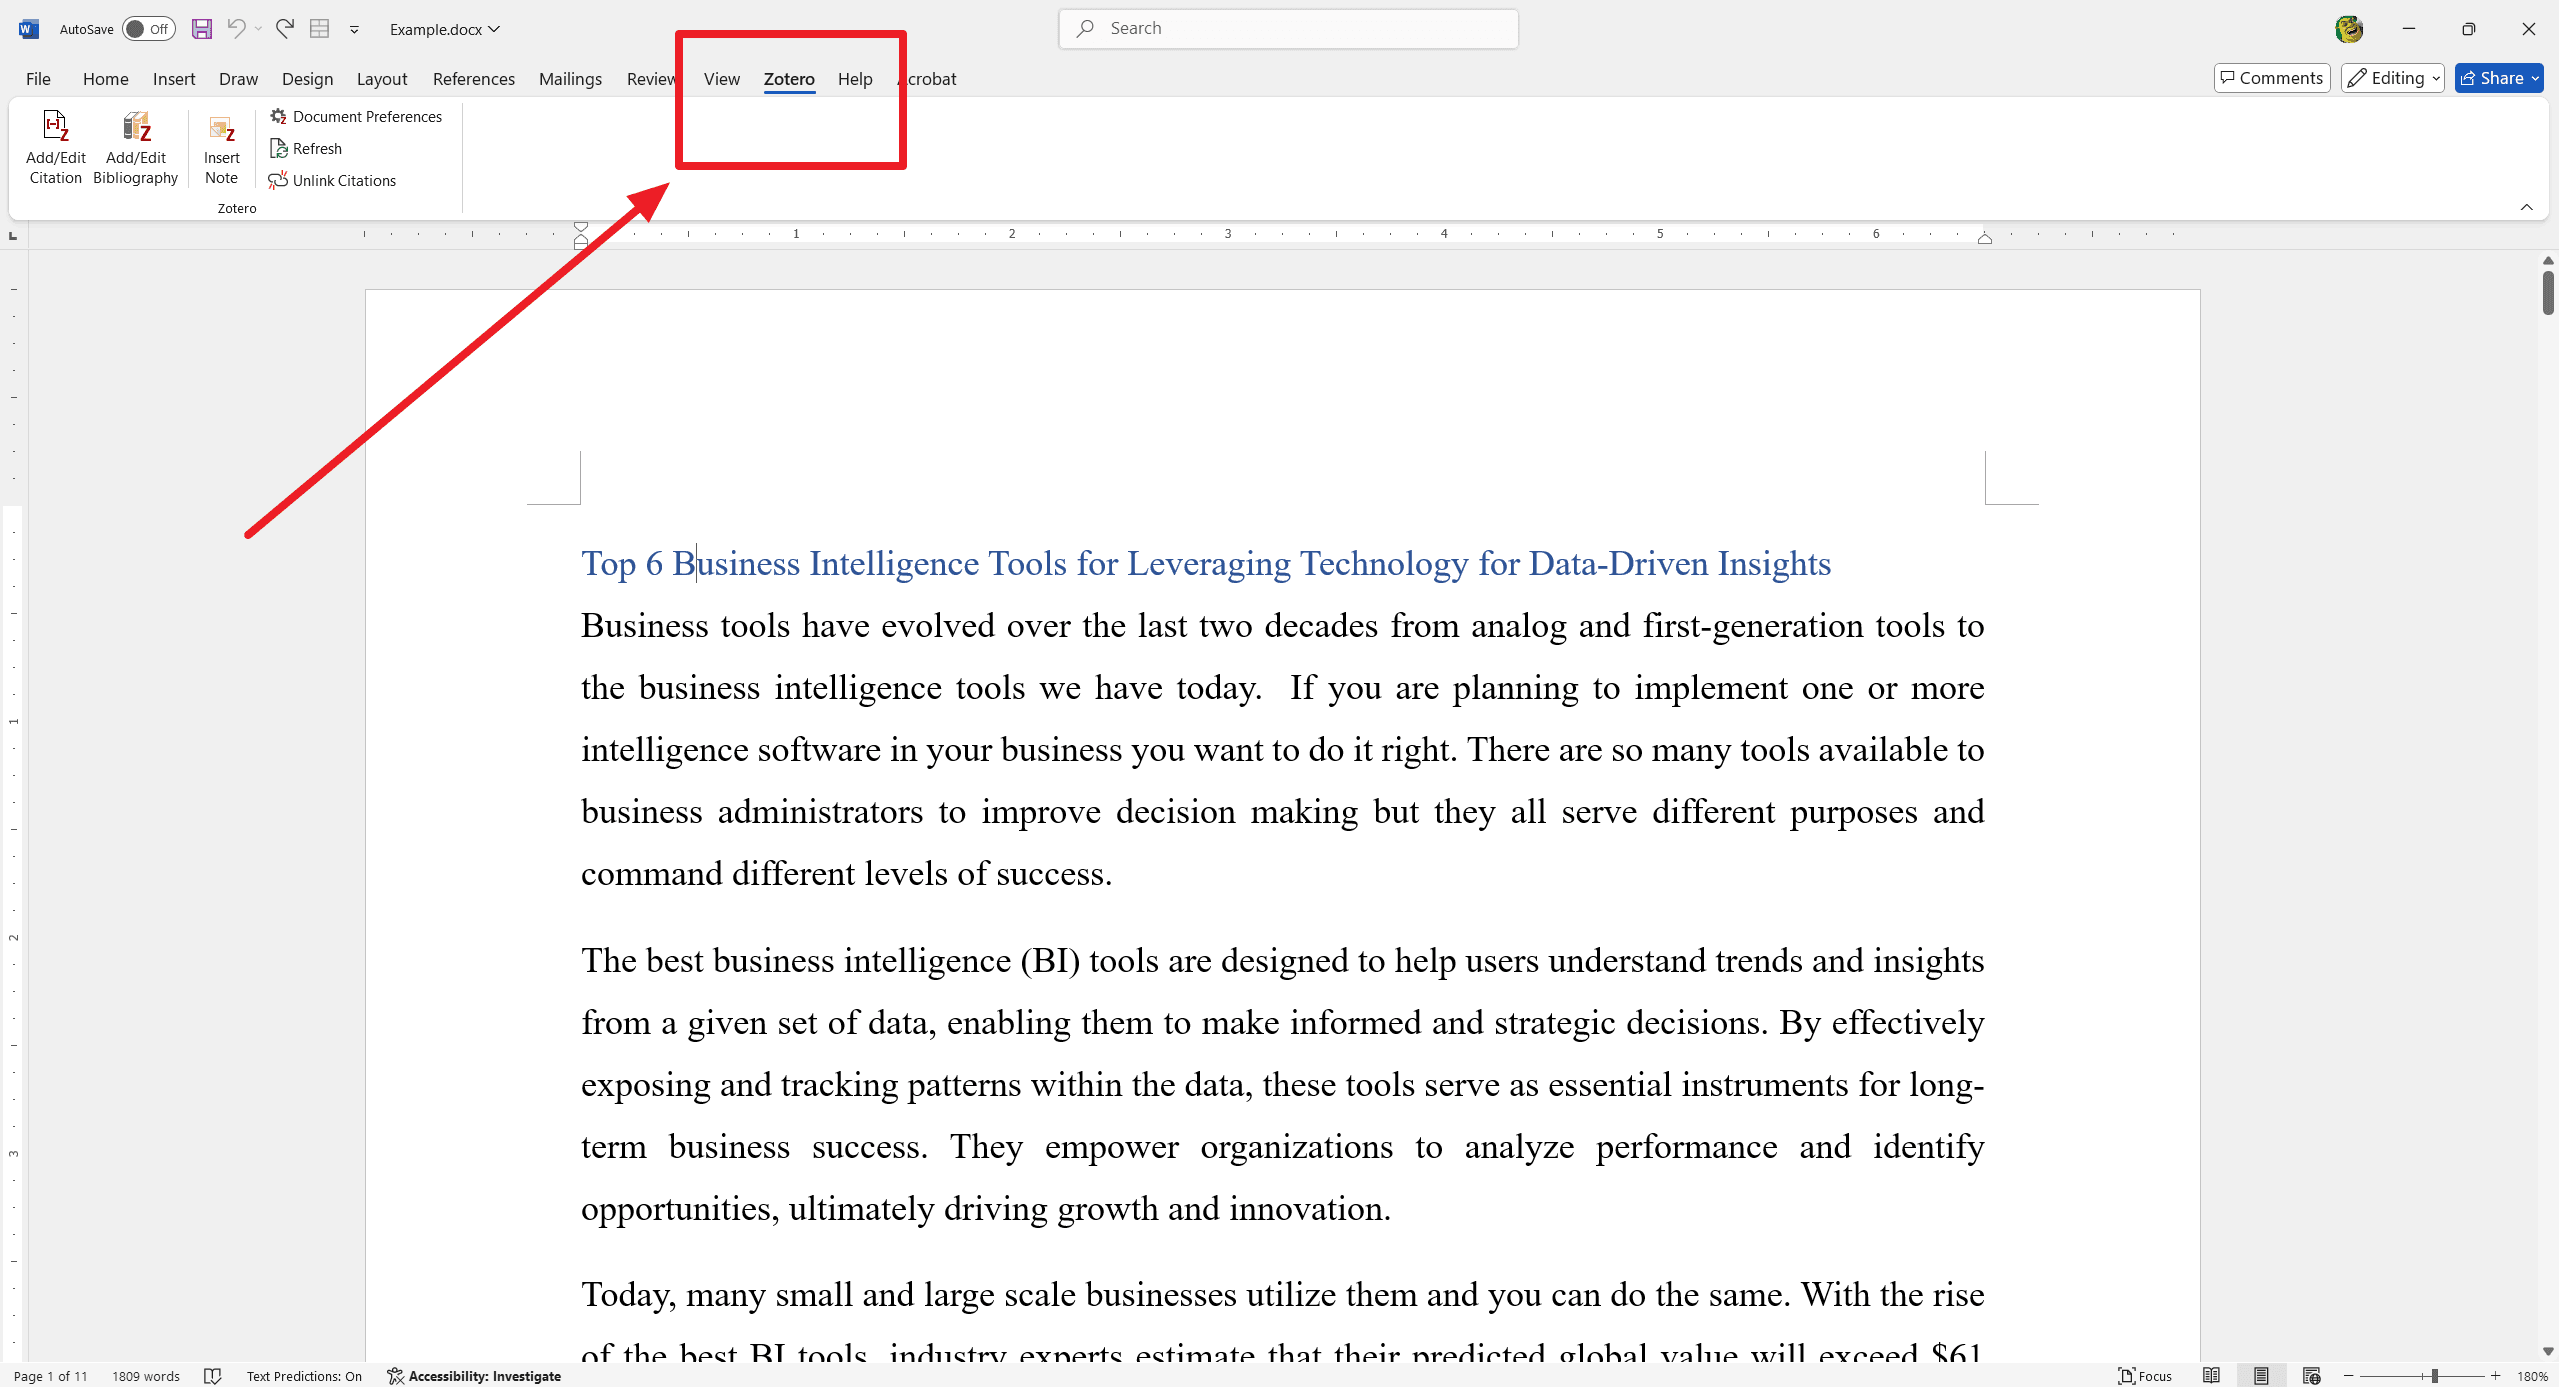
Download and install the Zotero plugin for Microsoft Word from the Zotero website. Open Word and ensure the Zotero plugin is enabled. You should see a Zotero tab on the ribbon. Basically speaking, as soon as you download the Zotero, Zotero plugin might automatically appear on the toolbox of Word.
Step 4: Insert Citations in Word
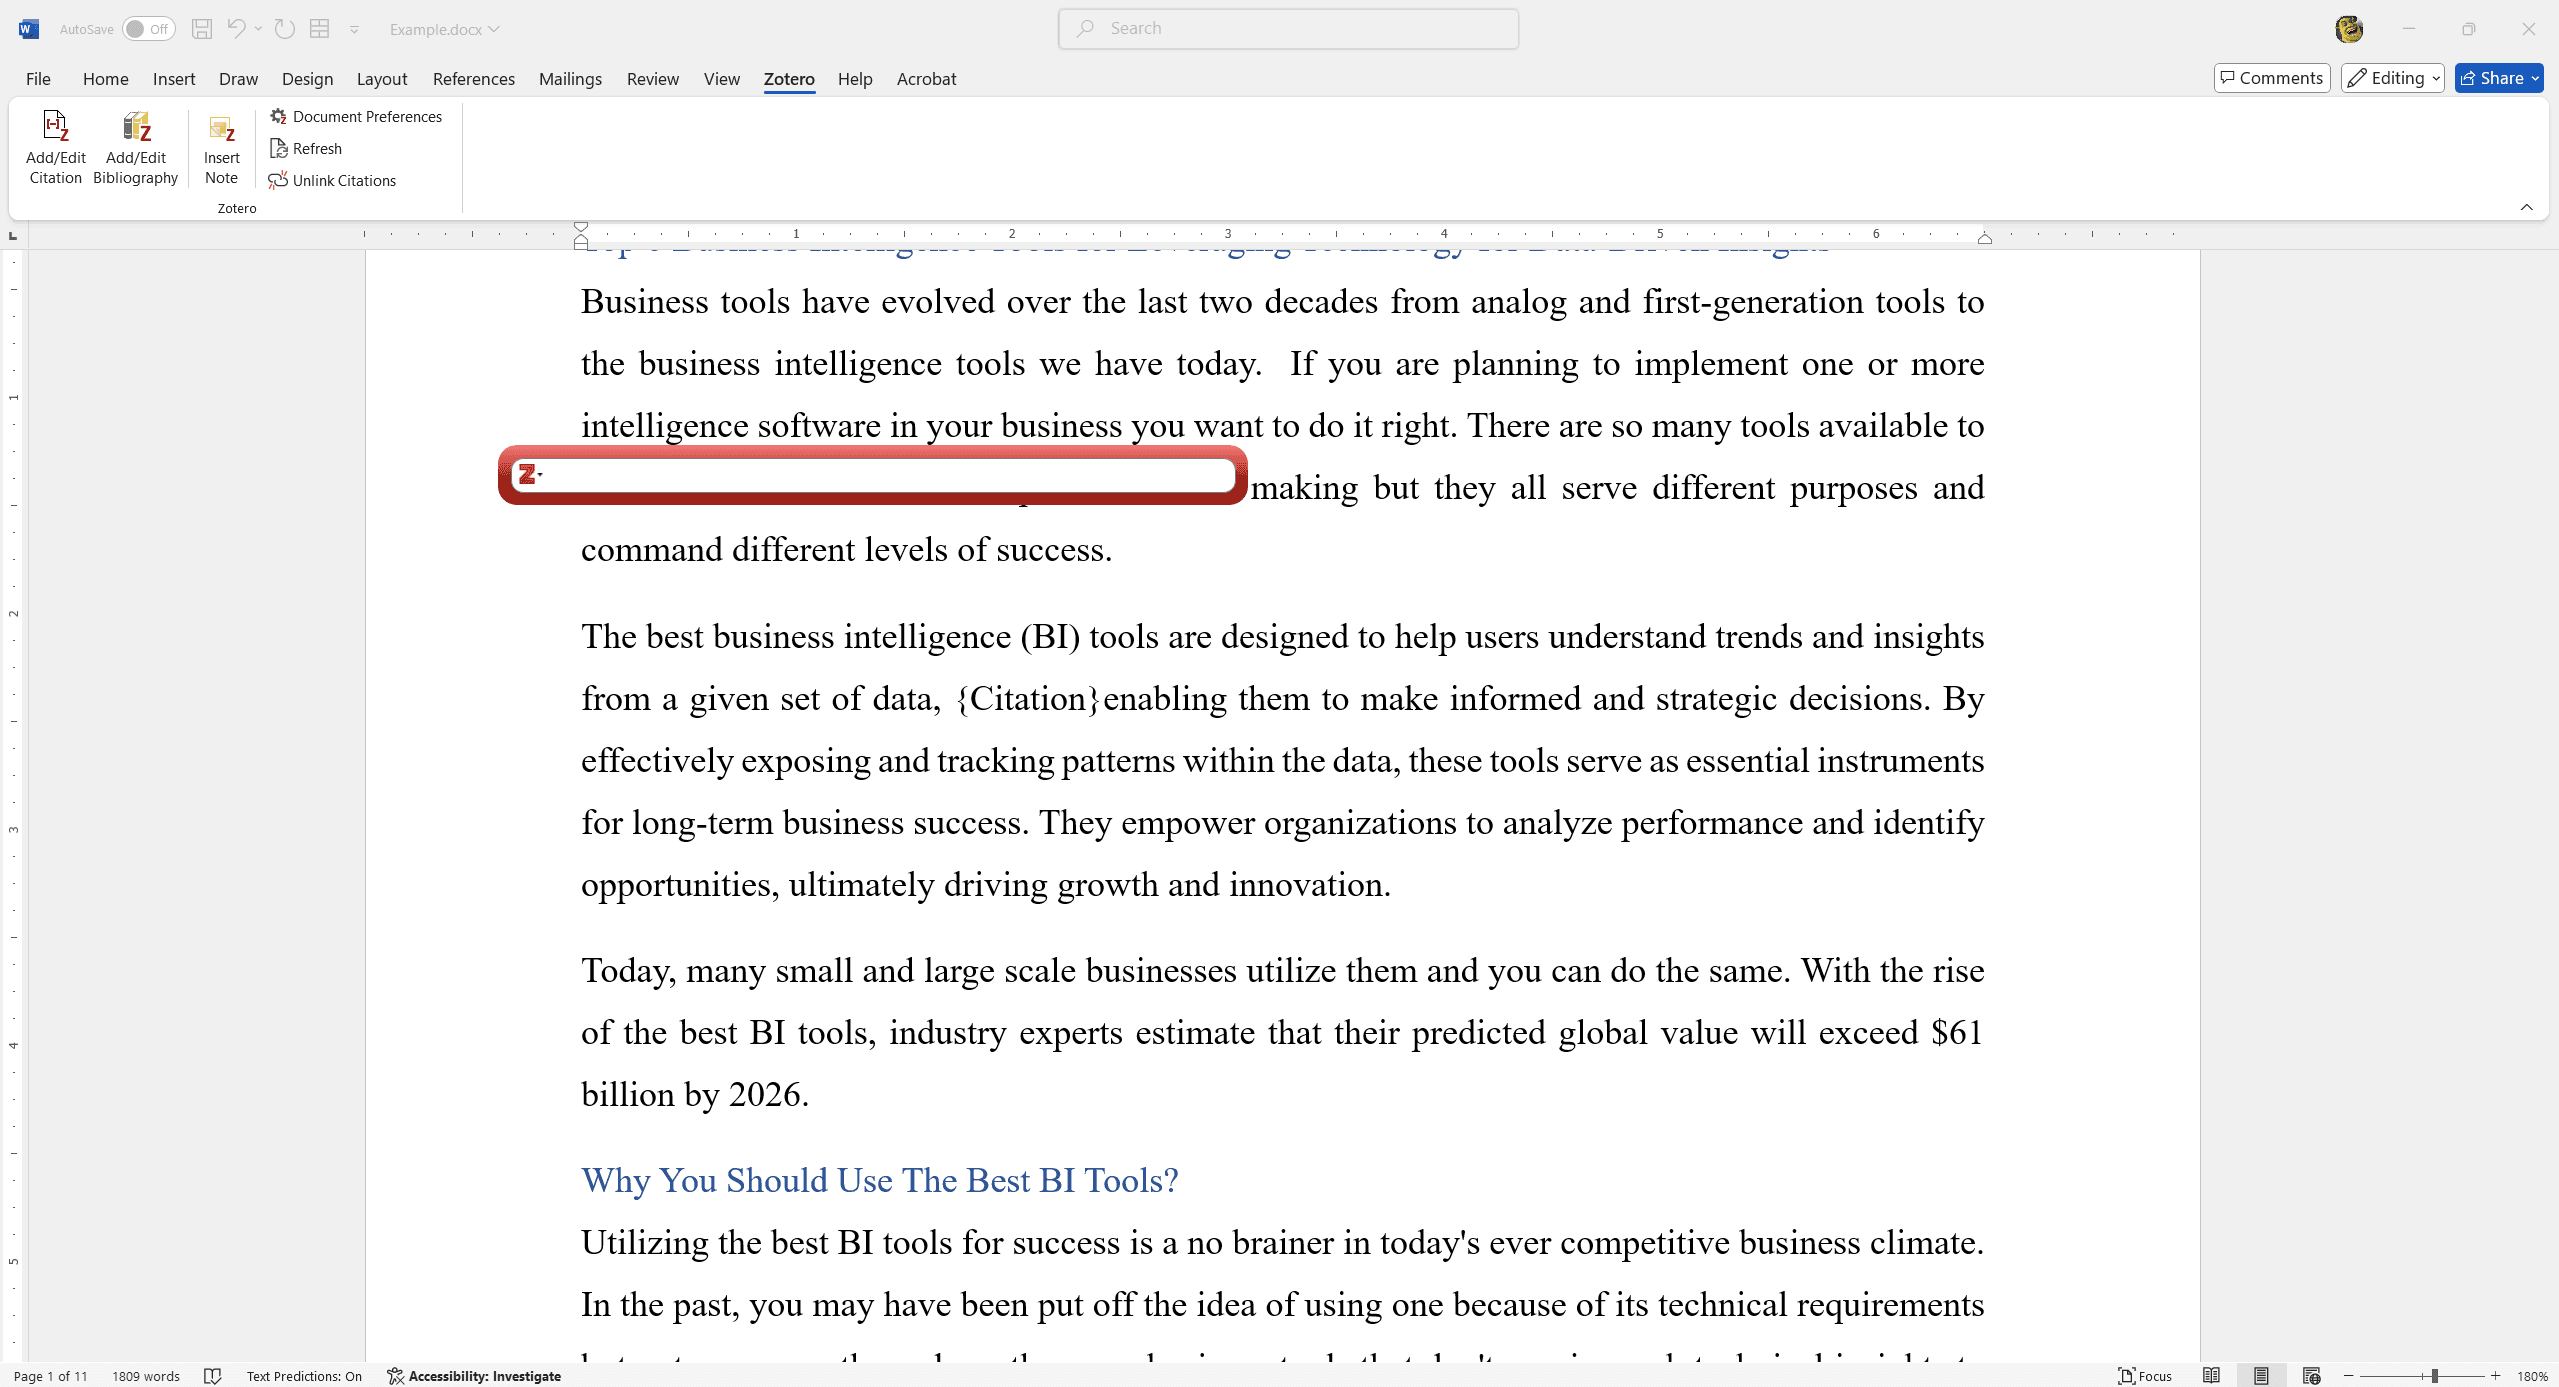
Insert Citation: Place your cursor where you want to insert the citation. Click on the Zotero tab in Word, then click "Add/Edit Citation." Then, you need to select document preferences. Choose the reference from your Zotero library.
Step 5: Generate the Bibliography
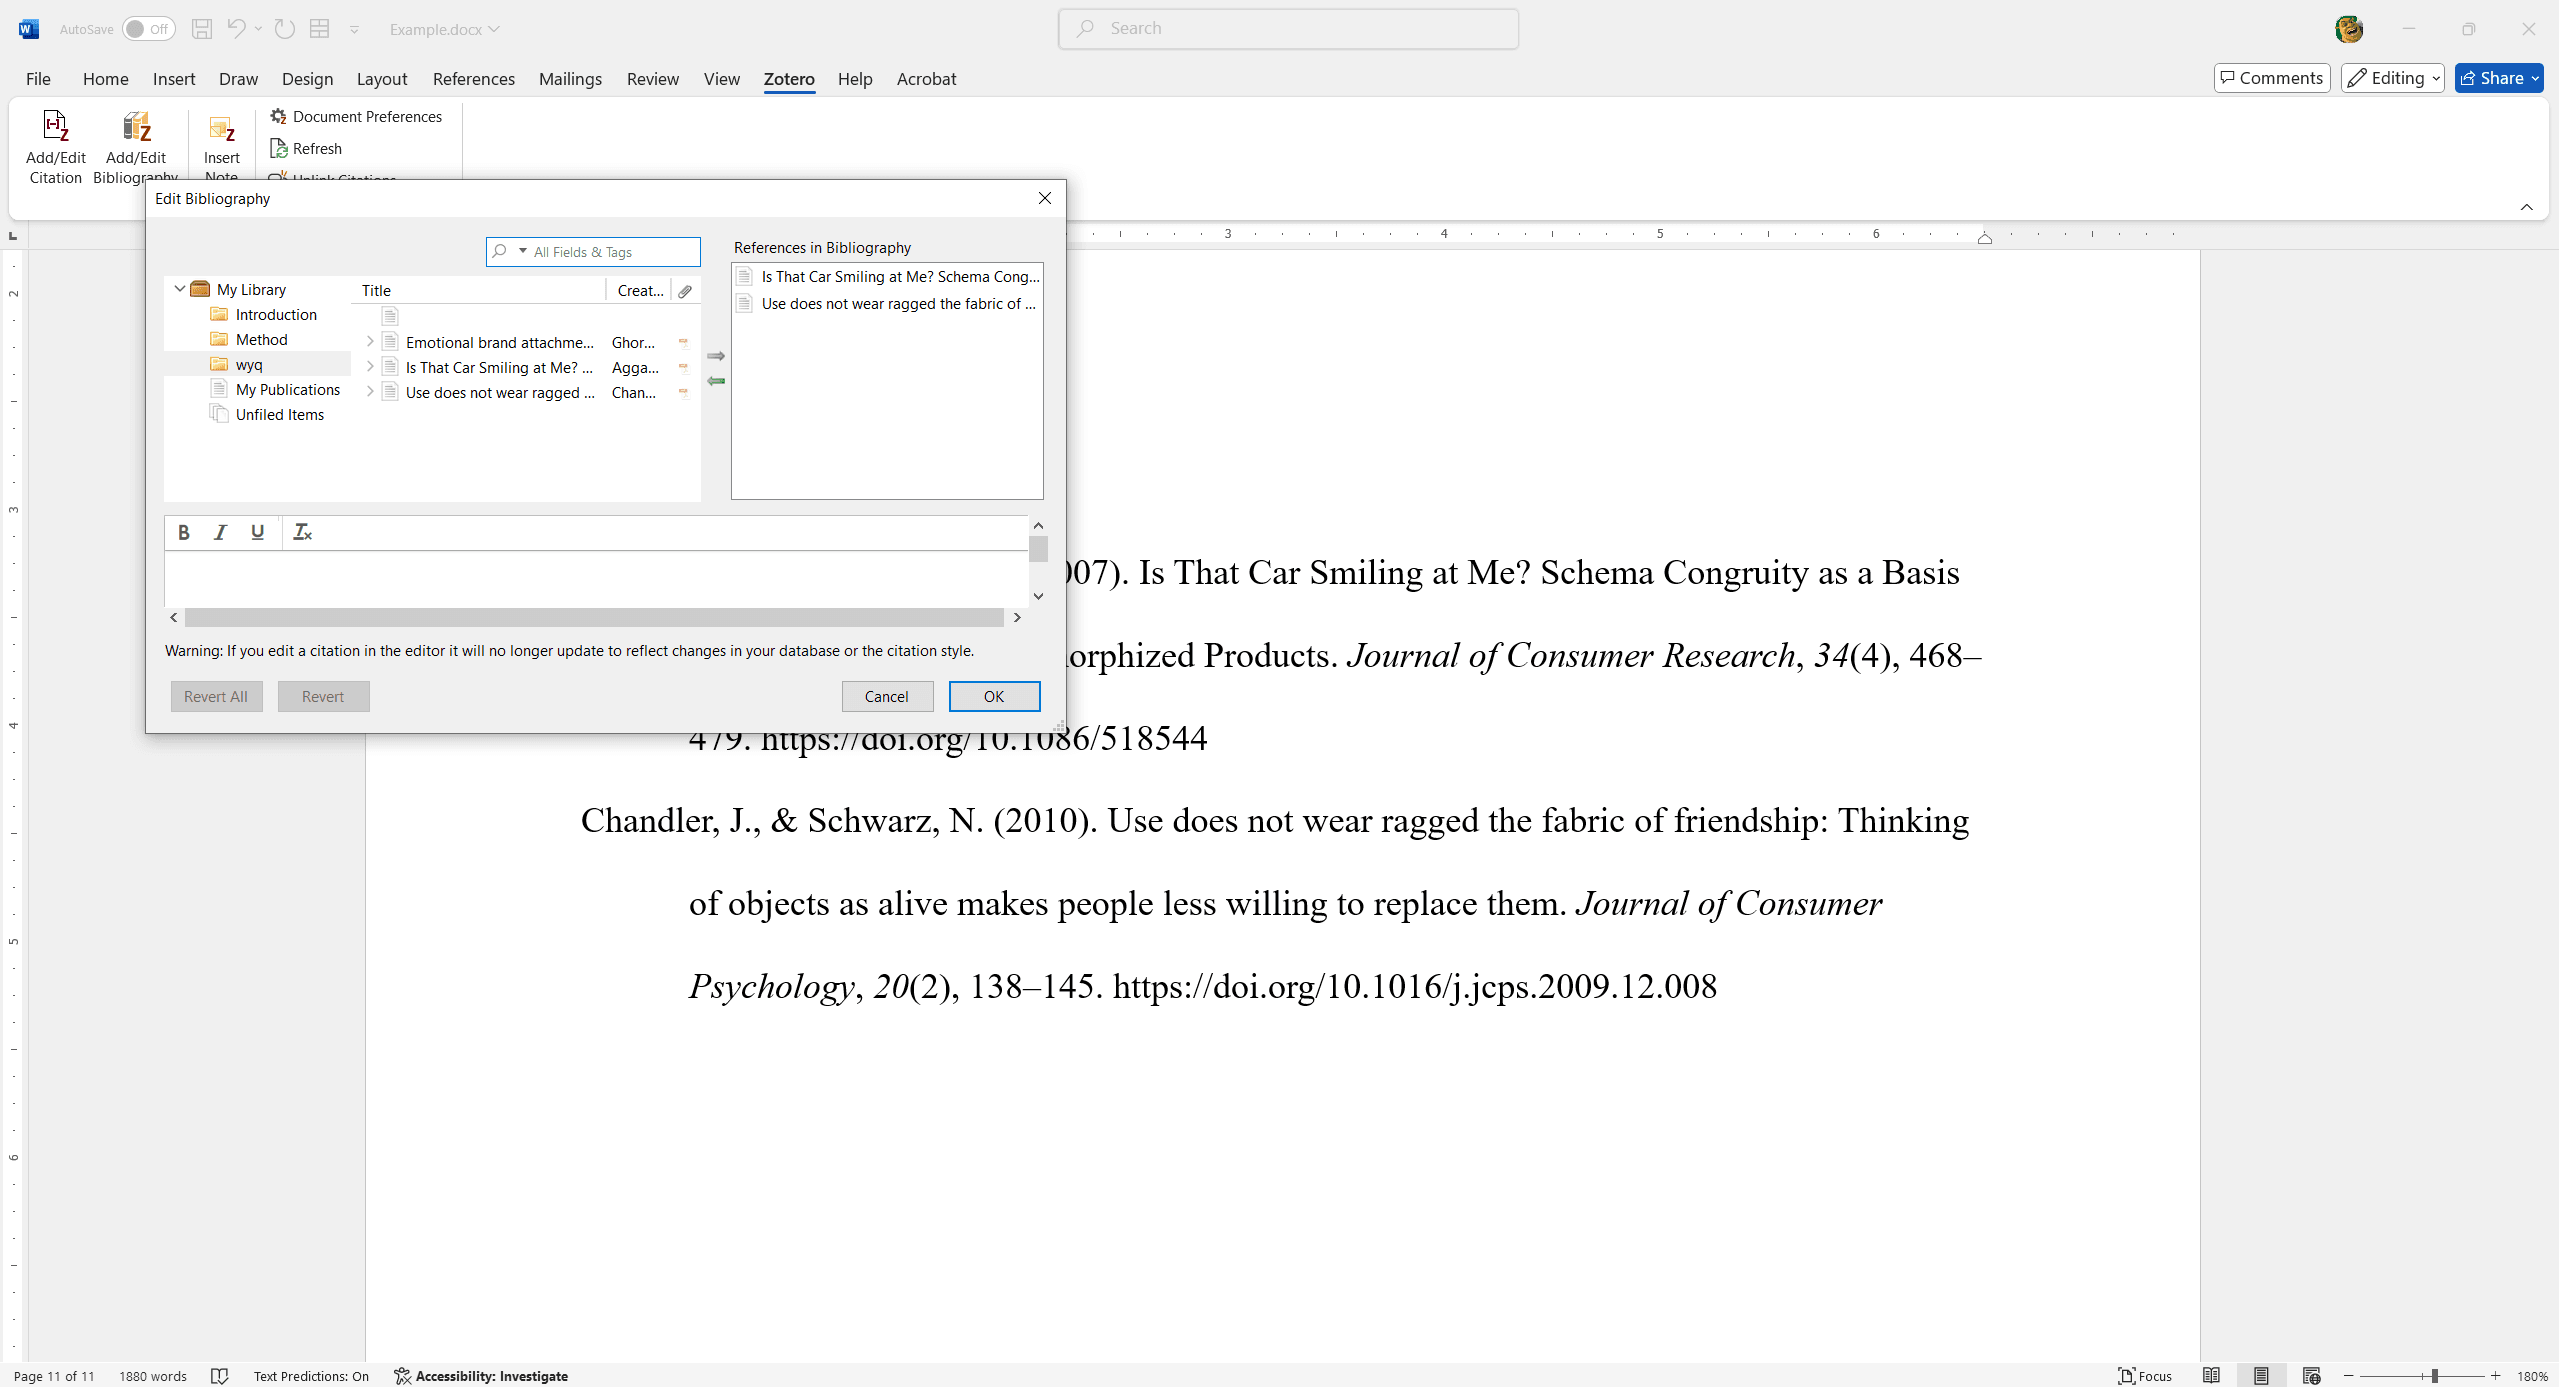
Insert Bibliography: Place your cursor where you want the bibliography to appear (usually at the end of the document)(Chandler & Schwarz, 2010). Click on the Zotero tab in Word, then click "Insert Bibliography." Ps. If you make changes to your references in Zotero, you can update the citations in your Word document by clicking "Refresh" in the Zotero tab. You can also change the citation style by clicking "Document Preferences" in the Zotero tab and selecting the desired style.
Additional Tips and Tricks
- Changing Citation Styles
- Tip: You can easily switch between different citation styles (e.g., APA, MLA, Chicago) by selecting the desired style from the References tab.
- Screenshot: Changing the citation style in Word
- Updating the Bibliography
- Tip: If you make changes to your citations, ensure you update the bibliography to reflect these changes. Simply click on the bibliography and select "Update Citations and Bibliography."
- Screenshot: Updating the bibliography to reflect changes
- Consistency in Formatting
- Tip: Maintain consistency in your citation and bibliography formatting by using Word's built-in tools or citation management software like EndNote.
- Screenshot: Ensuring consistent formatting in citations and bibliography
- Using Templates
- Tip: Utilize pre-made templates for academic papers or reports that already include properly formatted references and bibliographies.
- Screenshot: Accessing and using templates in Word
FAQs
Q: Why are my citations not appearing in the document?
A: Ensure that you have correctly inserted the citations using the References tab. If you're using a citation management tool like EndNote, make sure it is properly integrated with Word. Additionally, check if the citation style is correctly selected.
Q: The formatting of my citations is incorrect. How can I fix this?
A: Verify that you have selected the correct citation style (e.g., APA, MLA, Chicago) in the References tab. If you're using a manual method, double-check the formatting guidelines for the chosen style.
Q: My bibliography is not updating automatically. What should I do?
A: Make sure that your bibliography is linked to the citations in your document. If you're using the References tab, click on the bibliography and select "Update Citations and Bibliography" from the context menu.
Q: How can I change the citation style after I've already inserted citations?
A: You can change the citation style by going to the References tab, selecting the desired style from the "Style" dropdown menu, and then clicking “Update Citations and Bibliography.”
Conclusion
In this tutorial, we've explored three effective methods to add references in Microsoft Word: using the References tab, manually adding references, and utilizing citation management software like EndNote. Each method offers a practical approach, allowing you to choose the one that best fits your needs.
By following the step-by-step instructions and utilizing the clear visual aids provided, you should now be able to confidently add and manage references in your documents. Whether you're writing an academic paper, a report, or any other type of document, mastering the art of adding references can significantly enhance the credibility and professionalism of your work.


