Knowing how to create a dropdown list in Excel is good for streamlining data entry and ensuring uniformity. Dropdown lists allow users to select from predefined options and reduce manual input booboos. However, they are instrumental in scenarios where data validation is crucial. For example:
- Entering standardized categories
- Selecting project statuses
- Choosing product codes
You can maintain uniformity in your data sets by implementing dropdown lists. It simplifies complex spreadsheets and enhances productivity. We will guide you through creating a dropdown list in Excel in the following steps. Now time to make your data management tasks simpler.
Steps on How to Create a Dropdown List in Excel Sheet
1. Prepare Your List: Enter your dropdown options in a single column (e.g., A1:A3).
2. Select the Dropdown Cell: Click the cell where you want the dropdown to appear.
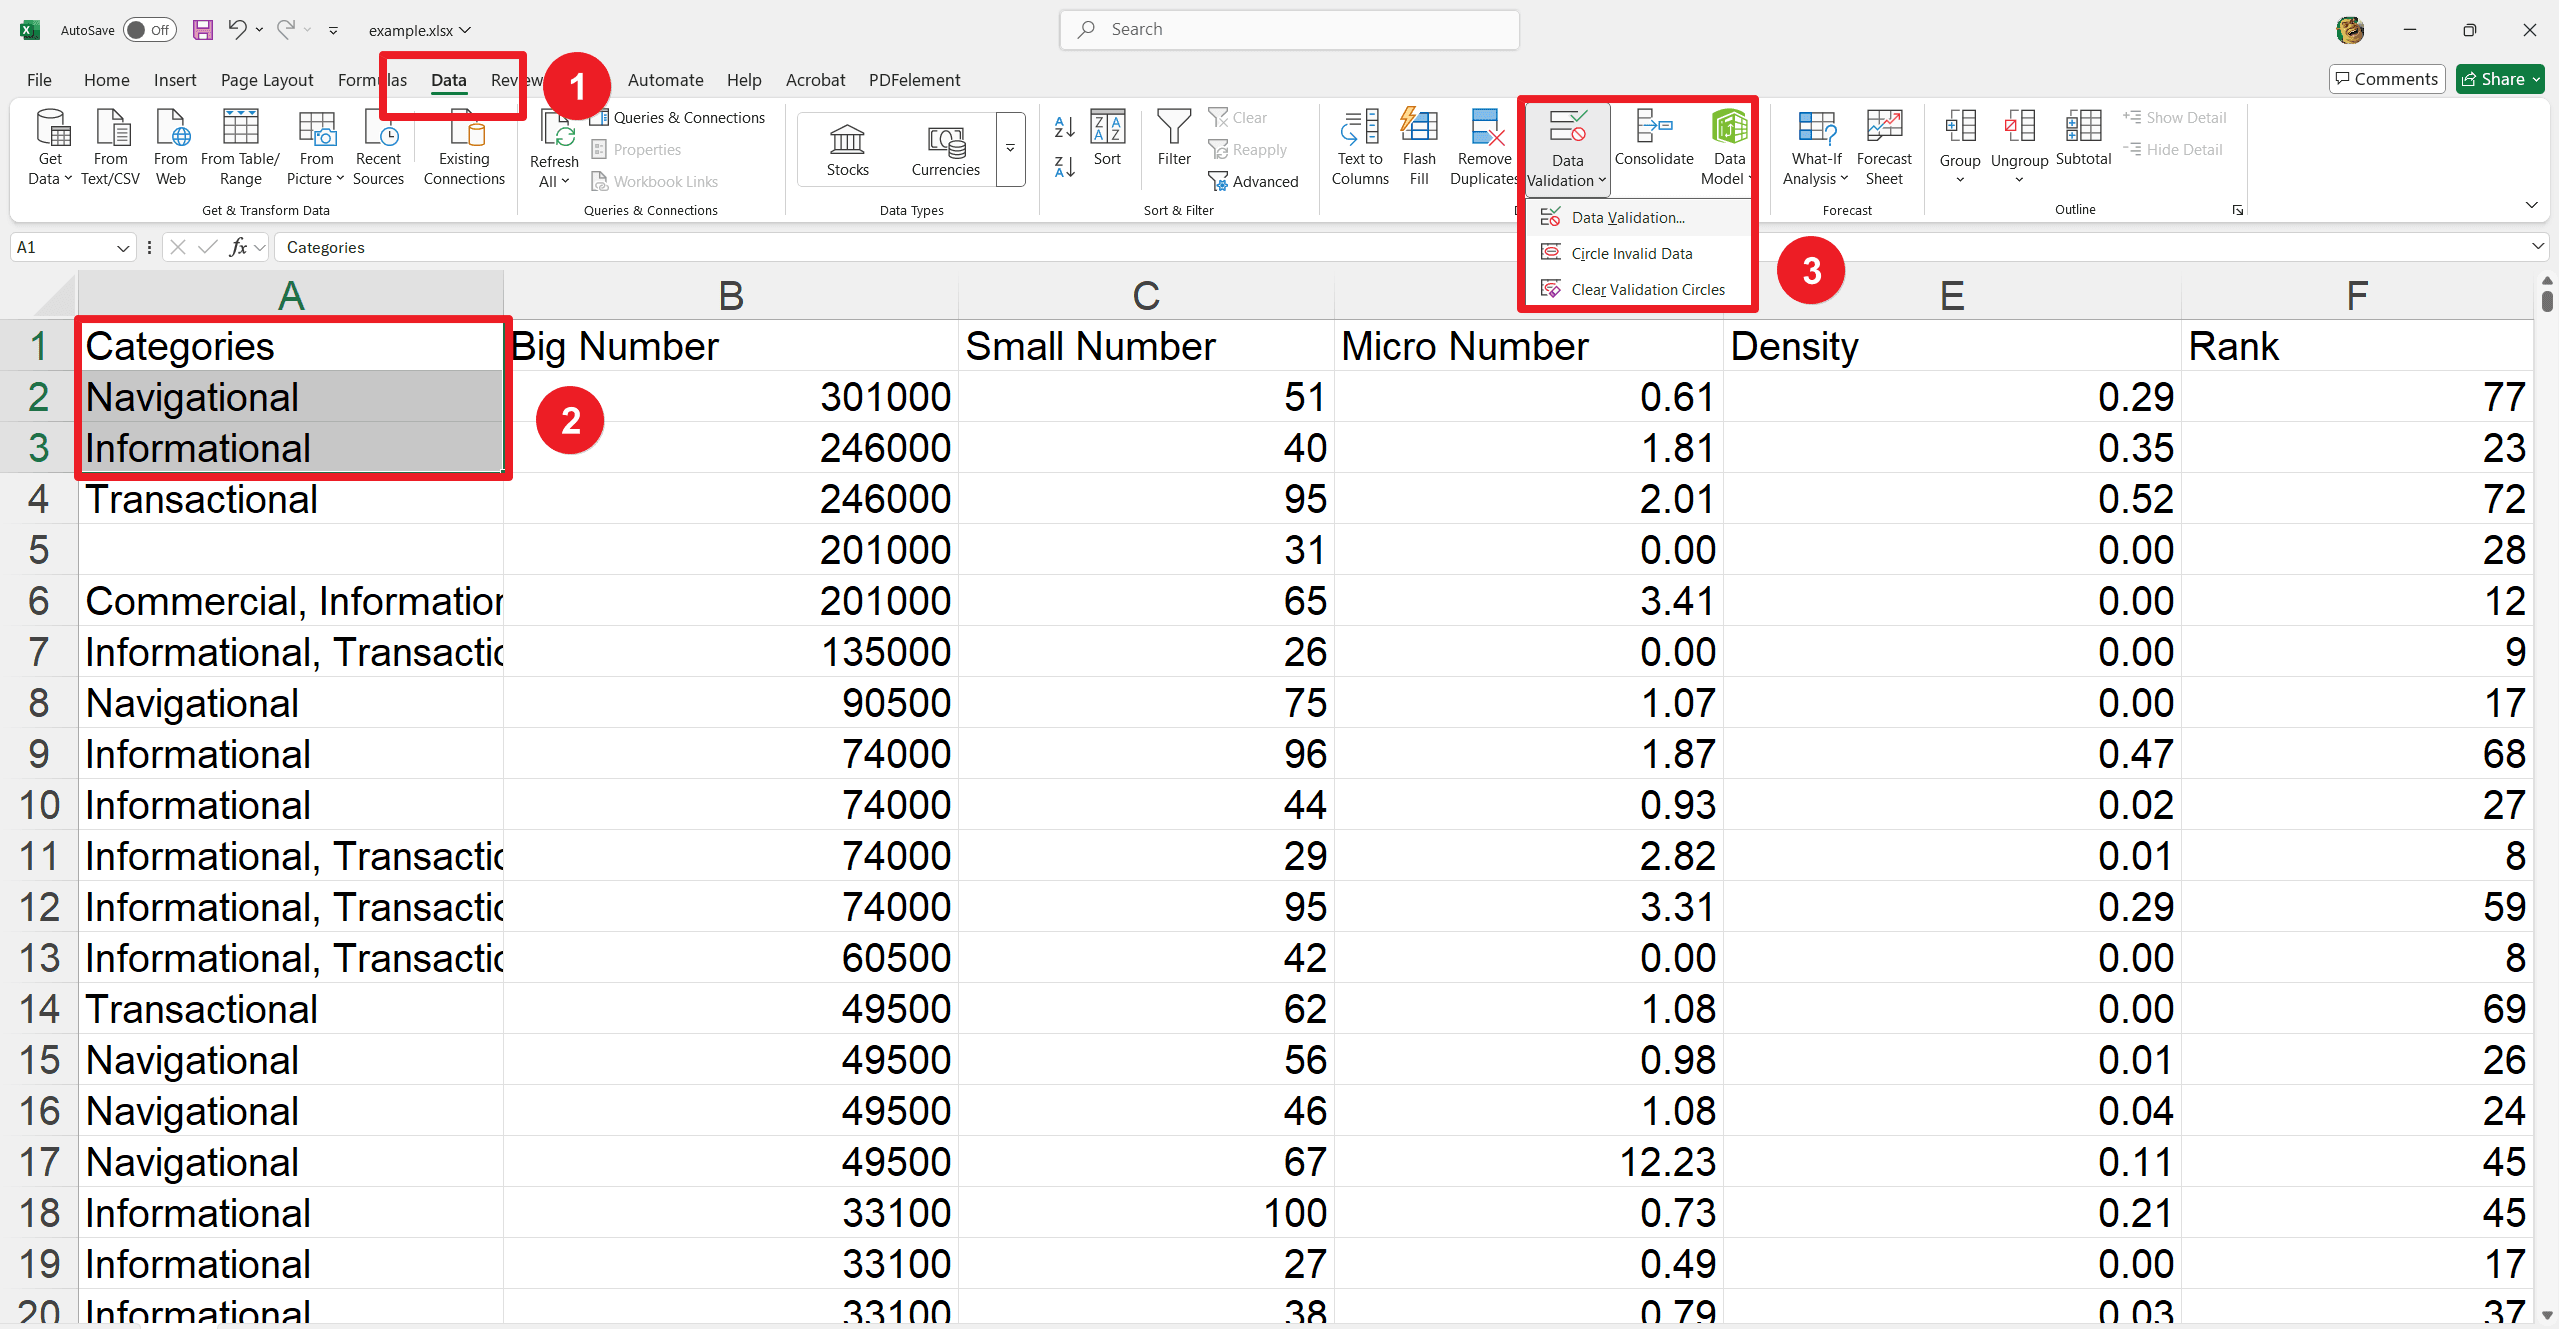
3. Open Data Validation: Go to the "Data" tab, and click “Data Validation.” In the "Settings" tab, choose "List" from the "Allow" dropdown.
4. Set the Source: Click in the "Source" box. Either select the range of your list (e.g., A1:A3) or type the values separated by commas (e.g., New York, Boston, Los Angeles). Thereafter, click the small icon to the right of the source box to minimize the window if needed.
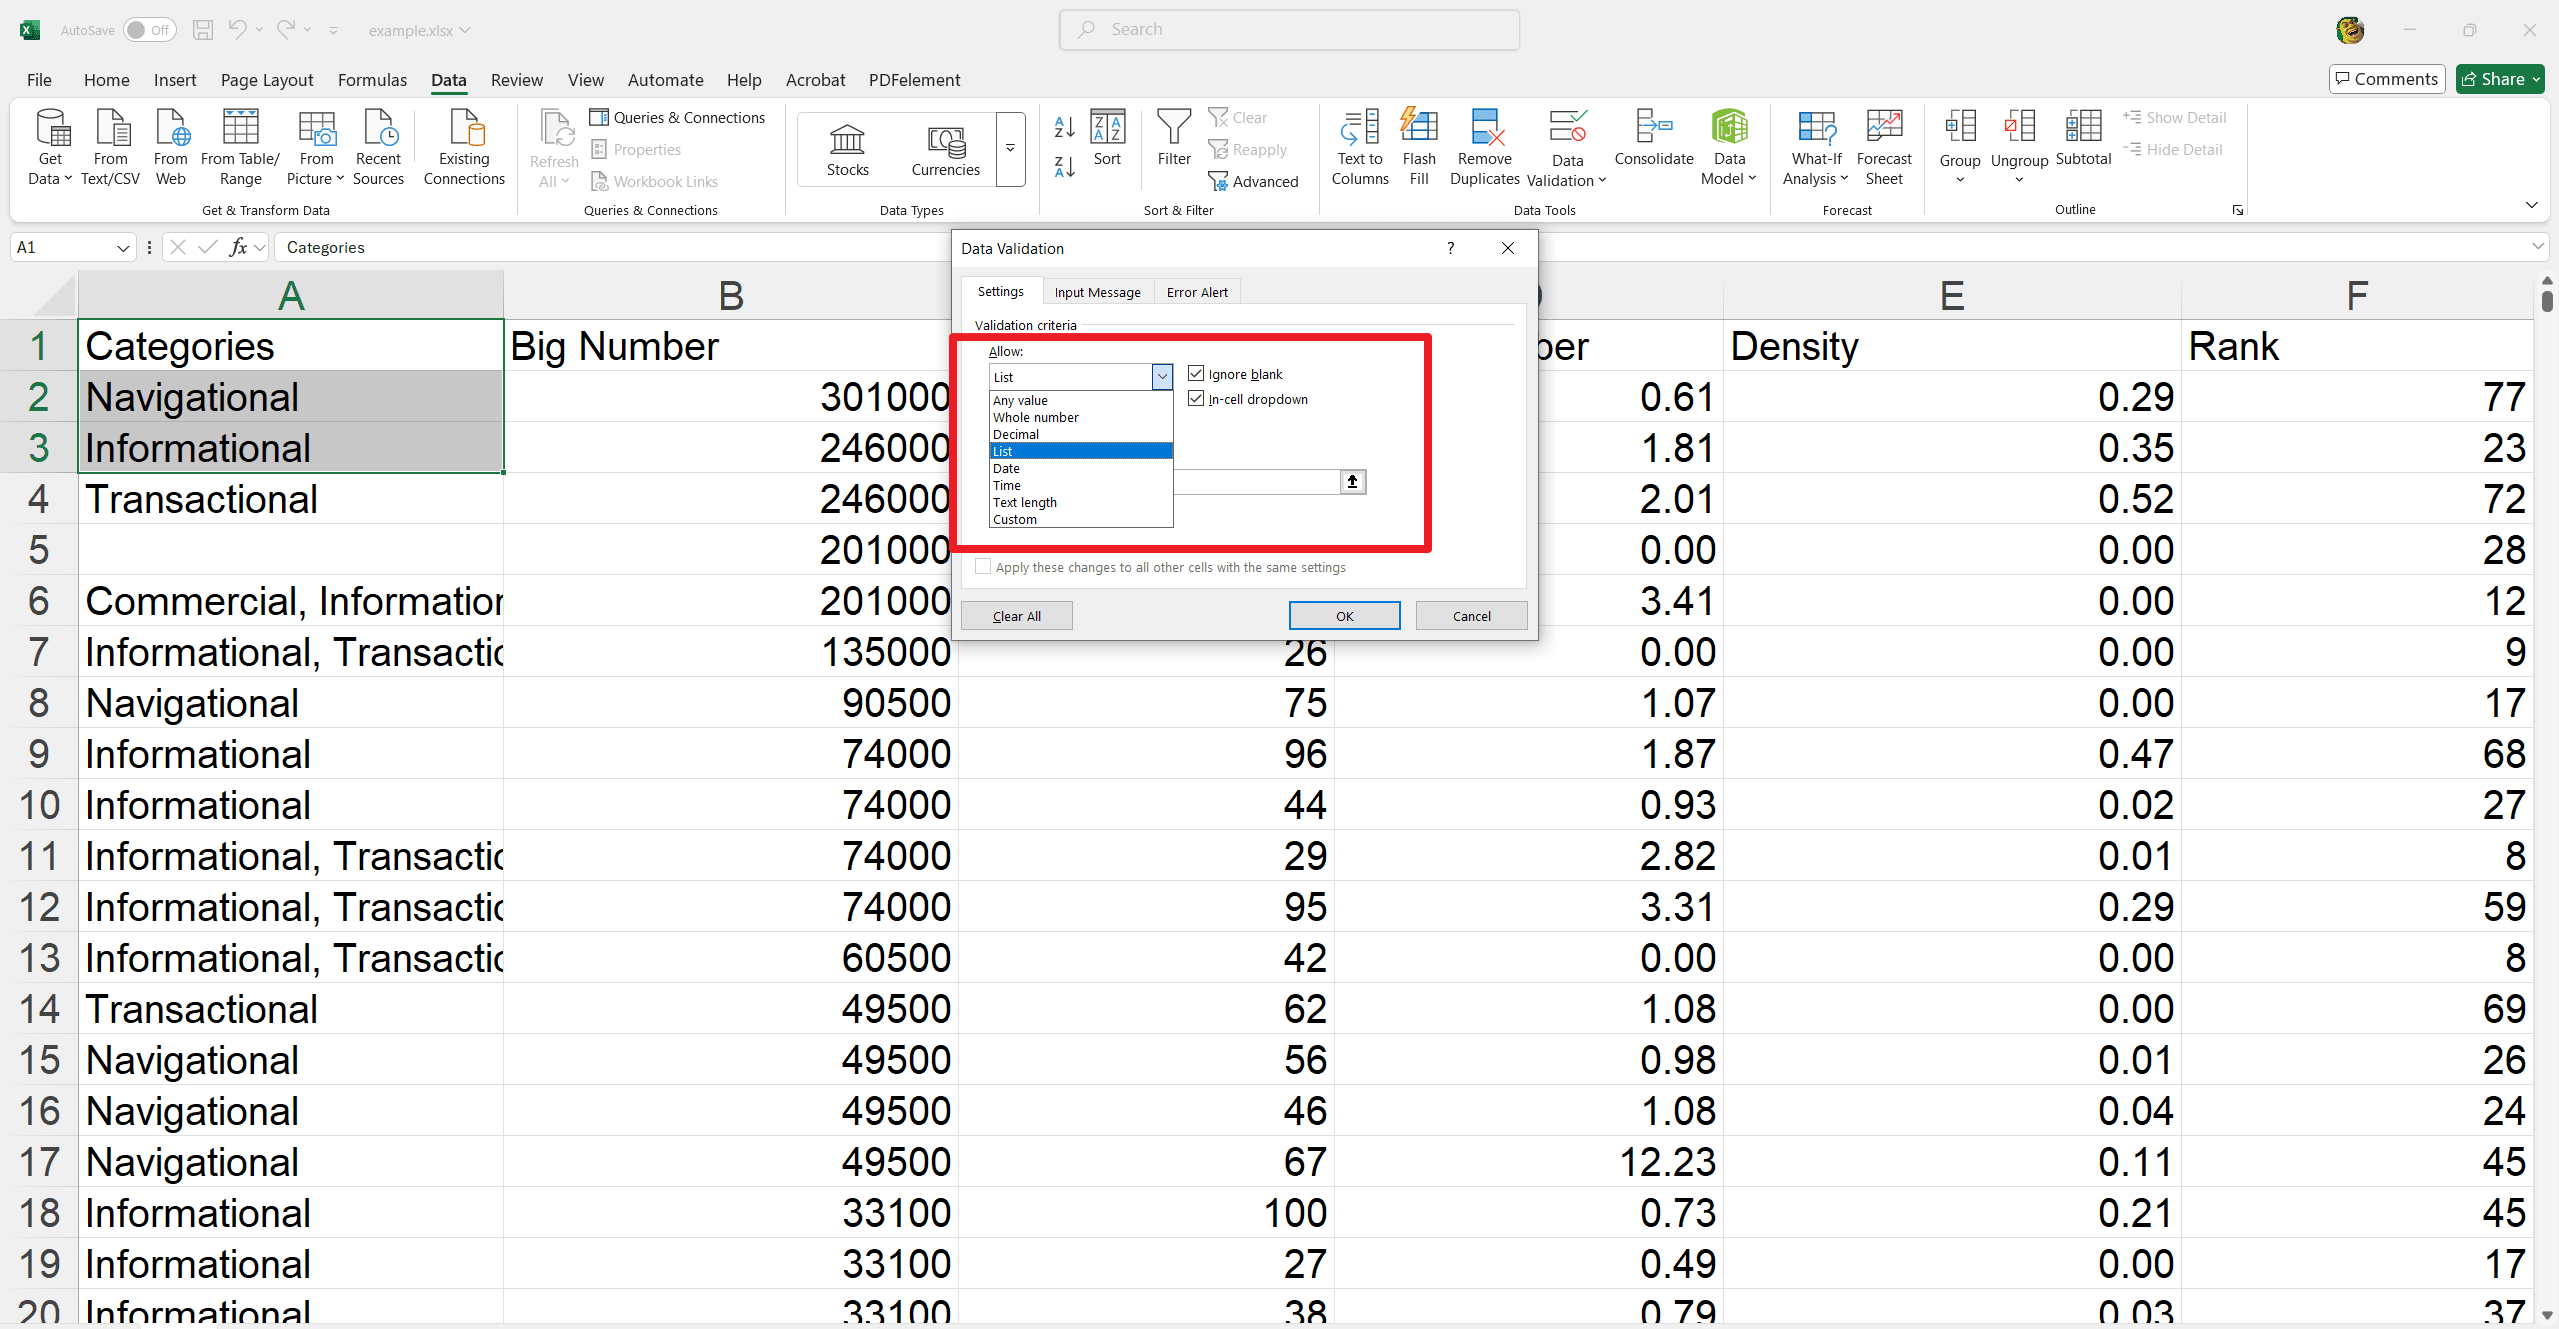
5. Adjust Settings (Optional): Ensure "In-cell dropdown" is checked. Check "Ignore blank" if you want to allow empty selections.
6. Finish: Click "OK."
Adding Advanced List Properties
Input Message
To add an input message for additional guidance when users select the cell:
- In the Data Validation dialogue box, navigate to the Input Message tab.
- Check the box labeled Show input message when the cell is selected.
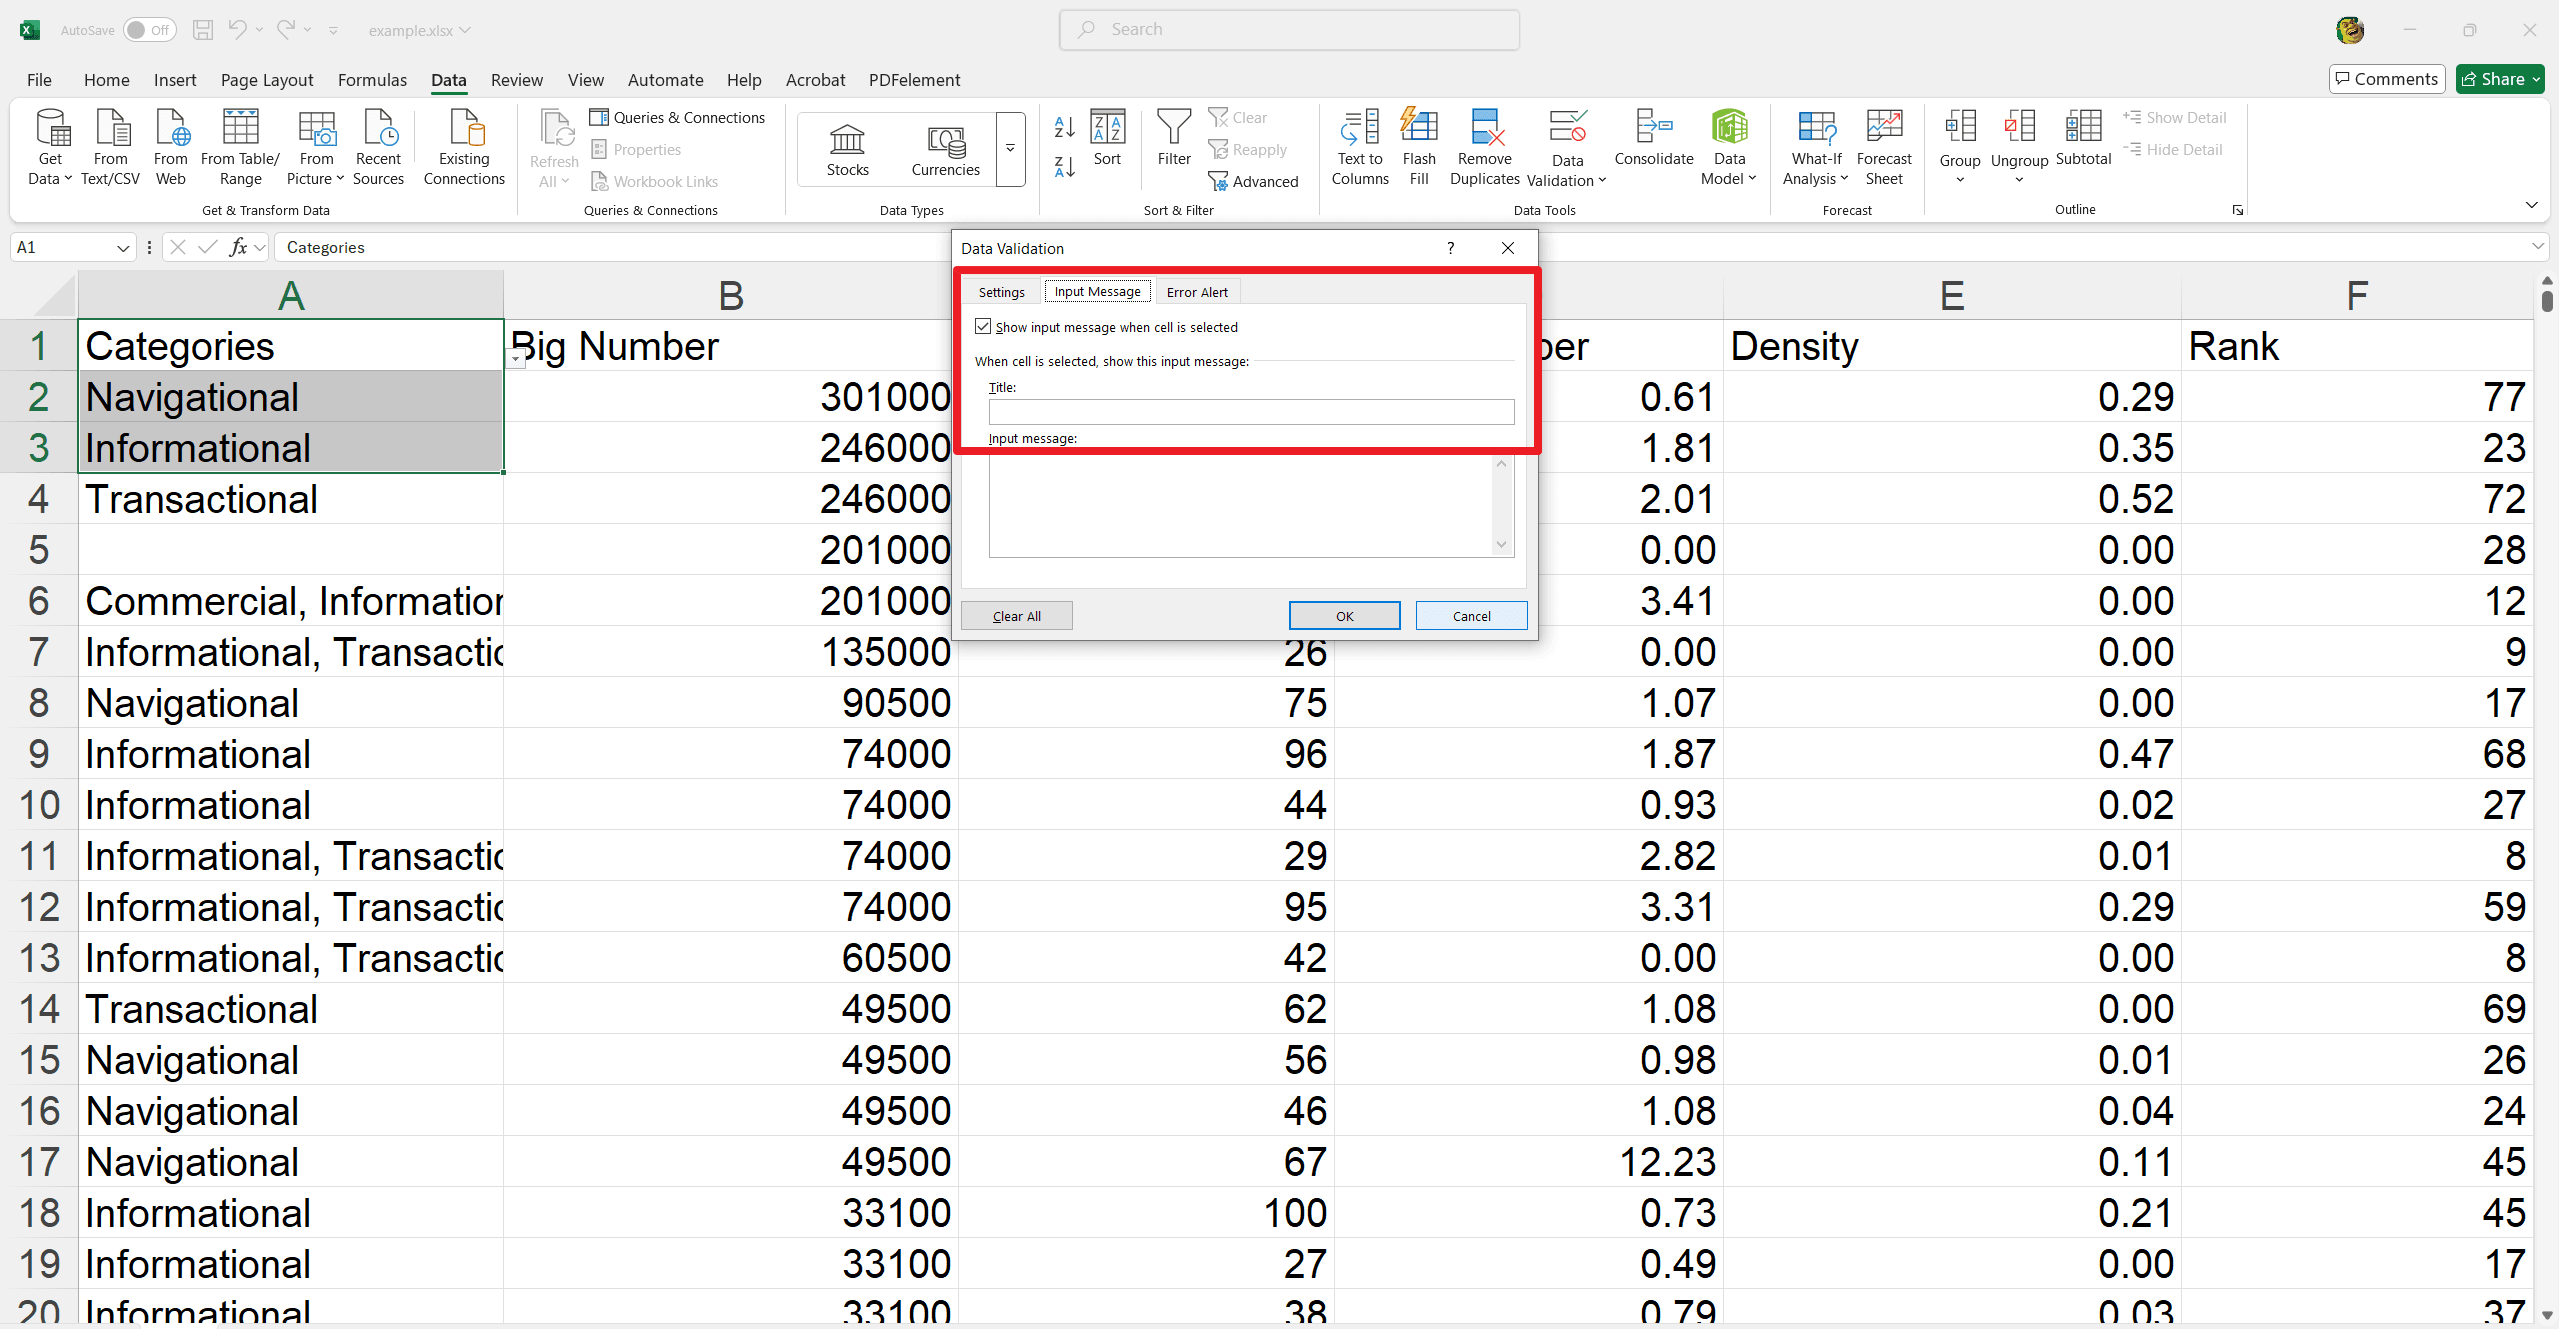
Now, write a custom title and input message:
- Enter a Title to indicate the purpose of the cell, such as “Select Item.”
- In the Input Message box, provide guidance, for example, "Please choose an item from the dropdown list."
This feature provides users with helpful instructions, improving data entry accuracy.
Adding Error Alerts
To ensure only valid data is entered, you can add error alerts:
- Go to the Error Alert tab in the Data Validation dialogue box.
- Check the box labeled Show error alert after invalid data is entered.
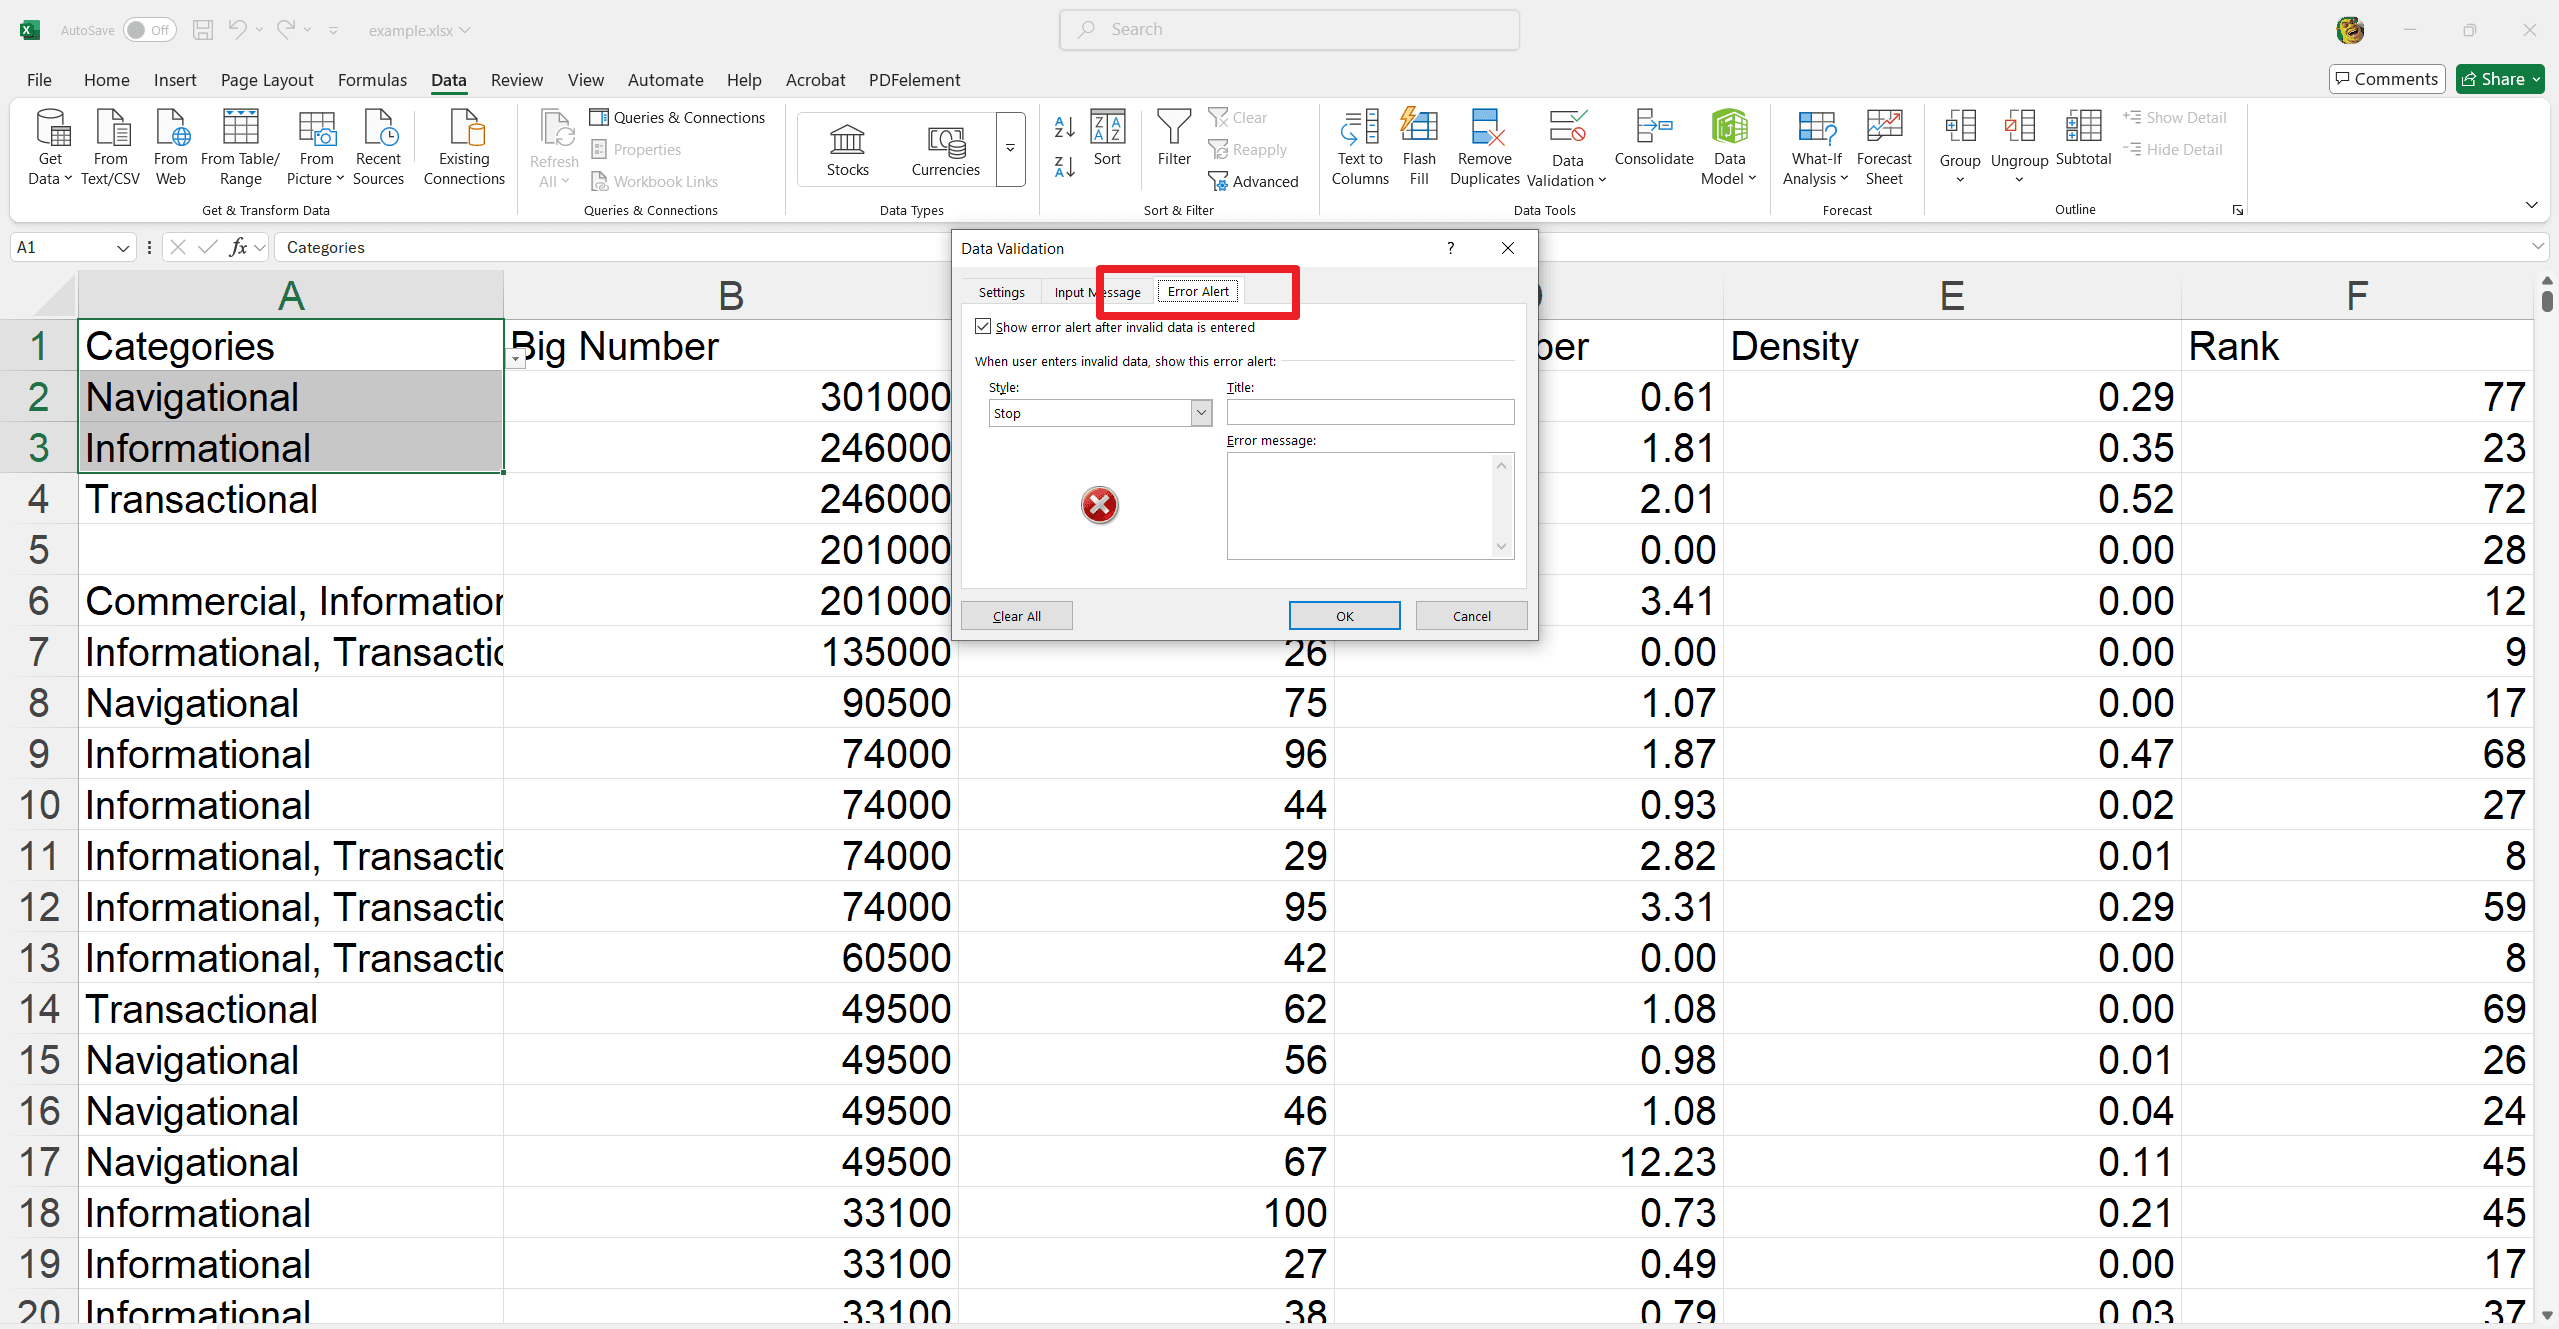
Error Icons and Implications
- Stop: Prevents invalid data entry altogether. Use this for stringent data rules.
- Warning: Displays a warning but allows invalid entries if the user proceeds.
- Information: Informs the user of invalid entry but accepts the data.
Customizing Error Messages
Enter a custom Title and Error Message:
- Title: Briefly describe the error, e.g., “Invalid Entry.”
- Error Message: Provide details, e.g., "Please select an option from the dropdown list."
It helps guide users in entering correct data and maintaining data integrity.
Convert Your Excel Sheets to PDF Using PDF Agile
PDF Agile is a powerful tool that seamlessly converts your Excel sheets into PDF format. Below are the steps and key features that make PDF Agile invaluable for editing spreadsheets:
Key Features of PDF Agile
- Easy Conversion: It quickly converts Excel files to PDF with just a few clicks and preserves your data in a universally accessible format.
- Batch Conversion: It saves time by converting multiple Excel sheets to PDF in one go rather than one at a time. Yet enhancing productivity.
- Editing PDFs: You can adjust the converted PDF files. It offers text editing, image modifications, and annotation features to refine your documents.
- Merging Documents: You can combine multiple PDF files into a single document. It is useful if you need to compile various reports into one cohesive document.
- File Compression: It reduces your PDFs size without compromising on quality. Yet, makes them easier to share and store!
- Security Features: It protects your PDFs with passwords and encryption. Now your sensitive data remains protected.
- OCR Technology: You can use Optical Character Recognition or OCR to convert scanned documents and images into PDFs that are editable and searchable. Manage and manipulate your data easily.
Follow these Steps to Convert Excel Sheets to PDF
1. Open PDF Agile: Launch the PDF Agile application on your device.
2. Convert Excel File: Click the Convert button.
A new pop-up window appears for conversion.
Click on Add File to upload Excel sheet
3. Configure Settings: Now adjust the conversion settings as needed for your specific needs.
4. Start Conversion: Click the Convert button to transform your Excel sheet into a PDF file.
PDF Agile can efficiently manage and share your Excel data in a comprehensive PDF format. It leverages its powerful features to ensure your documents meet your requirements.
For Further Reading
To safeguard the integrity of your Excel data when using dropdown lists:
- Place source tables on separate sheets
- Hide or group the columns
- Protect the cells containing source data
These steps ensure accurate data entry while maintaining the list's security. Exploring PDF Agile further can enhance your Excel data management. Easily convert sheets to PDF, leverage batch conversion, and enjoy robust editing features. With PDF Agile's validation capabilities, you can maintain data integrity and streamline document handling, making it a valuable tool for any Excel user.
For more Excel tips and PDF Agile tutorials, visit PDF Agile's blog's Excel Tips and How-To and Tips sections.


