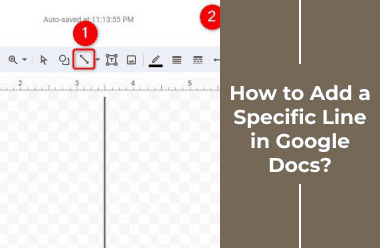
In Google Docs, lines play a crucial role in enhancing your document's visual structure and organization. They can be used to separate sections, highlight important information, or improve the aesthetic appeal of your text. You can insert two main types of lines into a Google Docs document: horizontal and vertical. Horizontal lines are great for dividing content into discrete sections, while vertical lines can help create columns or emphasize particular areas. This guide will show you how to line to a specific line in Google Docs, making your documents more organized and visually appealing.

Adding a Horizontal Line in Google Docs
Method 1: Using the Menu Bar Option
Using the menu bar option to add a horizontal line in Google Docs is a straightforward process:
1. Open the specific document.
2. Place the text cursor where you need the line.
3. Navigate through Insert -> Horizontal Line.
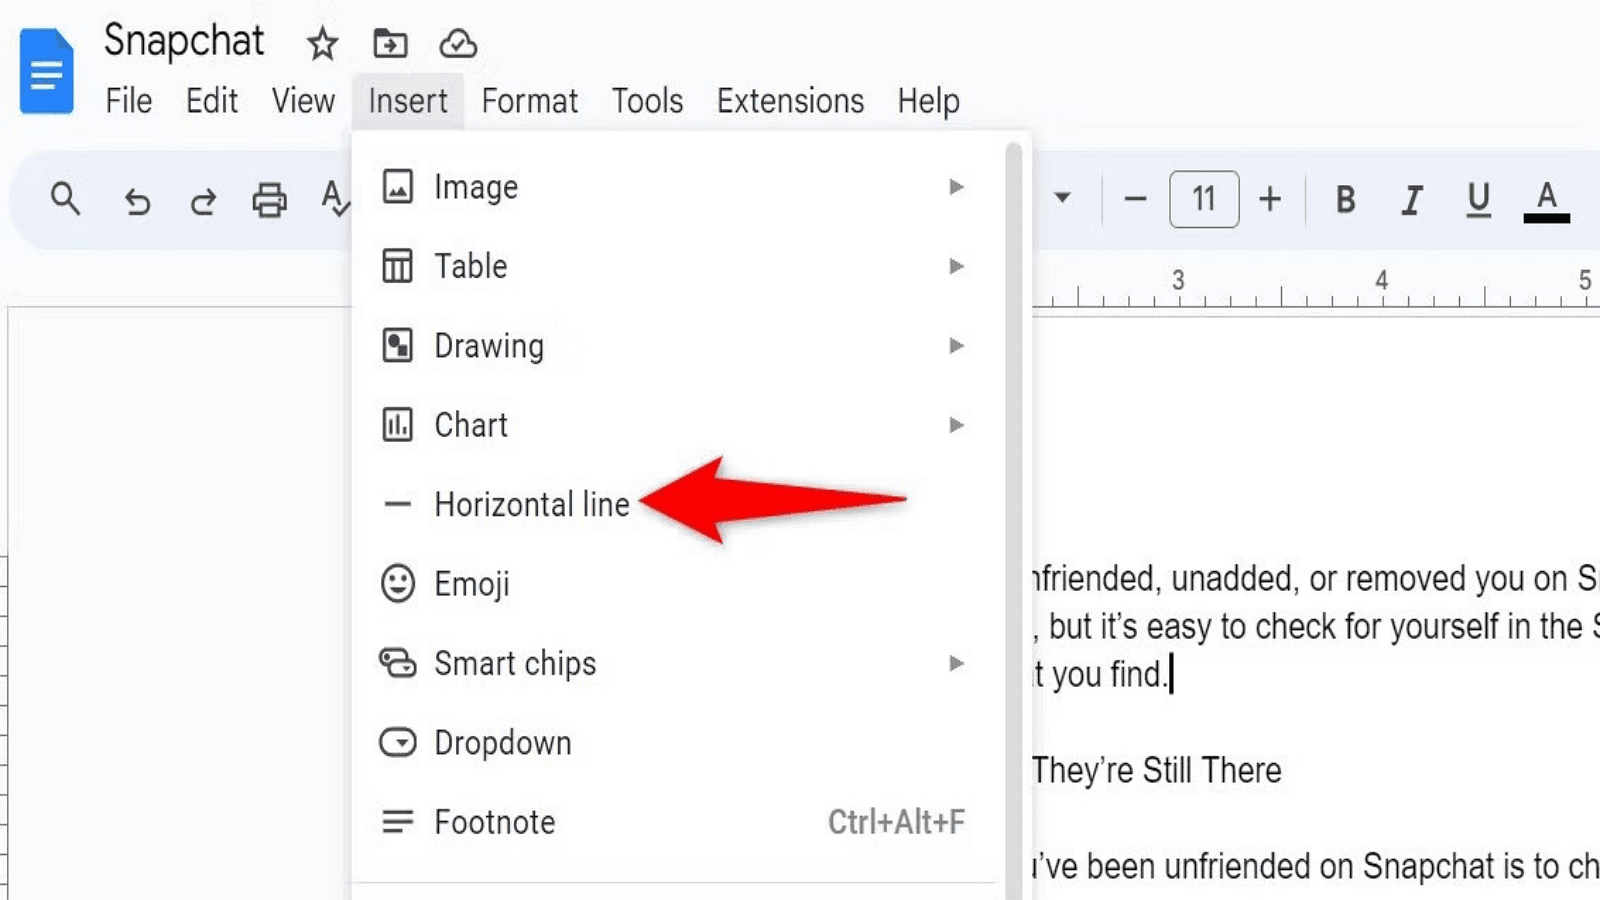
The horizontal line will appear at the cursor's position and automatically shift down when content is added above it.
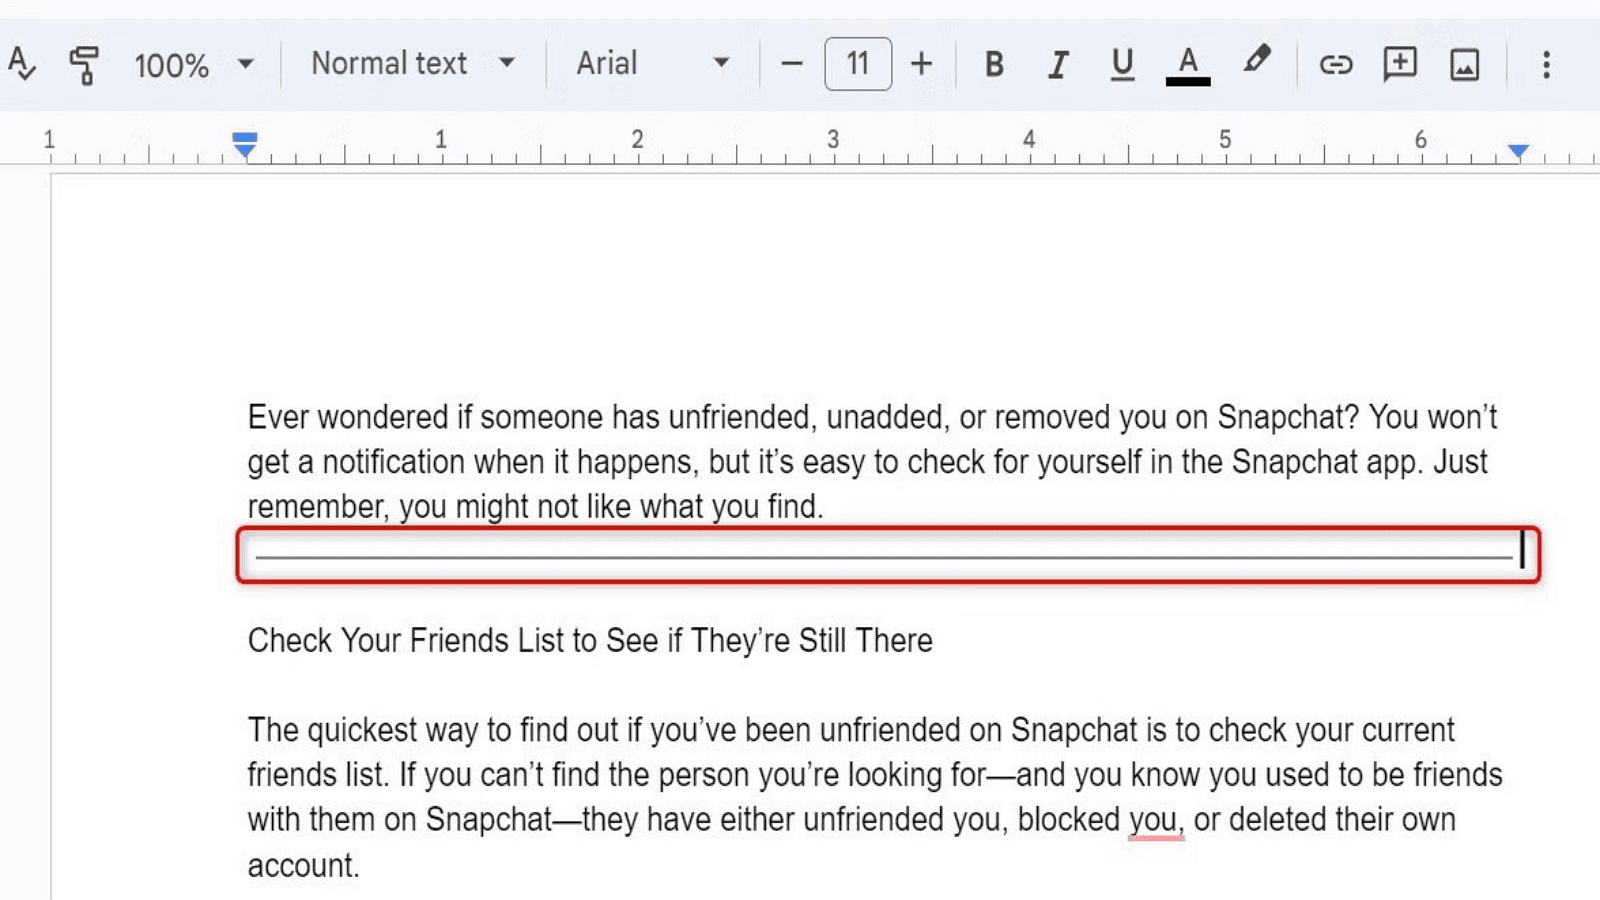
To remove the line:
1. Double-click the line to select it.
2. Press the Delete key.
Using Paragraph Styles
To add a line using paragraph styles in Google Docs, follow these steps:
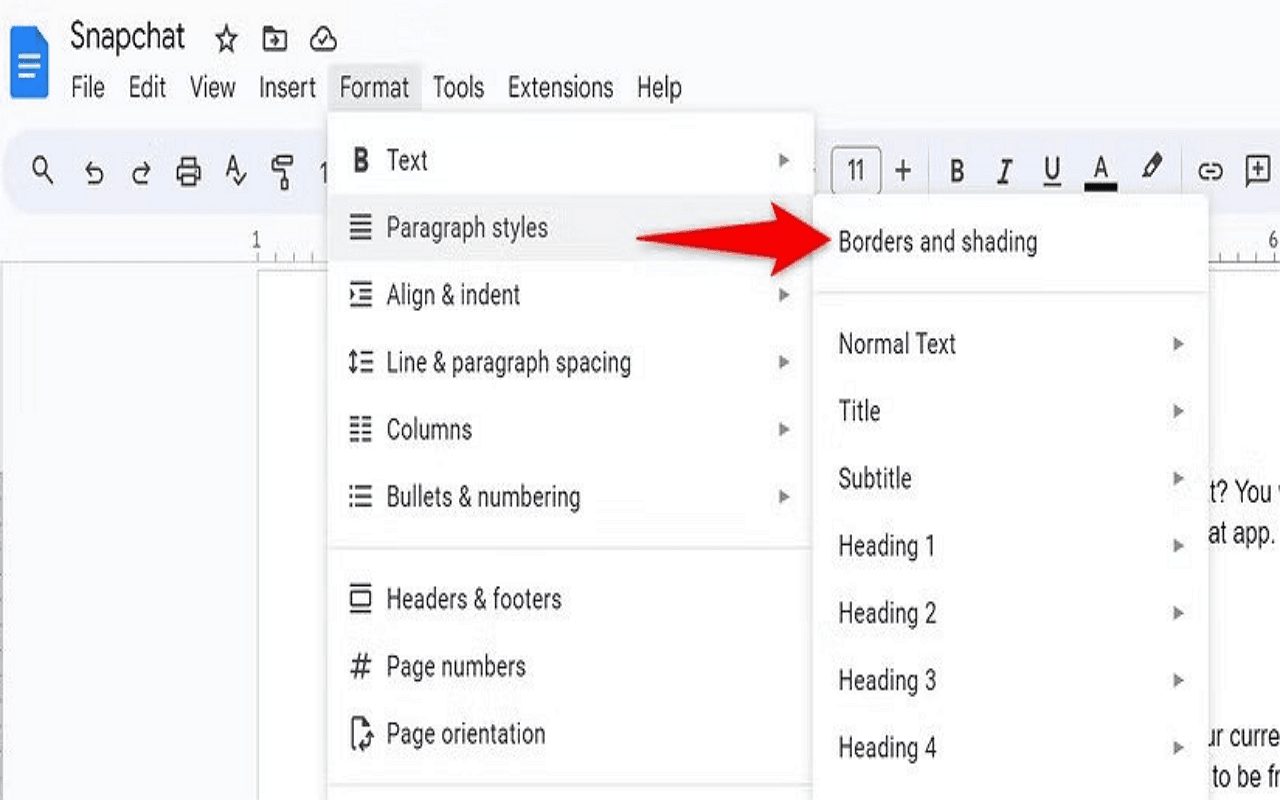
1. Open the document and select Format -> Paragraph Styles -> Borders and Shading.
2. Customize the paragraph style to include a line by setting the position, width, dash style, and other preferences.
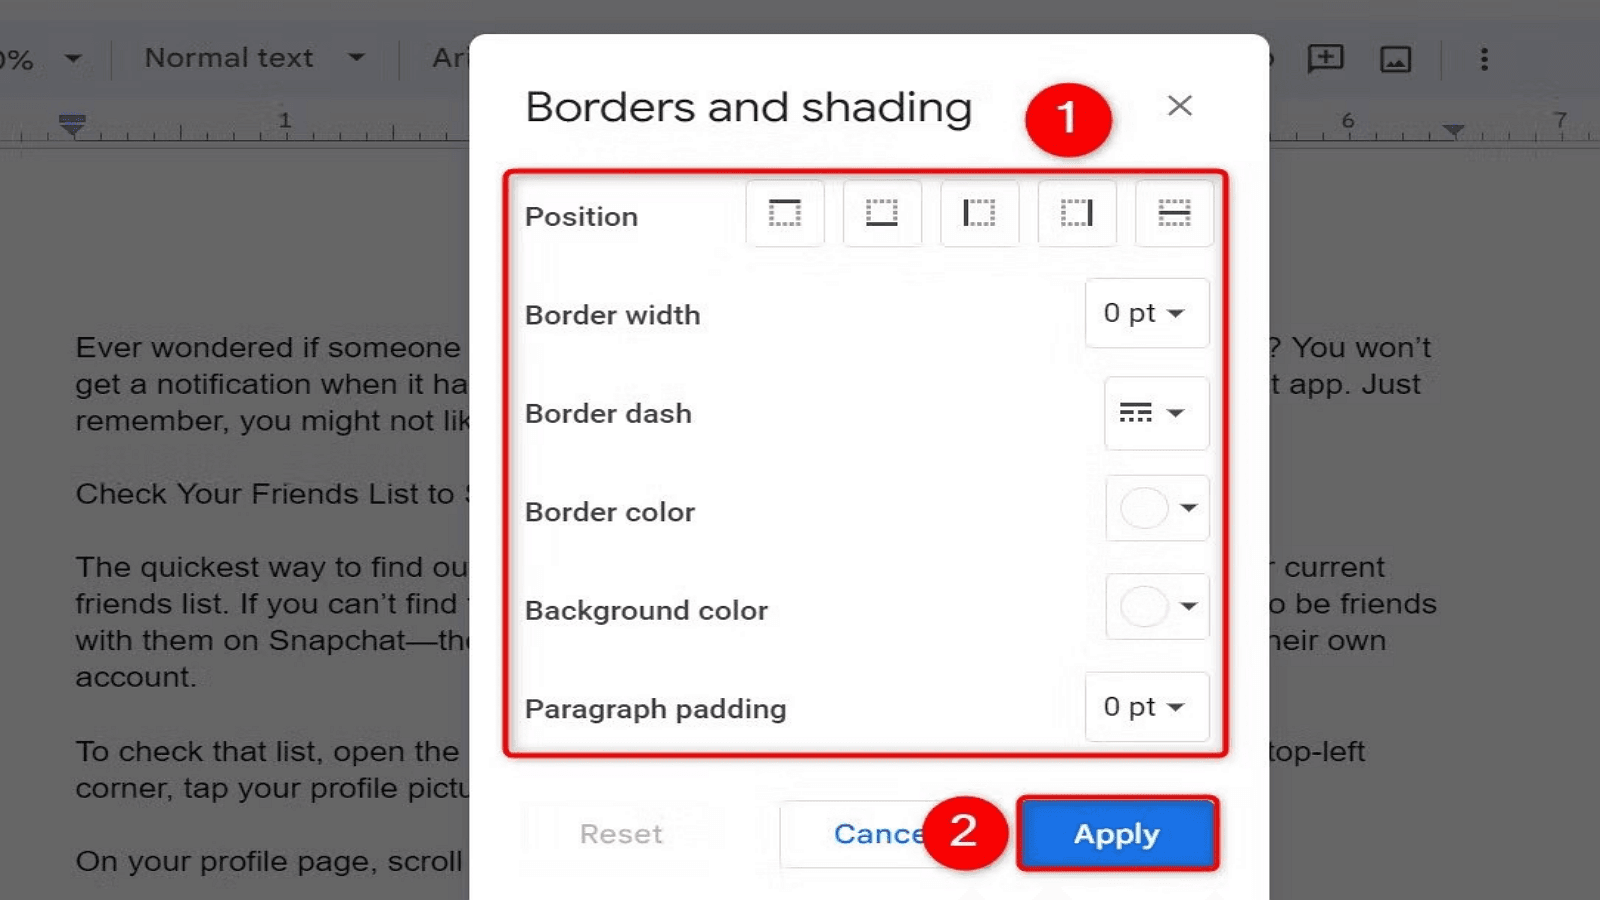
3. Apply the line and see it appear in the document per your specifications.
This method allows for greater customization and control over the appearance and positioning of lines.
Adding a Vertical Line in Google Docs
Using the Drawing Tool
To add a vertical line using the drawing tool in Google Docs, follow these steps:
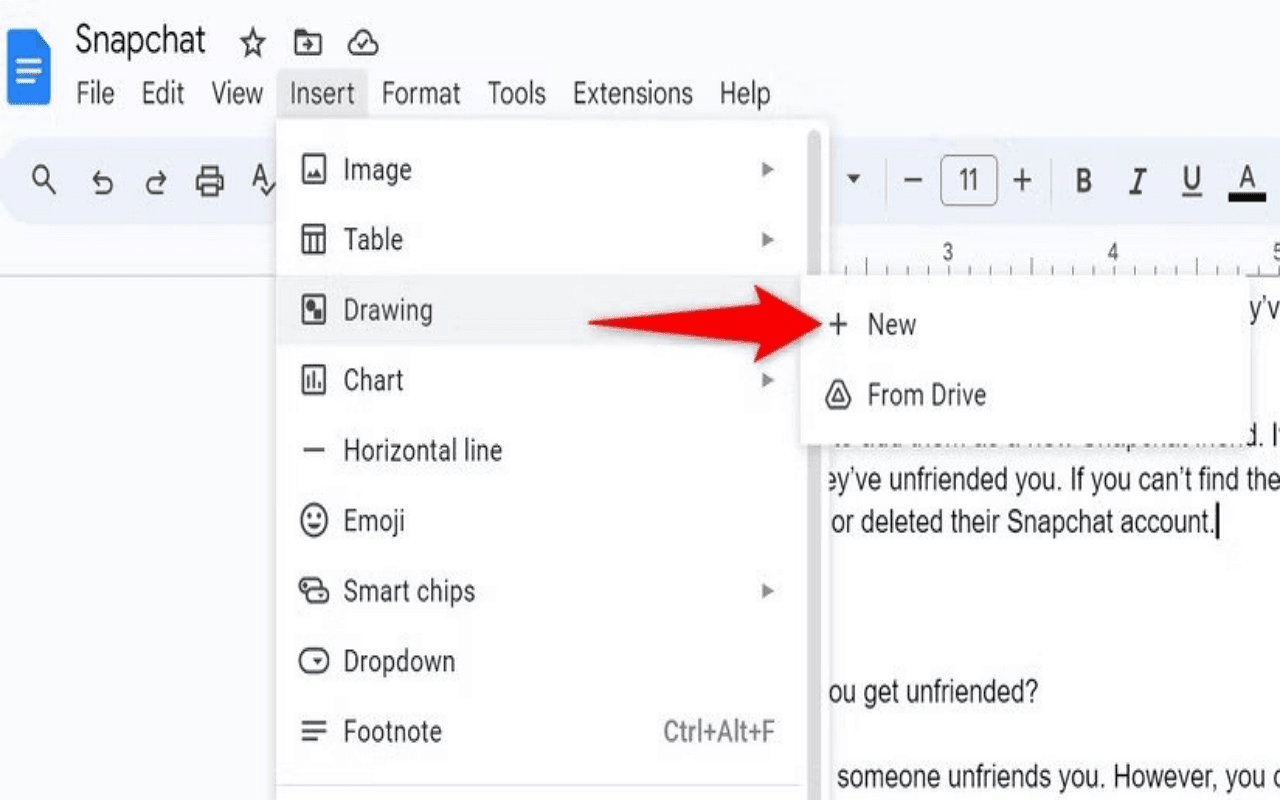
1. Open the document and go to Insert -> Drawing -> New.
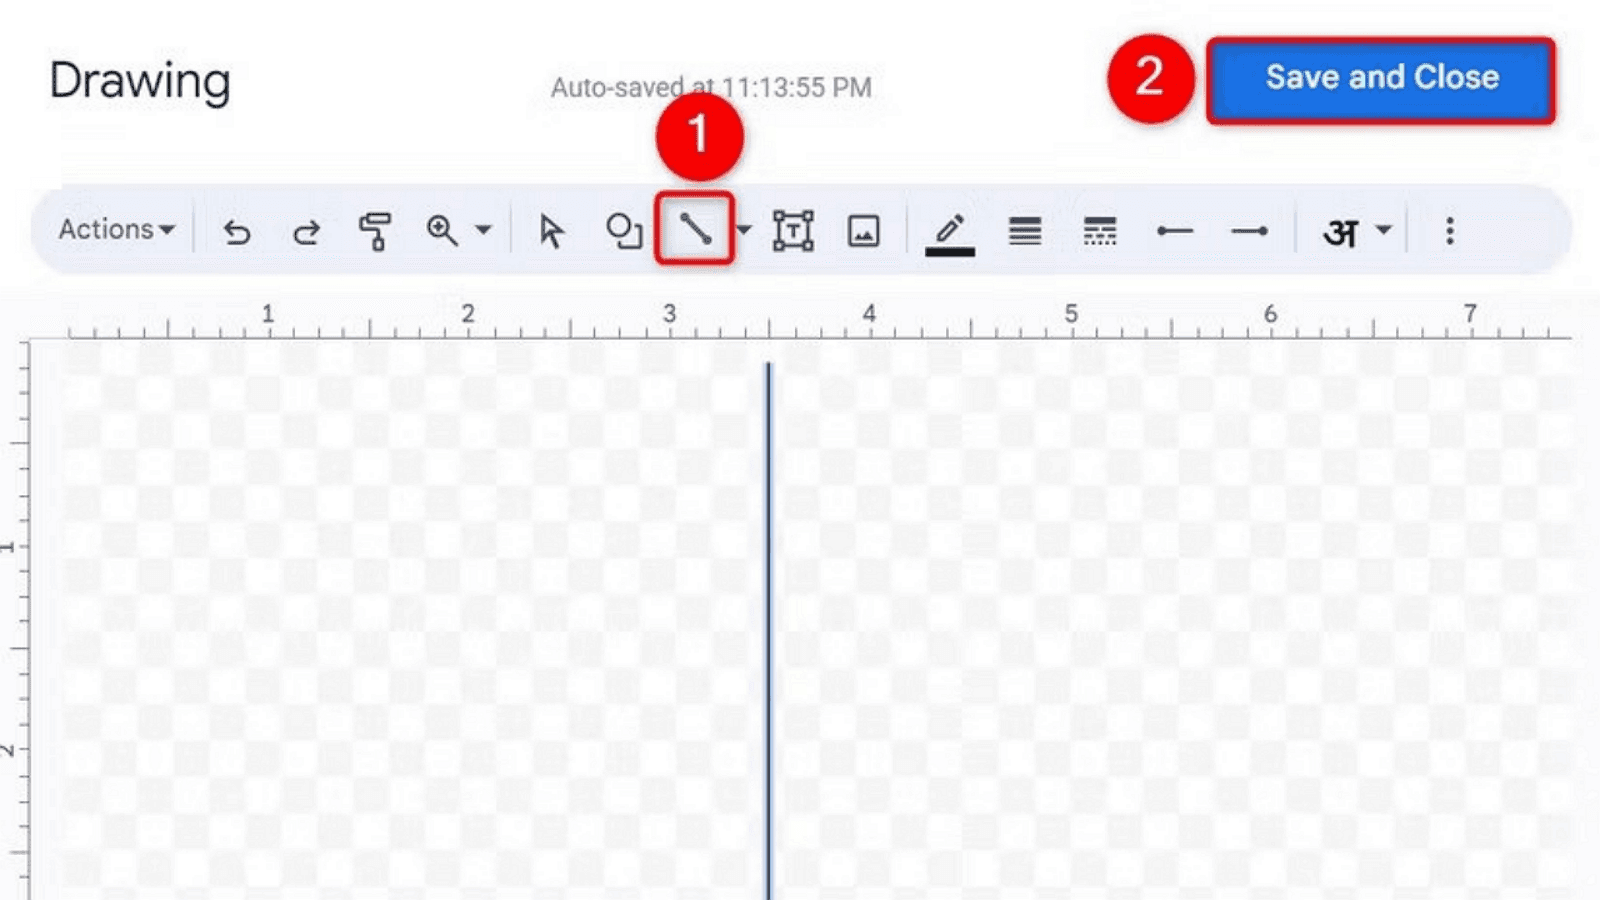
2. In the drawing window, select the line tool.
3. Hold the Shift key to draw a straight vertical line.
4. Save and close to insert the line into the document.
5. Adjust the position by clicking and dragging the line to your desired location.
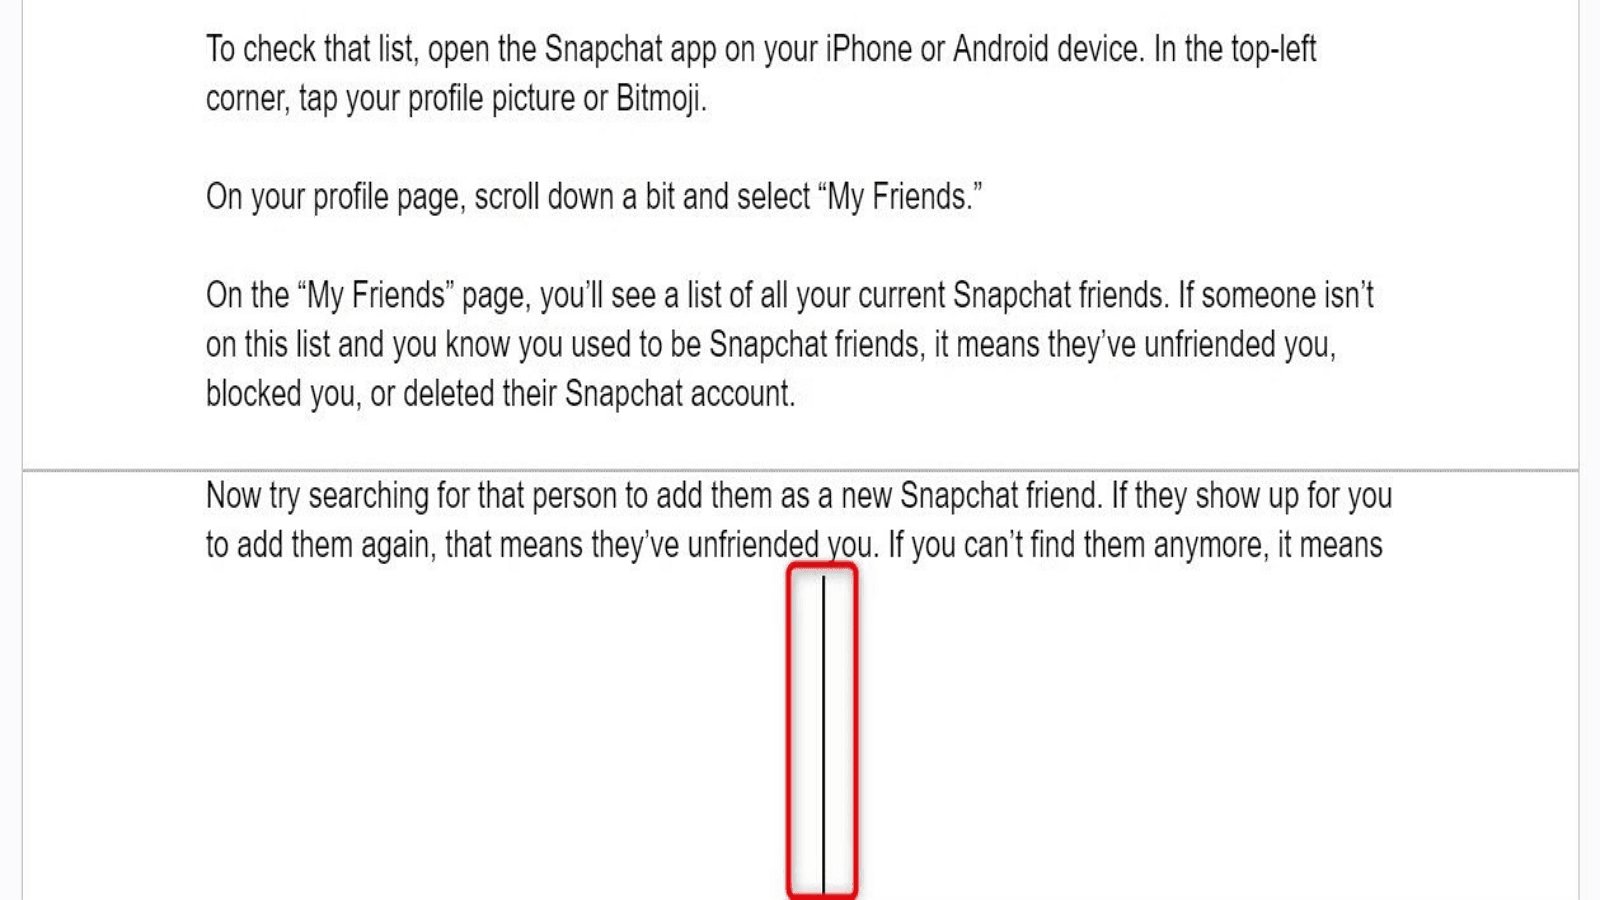
Utilizing the drawing tool provides flexibility and precision, making it simple to highlight or separate content effectively.
Using Columns in Google Docs
To add a vertical line between text columns in Google Docs, follow these steps:
1. Go to Format -> Columns -> More Options.
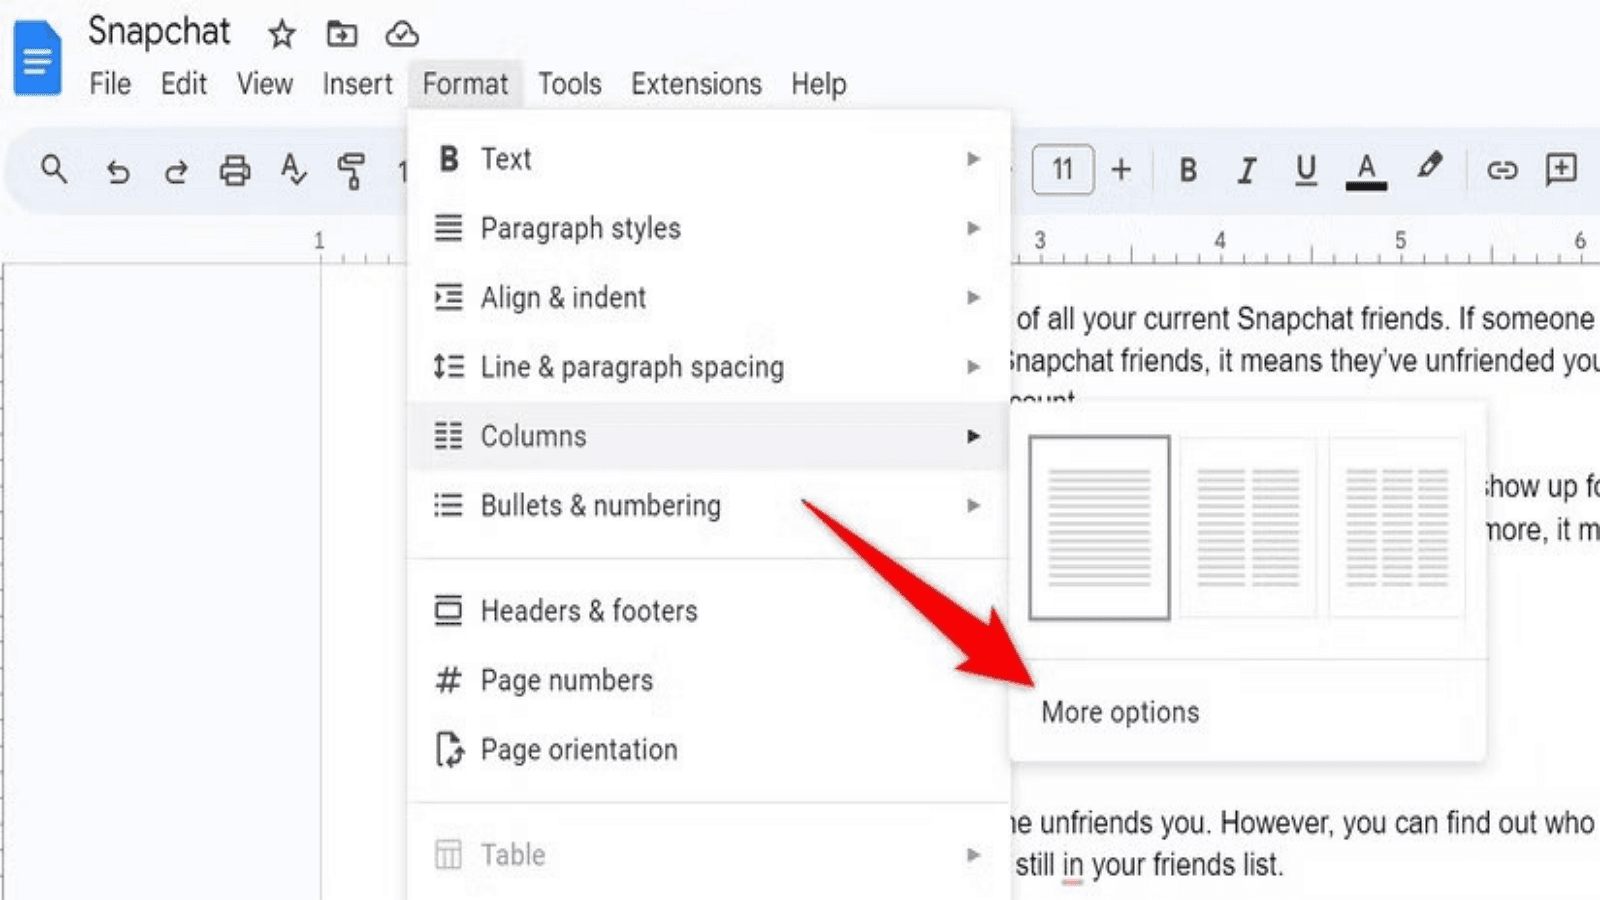
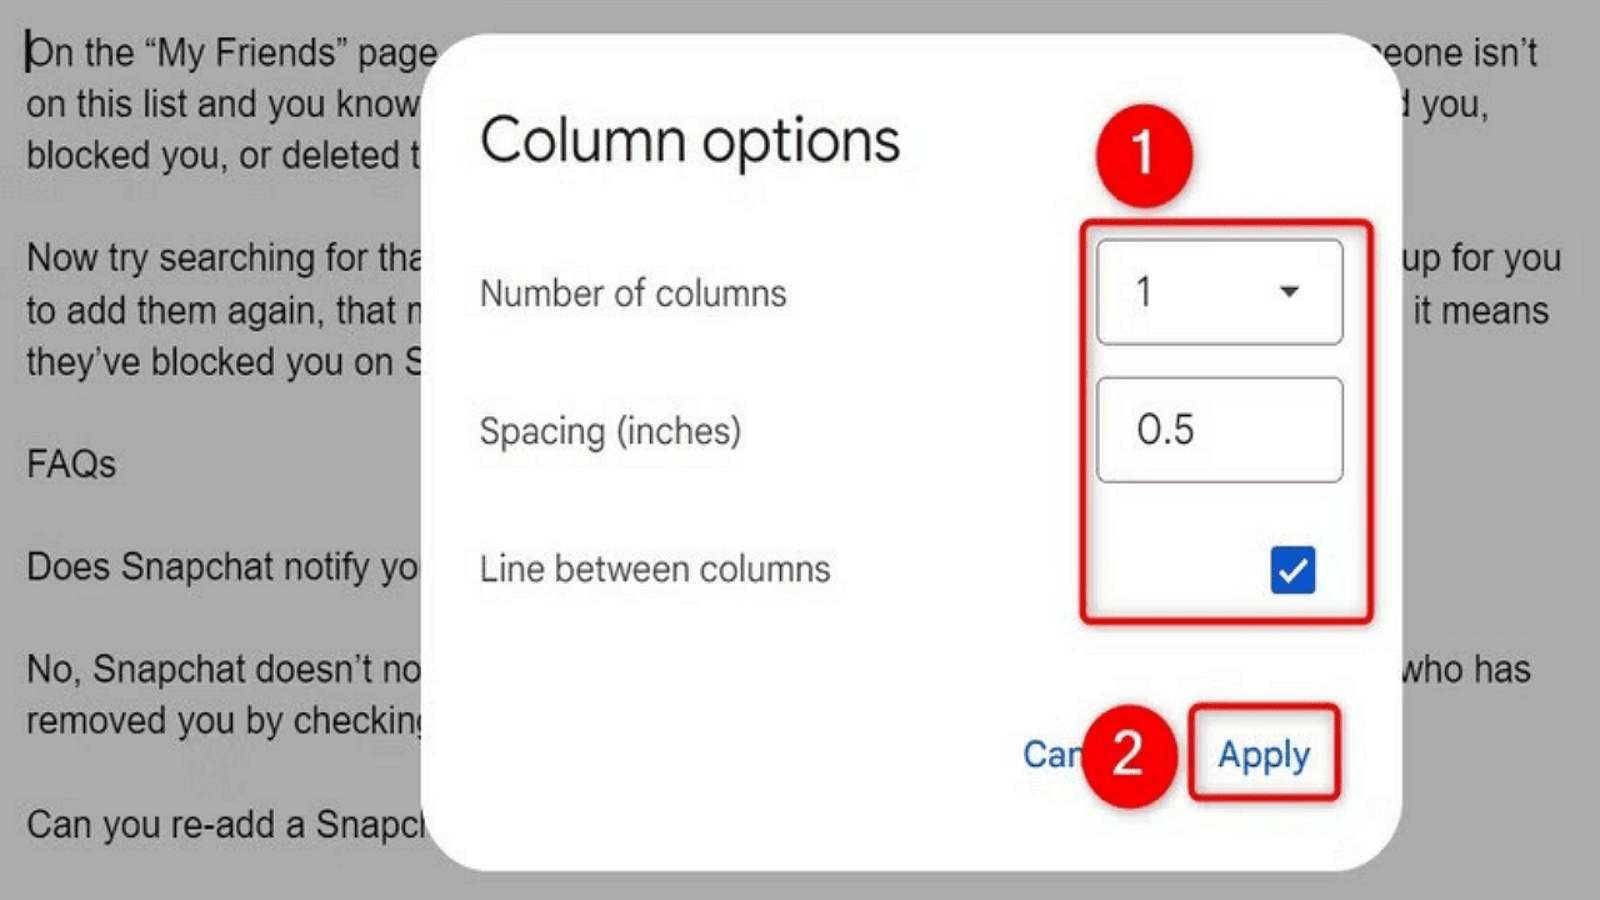
2. Please choose the number of columns and set the desired spacing between them.
3. Check the Line Between Columns option to insert a vertical line.
4. Click Apply to see the vertical line separating the text columns in your document.
This method effectively organizes content into multiple columns with a clear separation, enhancing readability and layout. It is useful for creating newsletters, brochures, and other documents where structured content presentation is essential.
Advanced Customization of Lines
To achieve advanced customization of lines in Google Docs, you can use add-ons. Here's how:
Step 1. Explore Add-ons: Go to Add-ons -> Get add-ons. Search for advanced line customization tools like "Drawing" or "Diagram" add-ons.
Step 2. Install Add-ons: Select the desired add-on and click Install. Follow the prompts to grant necessary permissions.
Step 3. Apply Add-ons: Once installed, access the add-on from the Add-ons menu. Use its features to create and customize lines with various styles, weights, and colors.
Step 4. Color and Styling Options in Google Docs:
Enhance your documents' visual appeal by changing the color and style of your lines in Google Docs:
- Changing Line Color: Select a line, then use the toolbar to choose a new color that fits your design.
- Line Styles: Experiment with different dash and line styles, such as solid, dashed, or dotted. Access these options by right-clicking the line and selecting the line format options.
- Customization: Use additional thickness and end-point styling features to customize the look further.
Practical Use Cases for Line Customization in Google Docs
Organizing Content
Lines can effectively segment different content sections, making your document more organized and easier to follow.
Enhancing Readability
Adding visual dividers helps to break up large blocks of text, enhancing the overall readability of your document. Use lines to separate headings, subheadings, or different topics, providing clear visual cues to the reader.
Decorative Purposes for Line Customization in Google Docs
You can utilize lines for aesthetic enhancements in various documents. For example, decorative lines can add a polished look to resumes, cover letters, and creative documents. These lines can separate sections, create borders, or highlight important information.
Templates with built-in decorative lines can save time and ensure a cohesive design. For instance, resume templates can feature lines between sections like experience and education, while cover letter templates might use lines to distinguish the header from the body text.
Troubleshooting Common Issues in Google Docs
Line Removal Challenges
Removing stubborn lines in Google Docs can be frustrating. Follow these steps:
1. Select the Line: Click on the line to highlight it.
2. Delete or Cut: Press the Delete key or use Ctrl + X (Windows) / Cmd + X (Mac).
Common Mistakes
- Ensure you are selecting the line and not the surrounding text or images.
- Double-check for hidden formatting marks that might affect line removal.
Aligning Lines Perfectly
To ensure lines are perfectly straight and in place, use these tips:
1. Grid View: Enable grid view for better alignment. Go to View > Show Ruler and enable Snap to Grid.
2. Alignment Tools: Use alignment guides or manually drag and snap lines to desired positions.
Using these tools helps maintain precise and clean document layouts, avoiding misaligned or skewed lines.
Conclusion
Adding horizontal and vertical lines in Google Docs is a straightforward process that greatly enhances document organization. Use the "Insert" menu for horizontal lines or the drawing tool for custom vertical lines. These lines serve as effective tools for segmenting content, creating visual clarity, and improving the overall structure of your document. The potential benefits include a more organized layout and improved readability, making navigating the content easier for your audience. I encourage you to experiment with both methods to determine what works best for your needs and preferences in enhancing document aesthetics.

