Converting PDF documents to JPG images is a common task that many people encounter, whether for personal projects or professional needs. While this process might seem daunting at first, especially for Mac users unfamiliar with file conversions, it is, in fact, straightforward, thanks to the availability of free online tools. These tools offer a simple and effective solution for converting PDFs to JPGs without requiring any software downloads or technical expertise. In this blog post, we'll dive into the step-by-step process of using these online resources to seamlessly perform conversions on your Mac.
Whether you're looking to share images from a PDF on social media, include graphics in a presentation, or simply want a more accessible image format, you'll find that these tools make the task convenient and hassle-free. By the end, you'll feel confident in transforming your PDF files into high-quality JPG images with just a few clicks.
How to Convert PDF to JPG on Mac Using Preview?
If you're a Mac user, you'll likely already be familiar with Preview — it's that handy little app packed right into macOS that lets you view and edit PDFs, images, and more without needing any extra software.
One of Preview's underrated features is its ability to convert PDFs to image formats like JPEG, HEIC, PNG, and others. It's straightforward to use, but there is a slight catch: it only lets you convert one PDF page to a JPEG at a time. So, even if you highlight multiple pages, it will only export the first page you selected as a JPEG image.
Let me walk you through the steps, as it's something I've done countless times myself.
Step 1: Open Your PDF File with Preview
First, find your PDF file and open it with Preview. You can usually do this by right-clicking on the PDF, selecting "Open with," and then choosing Preview.
Step 2: Export a PDF Page to JPEG
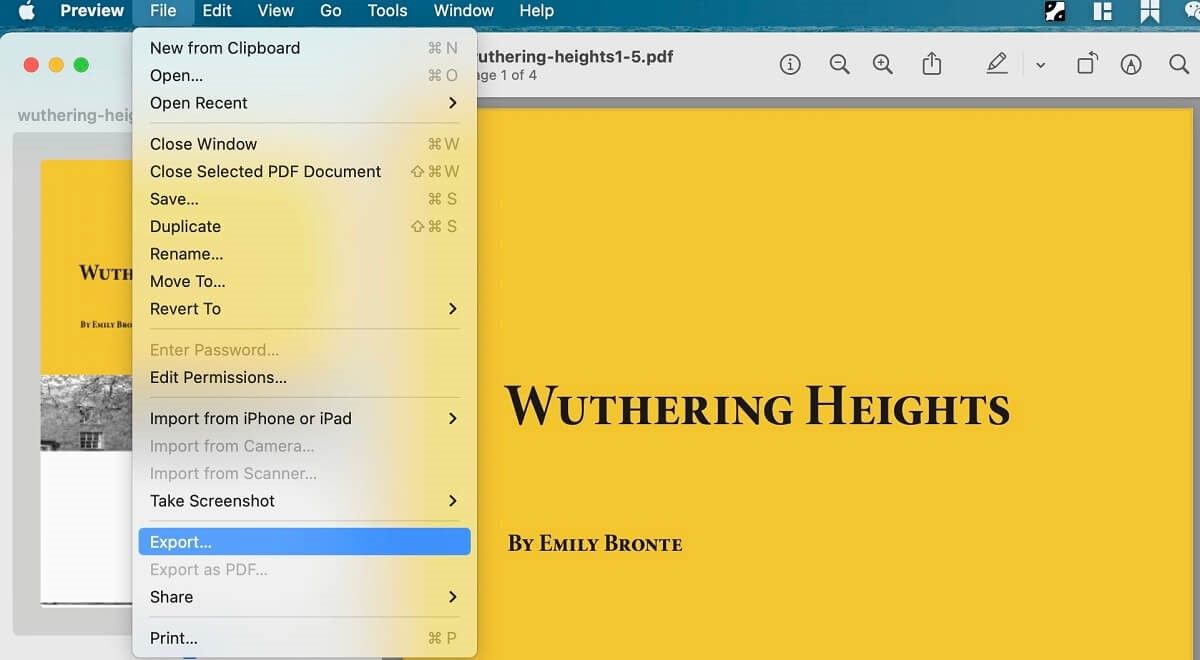
Next, click on the specific page you want to convert. Once it's selected, go to the top menu, click on File, and then on Export. This will take you to the next step.
Step 3: Save Your JPEG Image
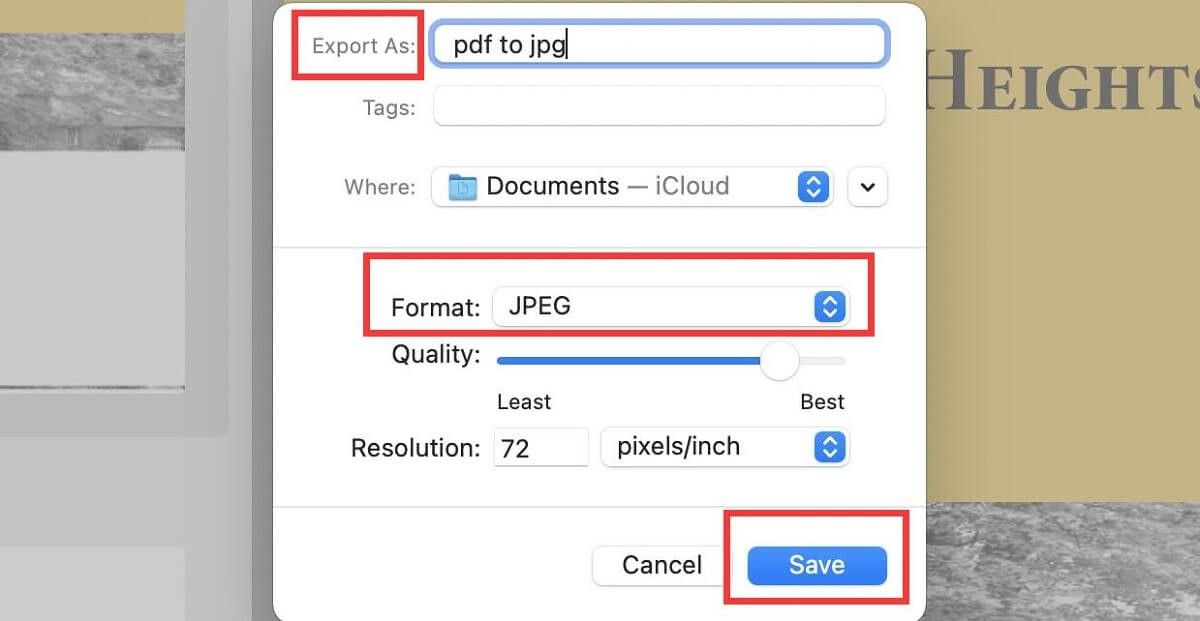
In the export popup window, you'll see an option to choose the format. Select JPEG from the drop-down menu. You'll also have the chance to name your file in the Export As field. Once you've done that, click Save, and voilà — you've got your JPEG image!
Even though it only handles one page at a time, Preview is a fantastic tool for quick conversions without the need for any third-party software. Plus, it's already right there on your Mac, ready to go!
How to Turn PDF to JPG with Automator Quick Actions?
If you frequently need to convert PDFs into JPGs or have a bunch of files to convert at once, Automator on your Mac can make your life a lot easier. You can set up a "quick action" that runs with just a few clicks, turning this repetitive task into a breeze.
If you've never used Automator before, don't stress. It might look a bit complex initially, but by following these simple steps, you'll have it all set up in no time:
Steps to Create a Quick Action with Automator
- Open Automator: Start by launching the Automator app on your Mac. You can find it in your Applications folder.
- New Document Selection: When Automator opens, click New Document, then choose Quick Action, and click Choose.
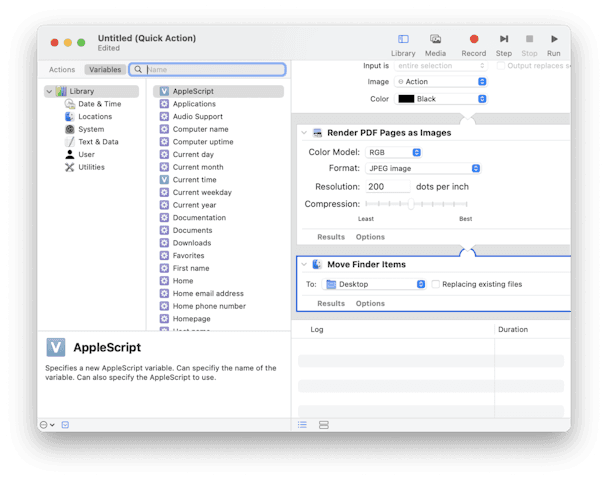
- Render PDF Pages as Images: At the top of the window, you'll see a search field for variables. Type in "Render PDF Pages as Images."
- Drag to Workflow: Drag this action over to the main workflow window to the right.
- Set Format to JPEG: Ensure that the Format drop-down menu is set to JPEG.
- Move Finder Items: Go back to the variables search field and type "Move Finder Items."
- Add to Workflow: Drag this action into the workflow window, placing it after the "Render PDF Pages as Images" action.
- Choose Destination Folder: In the "To" drop-down menu, select the folder where you want your converted files to be saved.
- Save the Quick Action: Click File in the top menu and then click Save.
- Name Your Quick Action: Give your quick action a name like "PDF to JPG" for easy reference.
- Use Your Quick Action: Navigate to Finder and select the PDF files you wish to convert. Control-click (right-click) on them.
- Run the Quick Action: From the context menu, choose Quick Actions and then select your newly created "PDF to JPG" action.
Dealing with Duplicate Files After Converting PDFs to JPG
Once you have converted your PDFs to JPGs using Automator, you will end up with both the original PDFs and the new JPGs. Managing these duplicates can be bothersome, especially if you're not keeping them all in one place.
Using Gemini 2 to Remove Duplicates
Thankfully, you can use Gemini 2 to help clean up duplicate files. Gemini 2 is a useful app that scans your Mac for duplicate and similar files, giving you an easy way to manage and delete them. Here are the steps to use Gemini 2 for cleaning up duplicate files:
1. Download and Install Gemini 2: Start by downloading Gemini 2 from the browser and install it on your Mac.
2. Open Gemini 2: Launch the Gemini 2 app.
3. Scan for Duplicates:
- Click the + button in the app's main window.
- Select the Home folder or select the specific folder where your files are located.
- Click Scan for Duplicates to start the scanning process.
4. Review and Clean:
- Wait for the scan to finish. Once done, you'll have two options:
- Review Results: This will allow you to see all the files that were flagged as duplicates or similar. You can preview each file and decide which ones to delete.
- Smart Cleanup: Let Gemini 2's algorithm decide which files to keep and which to delete. This option allows you to remove duplicates with a single click.
- Choose the option that best suits your needs.
Convert a PDF to JPG on a Mac Using Free Online Tools
You can easily convert a PDF to a JPG on a Mac using free online tools. Here's a simple step-by-step guide to help you through the process:
1. Upload the File:
- Visit any free online PDF to JPG conversion website (e.g., Smallpdf, iLovePDF, PDF to Image).
- Drag and drop your PDF file into the conversion window or click the Choose file button to select a document from your local folder or cloud storage.
2. Convert the File:
- Once your file is uploaded, click the Convert button and wait for the conversion to complete.
3. Download the JPG:
- After the conversion process finishes, click Download to save the output JPG image to your local device.
- You can also share the image online with others or start over and convert another file if needed.
Frequently Asked Questions (FAQs)
Q: Is it safe to use free online PDF to JPG conversion tools?
A: Yes, many reputable online conversion tools are safe to use. They typically have robust privacy policies to ensure your documents are secure. However, it's always a good idea to read user reviews and check for security features like SSL encryption before uploading sensitive documents.
Q: Will the converted JPG image retain the quality of the original PDF?
A: Most online conversion tools strive to retain the quality of the original PDF in the JPG output. However, the quality can sometimes vary depending on the tool you use. It's a good practice to test a few different services to find one that consistently meets your quality expectations.
Q: Can I convert multiple PDF pages to JPG images at once?
A: Yes, many online tools offer batch conversion options, enabling you to convert multiple pages of a PDF into separate JPG images simultaneously. This feature saves time and ensures consistency across all converted images.
Q: Do I need to install any software to convert PDF to JPG online?
A: No, one of the advantages of using free online tools is that they do not require any software installation. You can perform the conversion directly through your web browser, keeping your Mac clutter-free and saving you from the hassle of managing additional applications.
Final Words
Converting PDF files to JPG images on a Mac doesn't have to be a complex or time-consuming task. With the help of free online tools, you can quickly and effortlessly transform your documents into high-quality images suitable for a variety of uses. These tools provide an intuitive, user-friendly interface that requires no technical knowledge, making it accessible to everyone, from tech-savvy professionals to casual users.
By following the easy steps outlined in this guide, you can ensure that your file conversions are done efficiently and effectively. Whether you need to enhance your digital presentations, share visual content online, or simply prefer to work with image files, these online resources offer a practical and convenient solution. Embrace the simplicity of online conversions and enjoy the flexibility and versatility that comes with having your files in JPG format. Happy converting!

