Deleting a page in Microsoft Word is sometimes very simple, yet at other times frustrating, when you just want to get rid of that blank page or all that stuff on it. This article will walk you through several ways to delete pages successfully in the comfort of your Windows computer or Mac. How do you delete a page in Word? We will guide you on how to do that in the remaining part of this write-up.
Whether you're dealing with a stubborn blank page at the end of your document or an unwanted section in the middle, we've got you covered. Understanding the different methods available can save you time and help maintain the document's overall formatting. Let’s explore these techniques to ensure a clean and professional final product.
While it is beneficial to know how to remove these pages, more significant is how to realize why such undesired pages would crop up in your document. The most common reasons include:
- Blank pages: These are created usually because there are excess paragraph marks, page breaks, or section breaks.
- Content overflow: Sometimes, when content on a previous page does not have enough space, Word might just create a new page for its spillover.
- Manual page breaks: It is also possible that users add page breaks themselves without realizing it and end up creating extra pages.
Method 1: Using the Navigation Pane
One of the easiest ways to delete a page is by using the Navigation Pane. This works very well for both blank pages and pages containing content.
Step 1: To Open the Navigation Pane
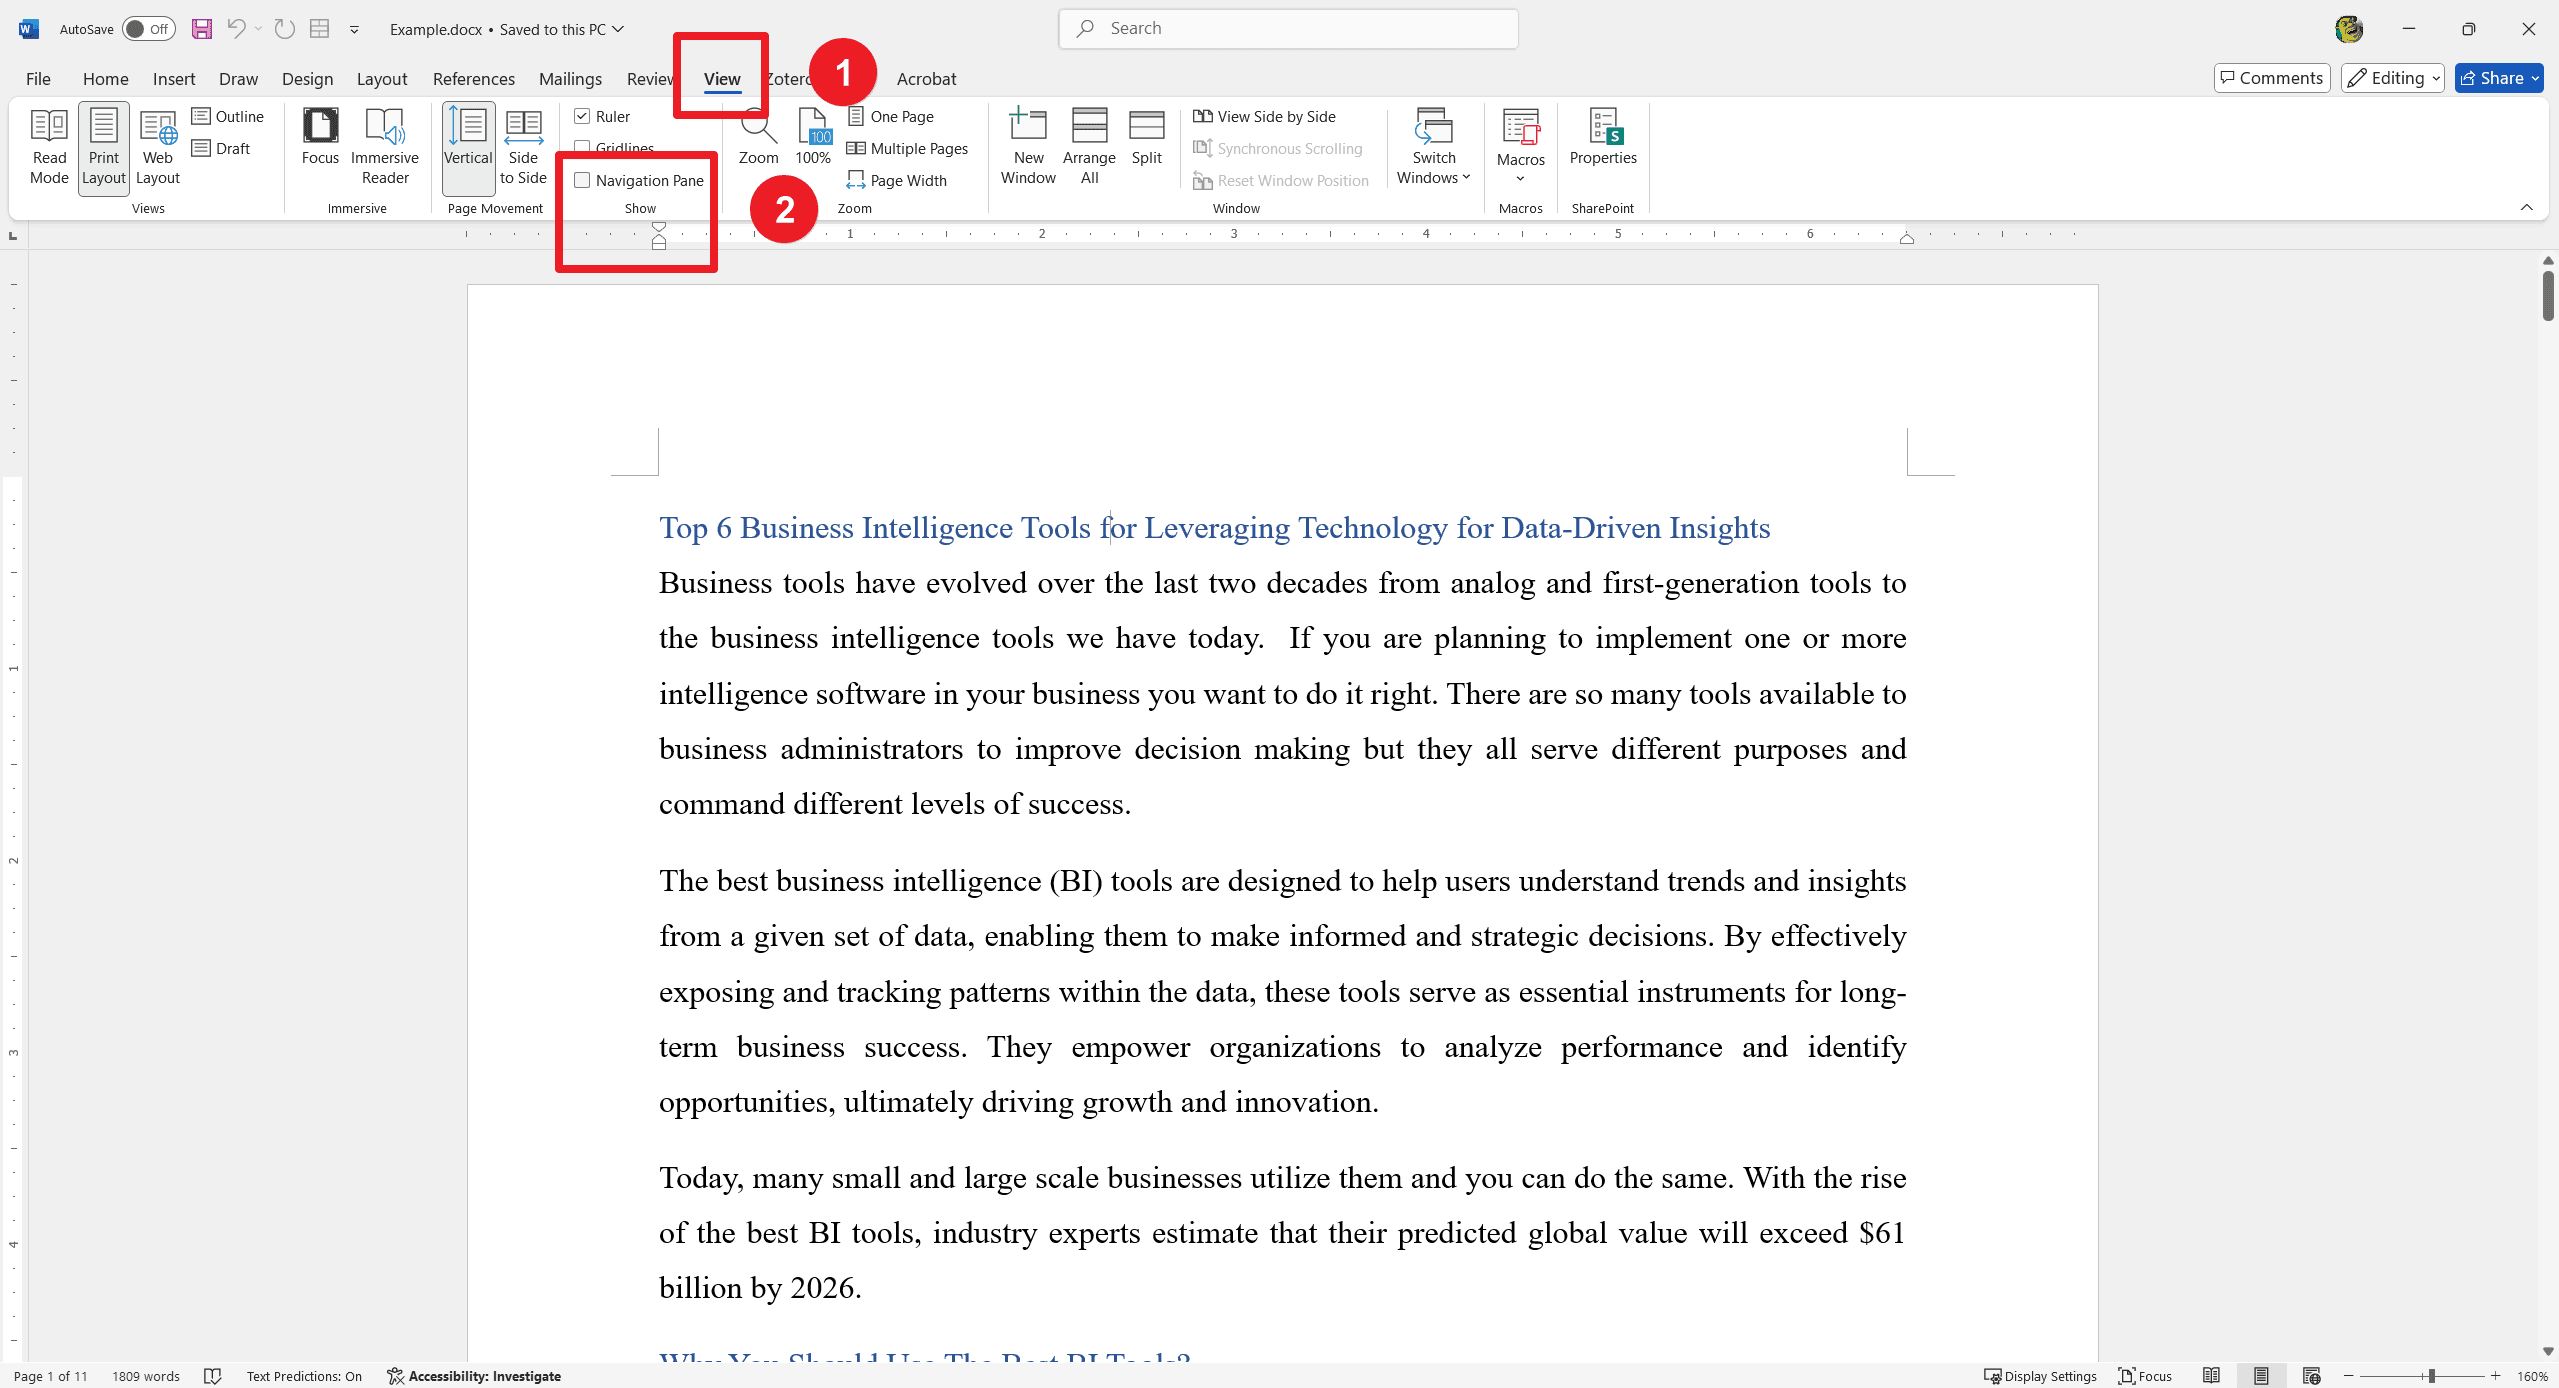
Click on the View tab on the Ribbon. Under the Navigation Pane, check the box beside it.
Step 2: Select Pages
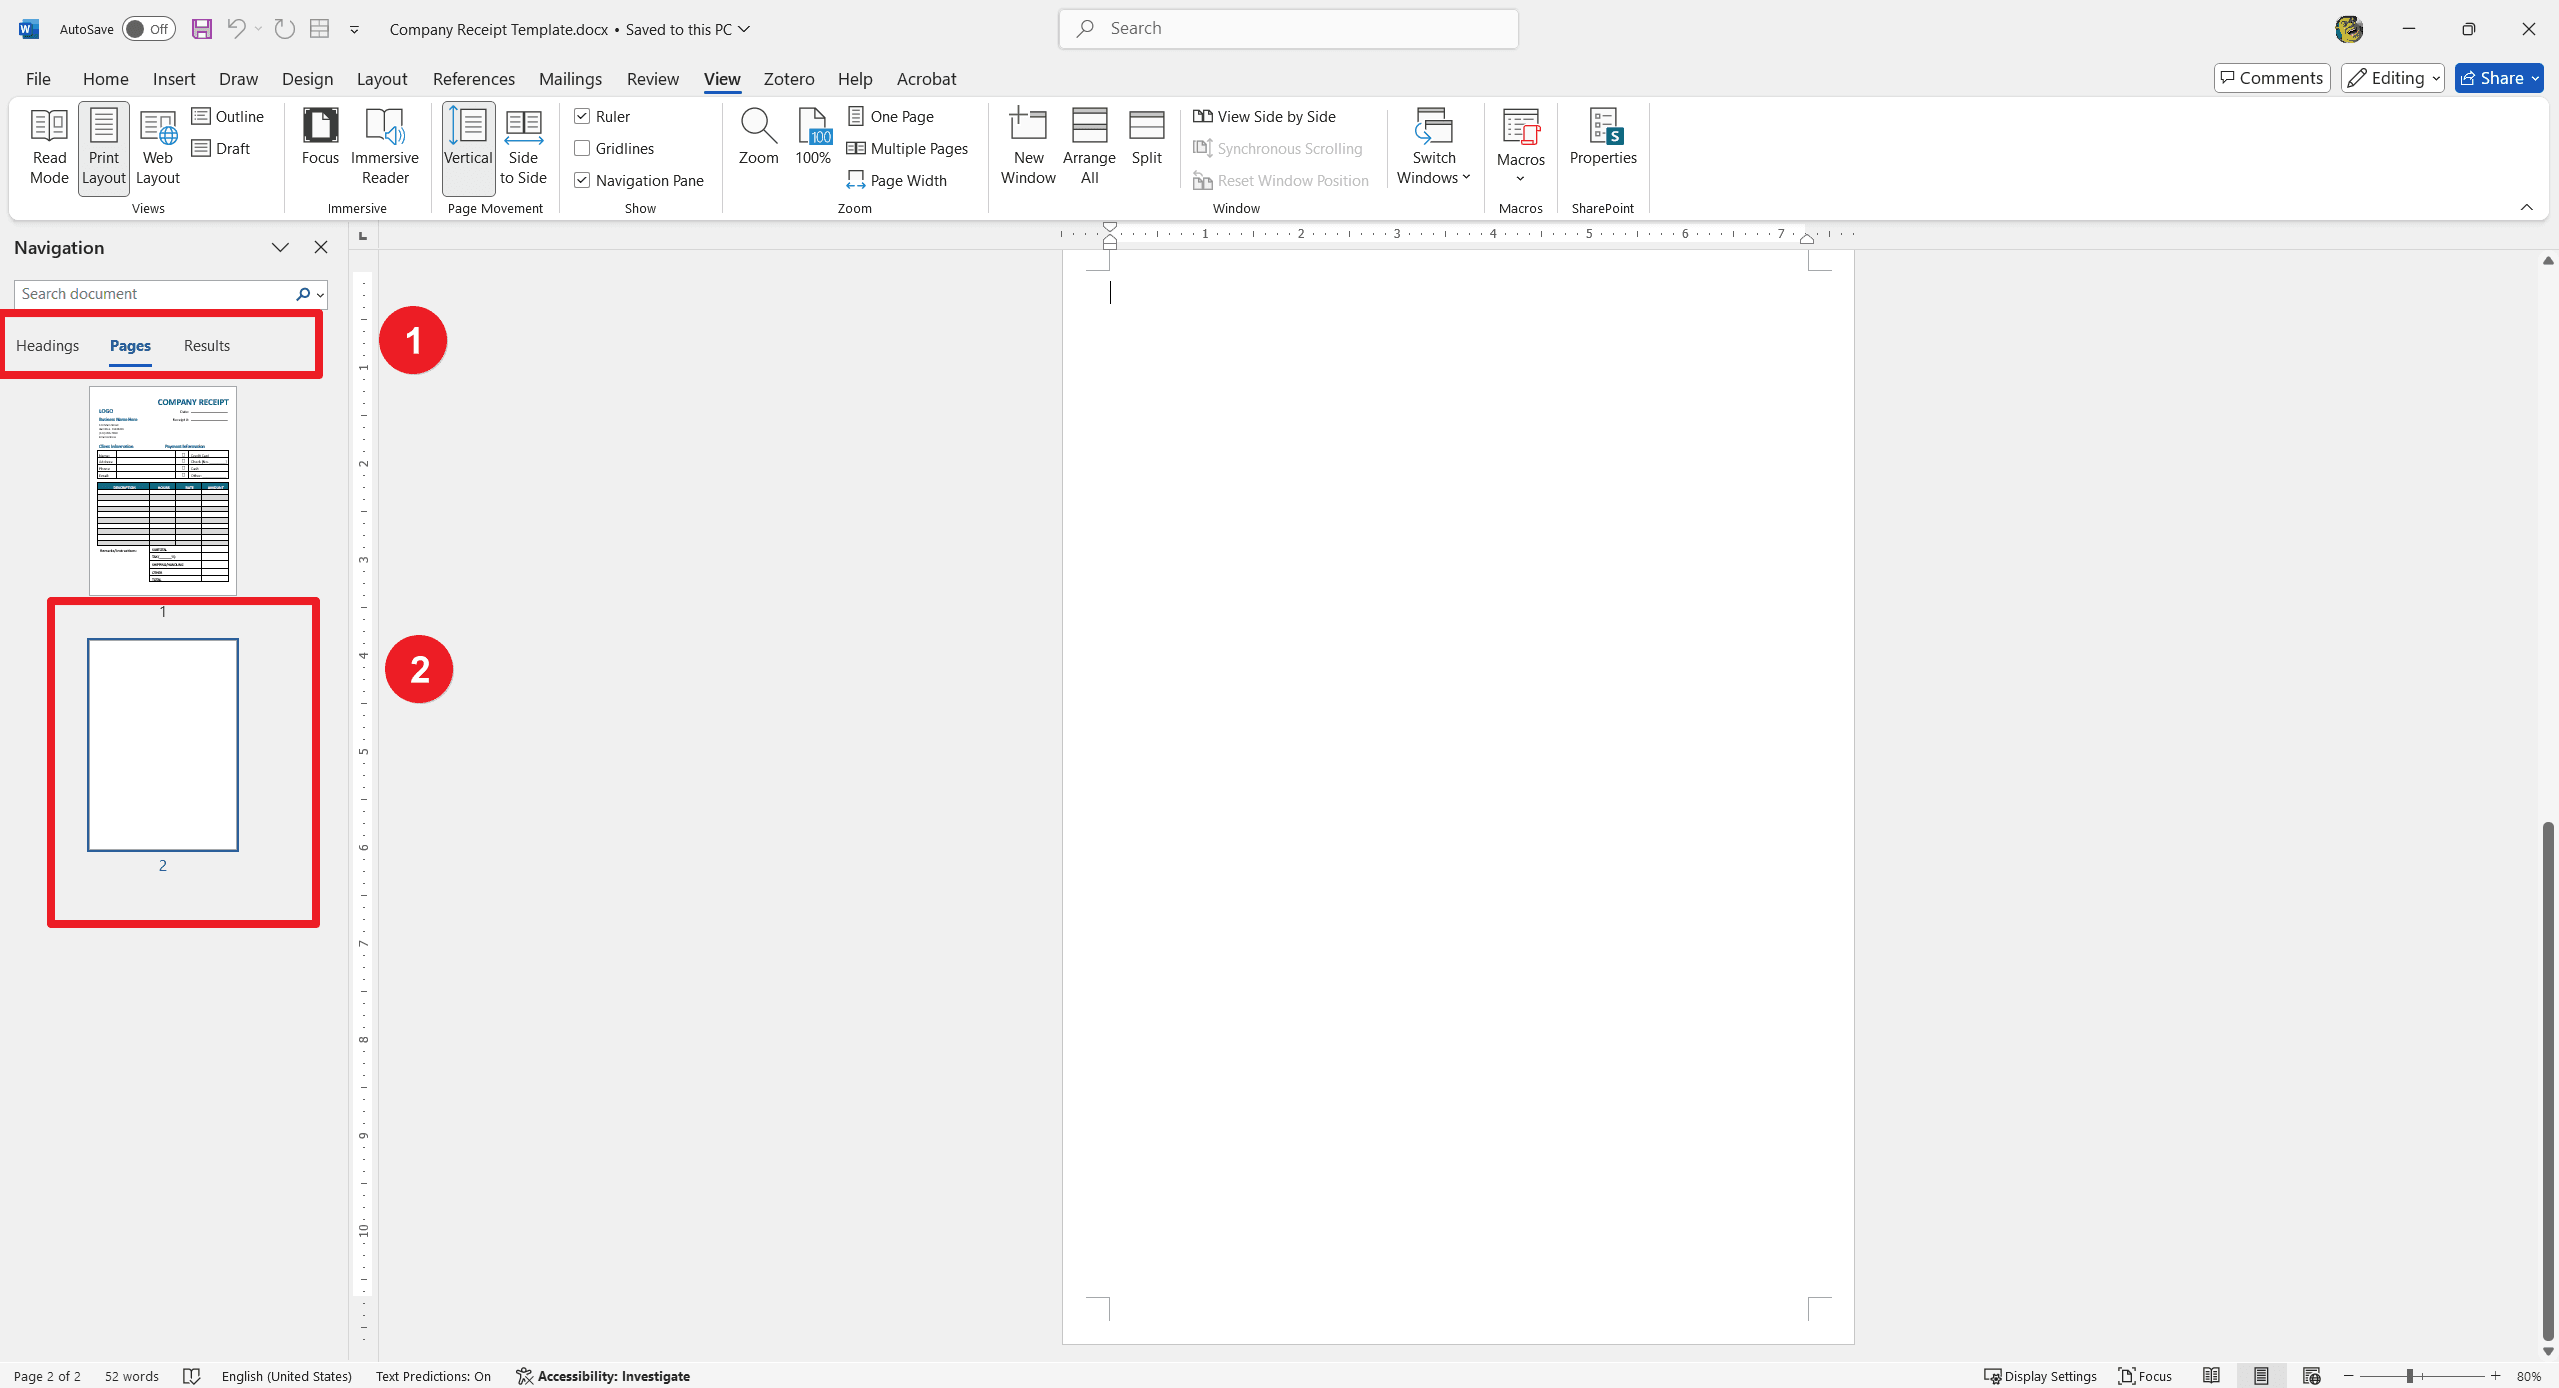
When the Navigation Pane opens on the left, click Pages. The document thumbnails of all your pages appear.
Step 3: How to Delete A Page in Word
Click the thumbnail of the page to be deleted. And then, press the Delete key on your keyboard. If it's an empty page with paragraph marks, you may need to press Delete several times.
Method 2: Using Keyboard Shortcuts
If you are more into keyboard shortcuts, then this is an easy and fast way to delete pages that are not empty.
For Windows:
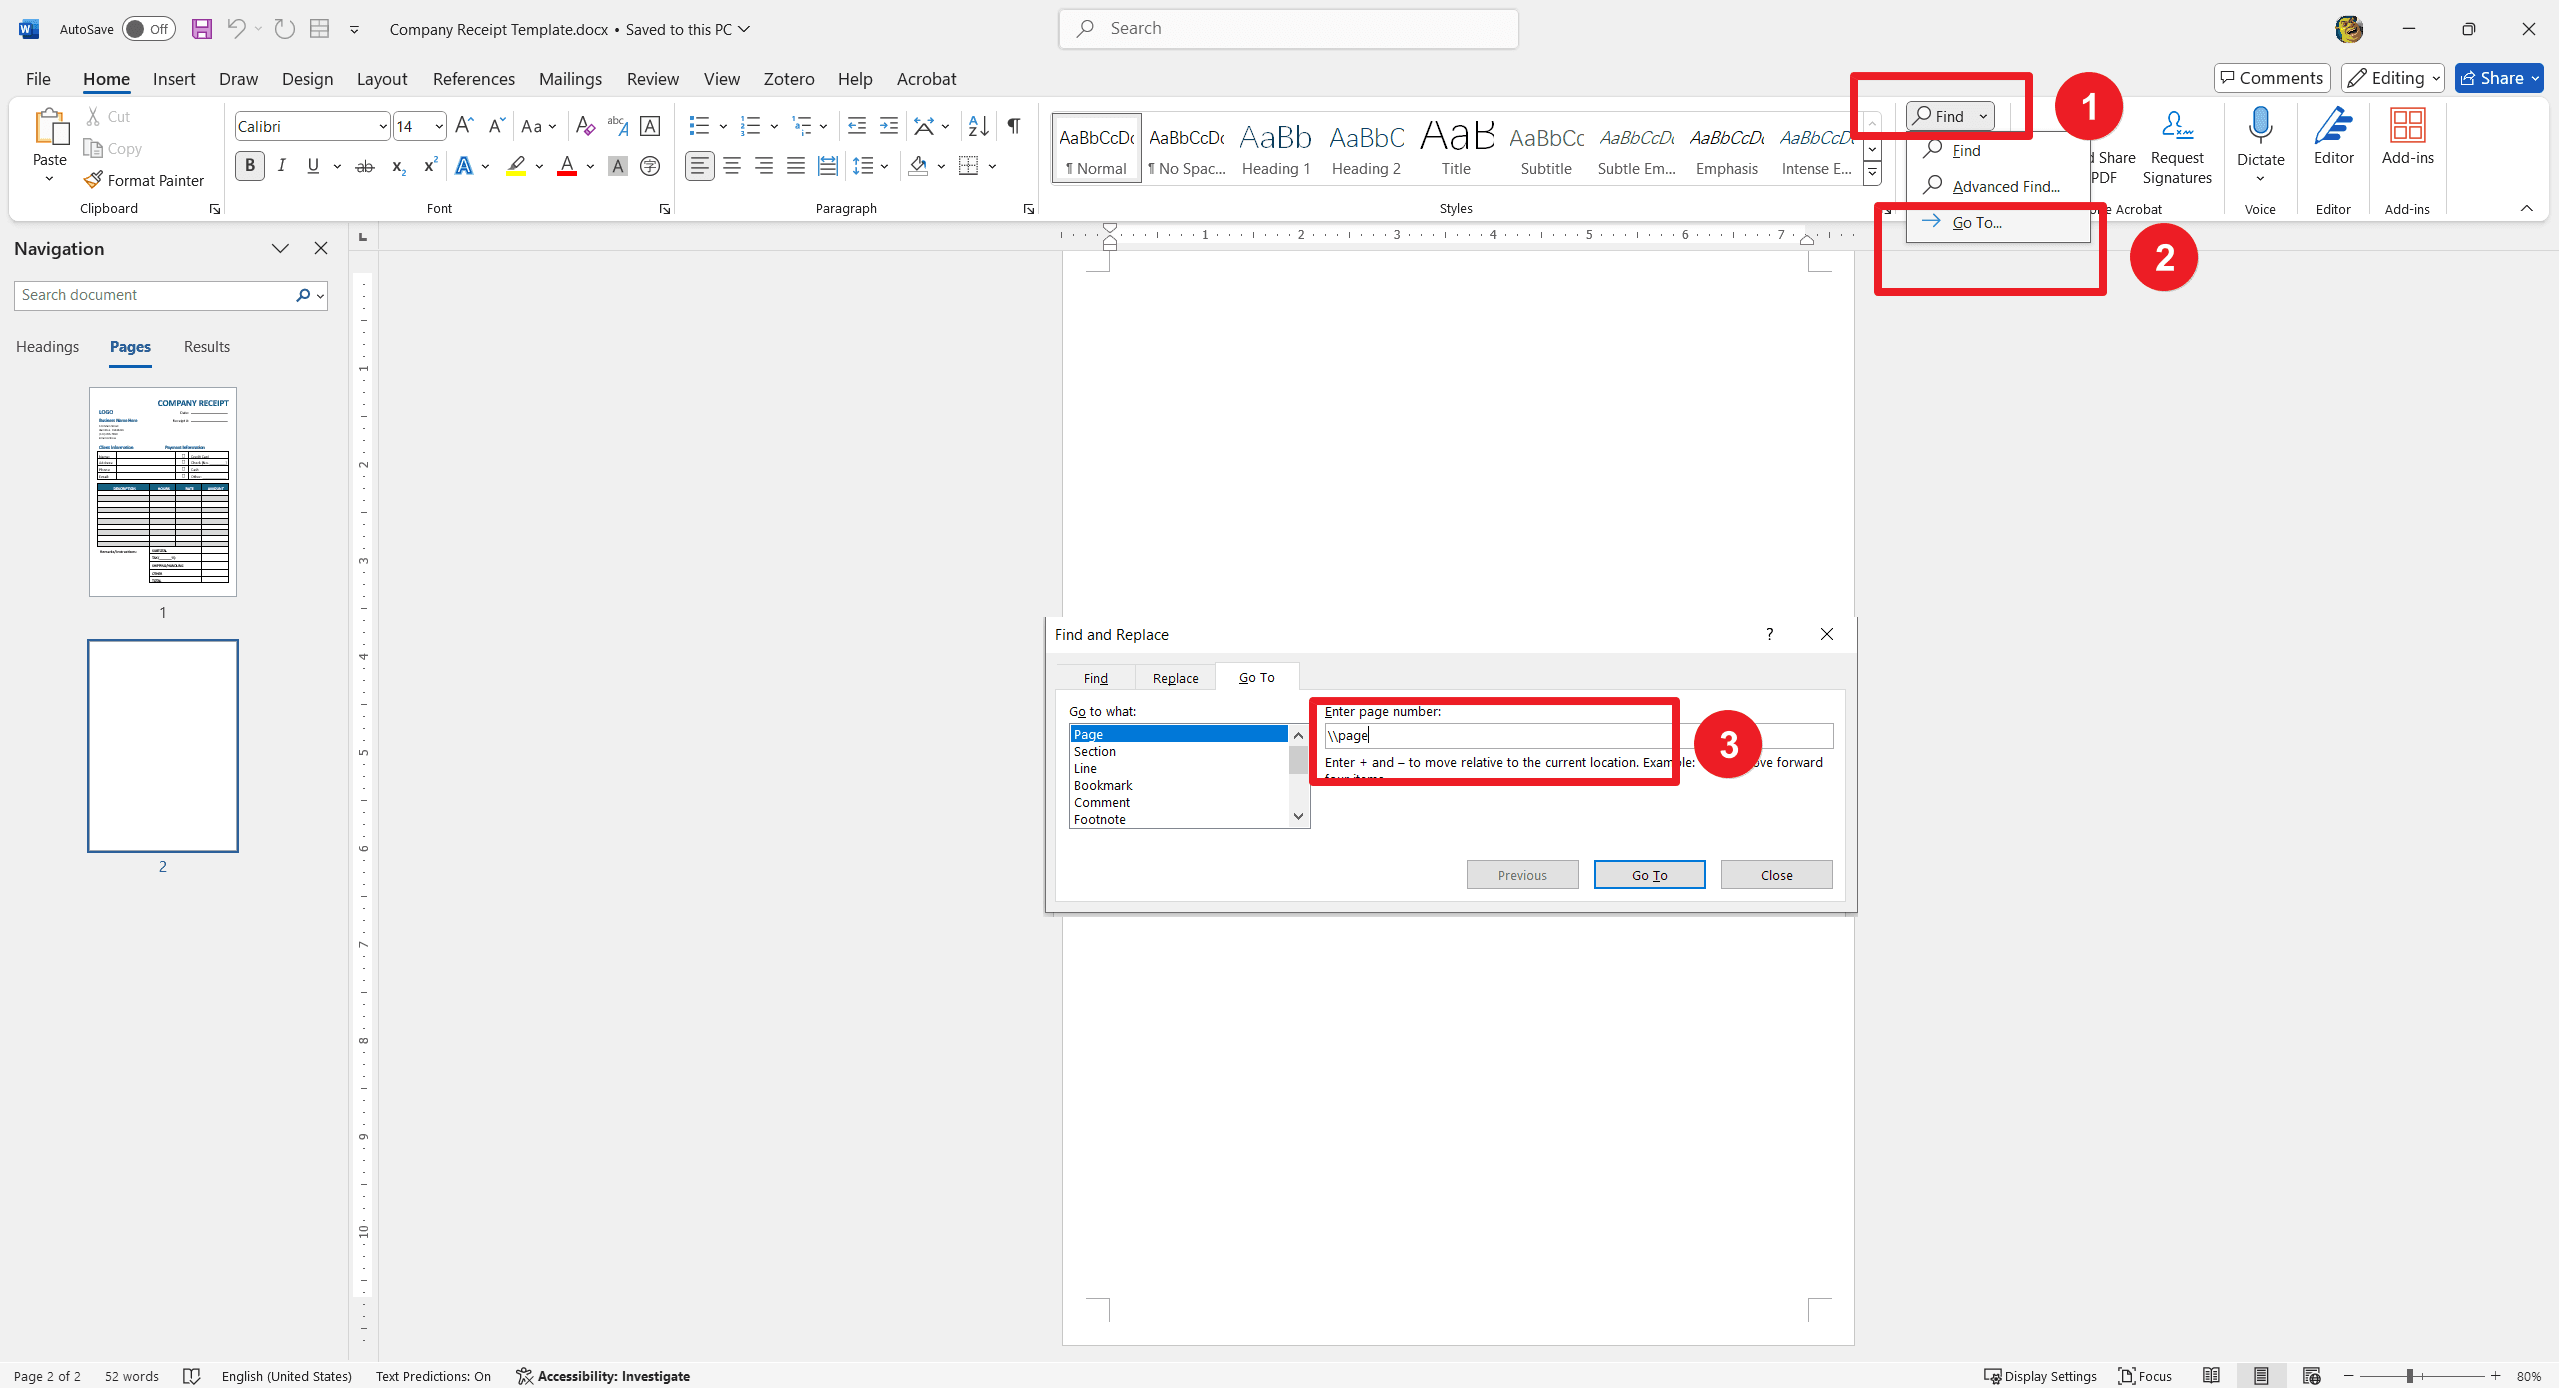
- Select the Page: Place your cursor anywhere on the page you want to delete.
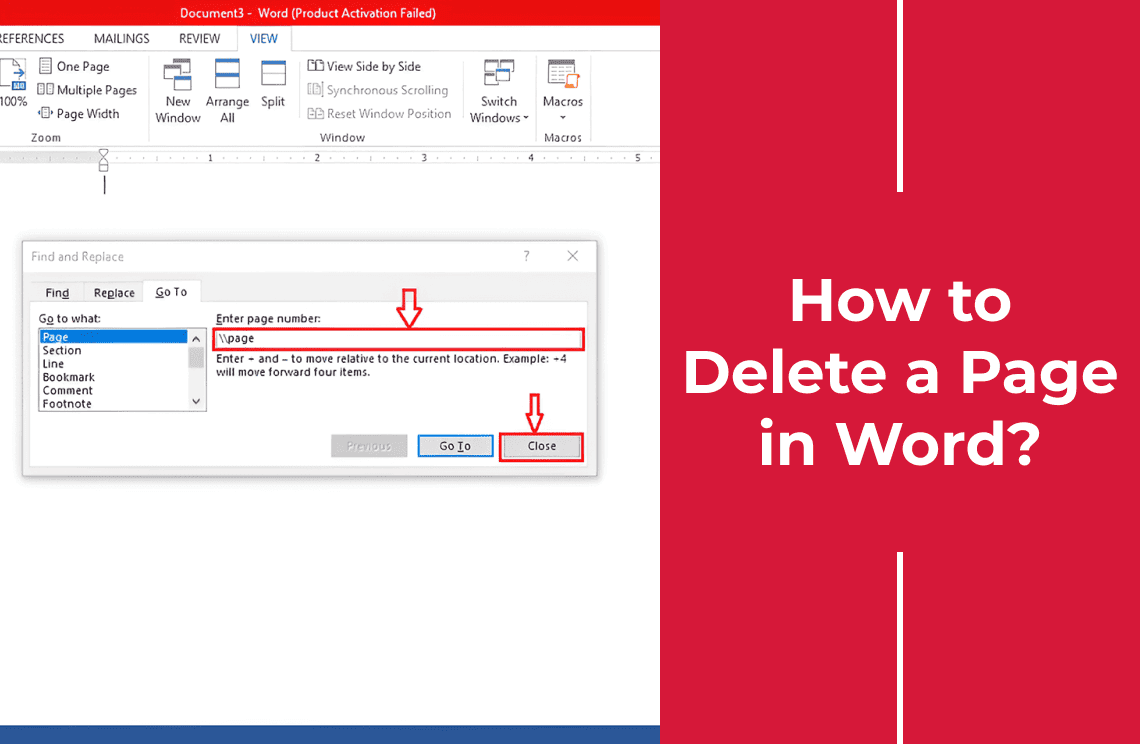
- Open Go to Dialog: Press Ctrl + G, which will open the "Go To" dialog box.
- Enter Page Command: In the "Enter page number" field, type `\\page` and press Enter.
- Close Dialog: Click on Close, and you will see that the entire page is selected.
- Delete Content: Press the Delete key on your keyboard to remove the selected page.
For Mac:
- Select the Page: Click anywhere on the page you want to delete.
- Open Go to Dialog: Press Option + Command + G.
- Enter Page Command: Type `\\page` in the "Enter page number" box and press Enter.
- Close Dialog: Click on Close to ensure the content is selected.
- Delete Content: Click on that and press the Delete key.
Method 3: Manual Deletion of Content
To delete a page in Word is not difficult. For any specific page of content that you would want to delete, you could do that manually by carrying out these steps:
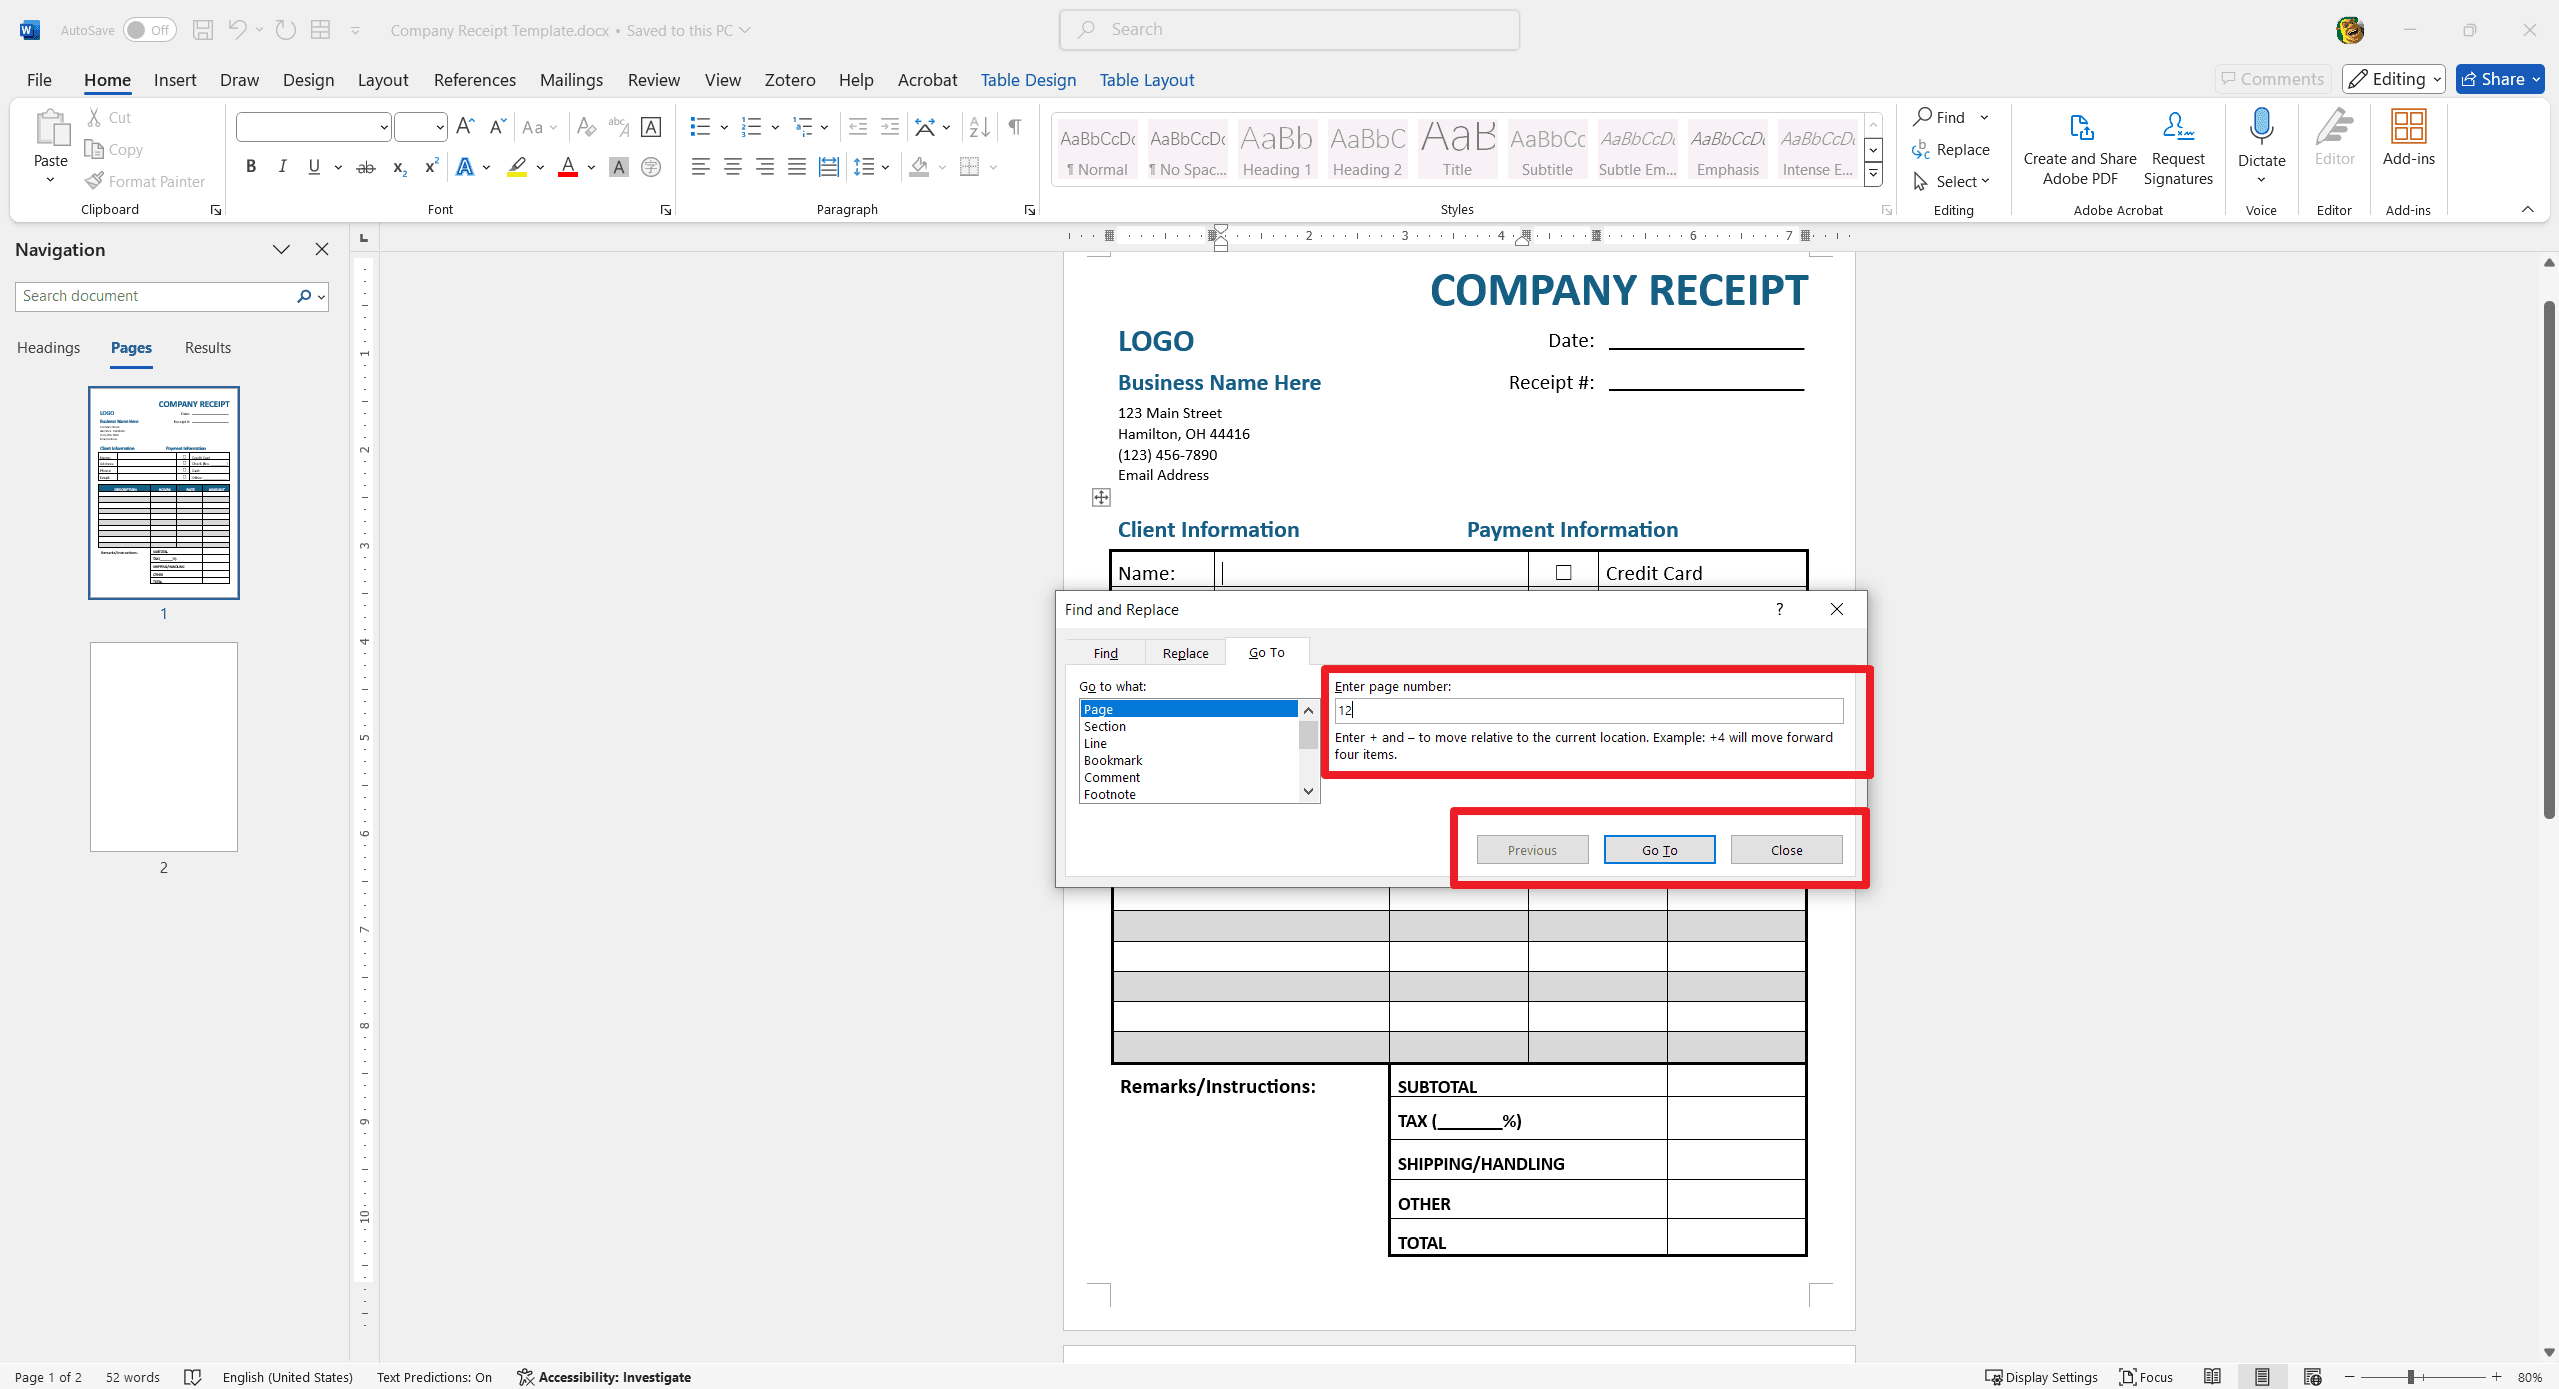
Open the page to be deleted and press Ctrl +G; this will show the Go To dialog box. And then, provide the page number to be deleted and enter it. This will open the page. And than, drag your cursor over the content to be deleted . And then, tap on backspace or Delete on the keyboard to complete the process.
Method 4: Paragraph Mark Adjustments
Sometimes the extra blank pages are due to paragraph marks that do not fit in your margins. Knowing how to delete a blank page in Word will free your works from this issue: First, turn the paragraph marks on by hitting Ctrl + Shift + 8 (Windows) or Command + 8 (Mac).
Mark any paragraph markers that are visible at the bottom of the page you don't want to show up. Select these markers and change font size to `1` or delete them completely. Once done, disable paragraph markers again by using the same key combination as above.
Method 5: Deleting Section Breaks
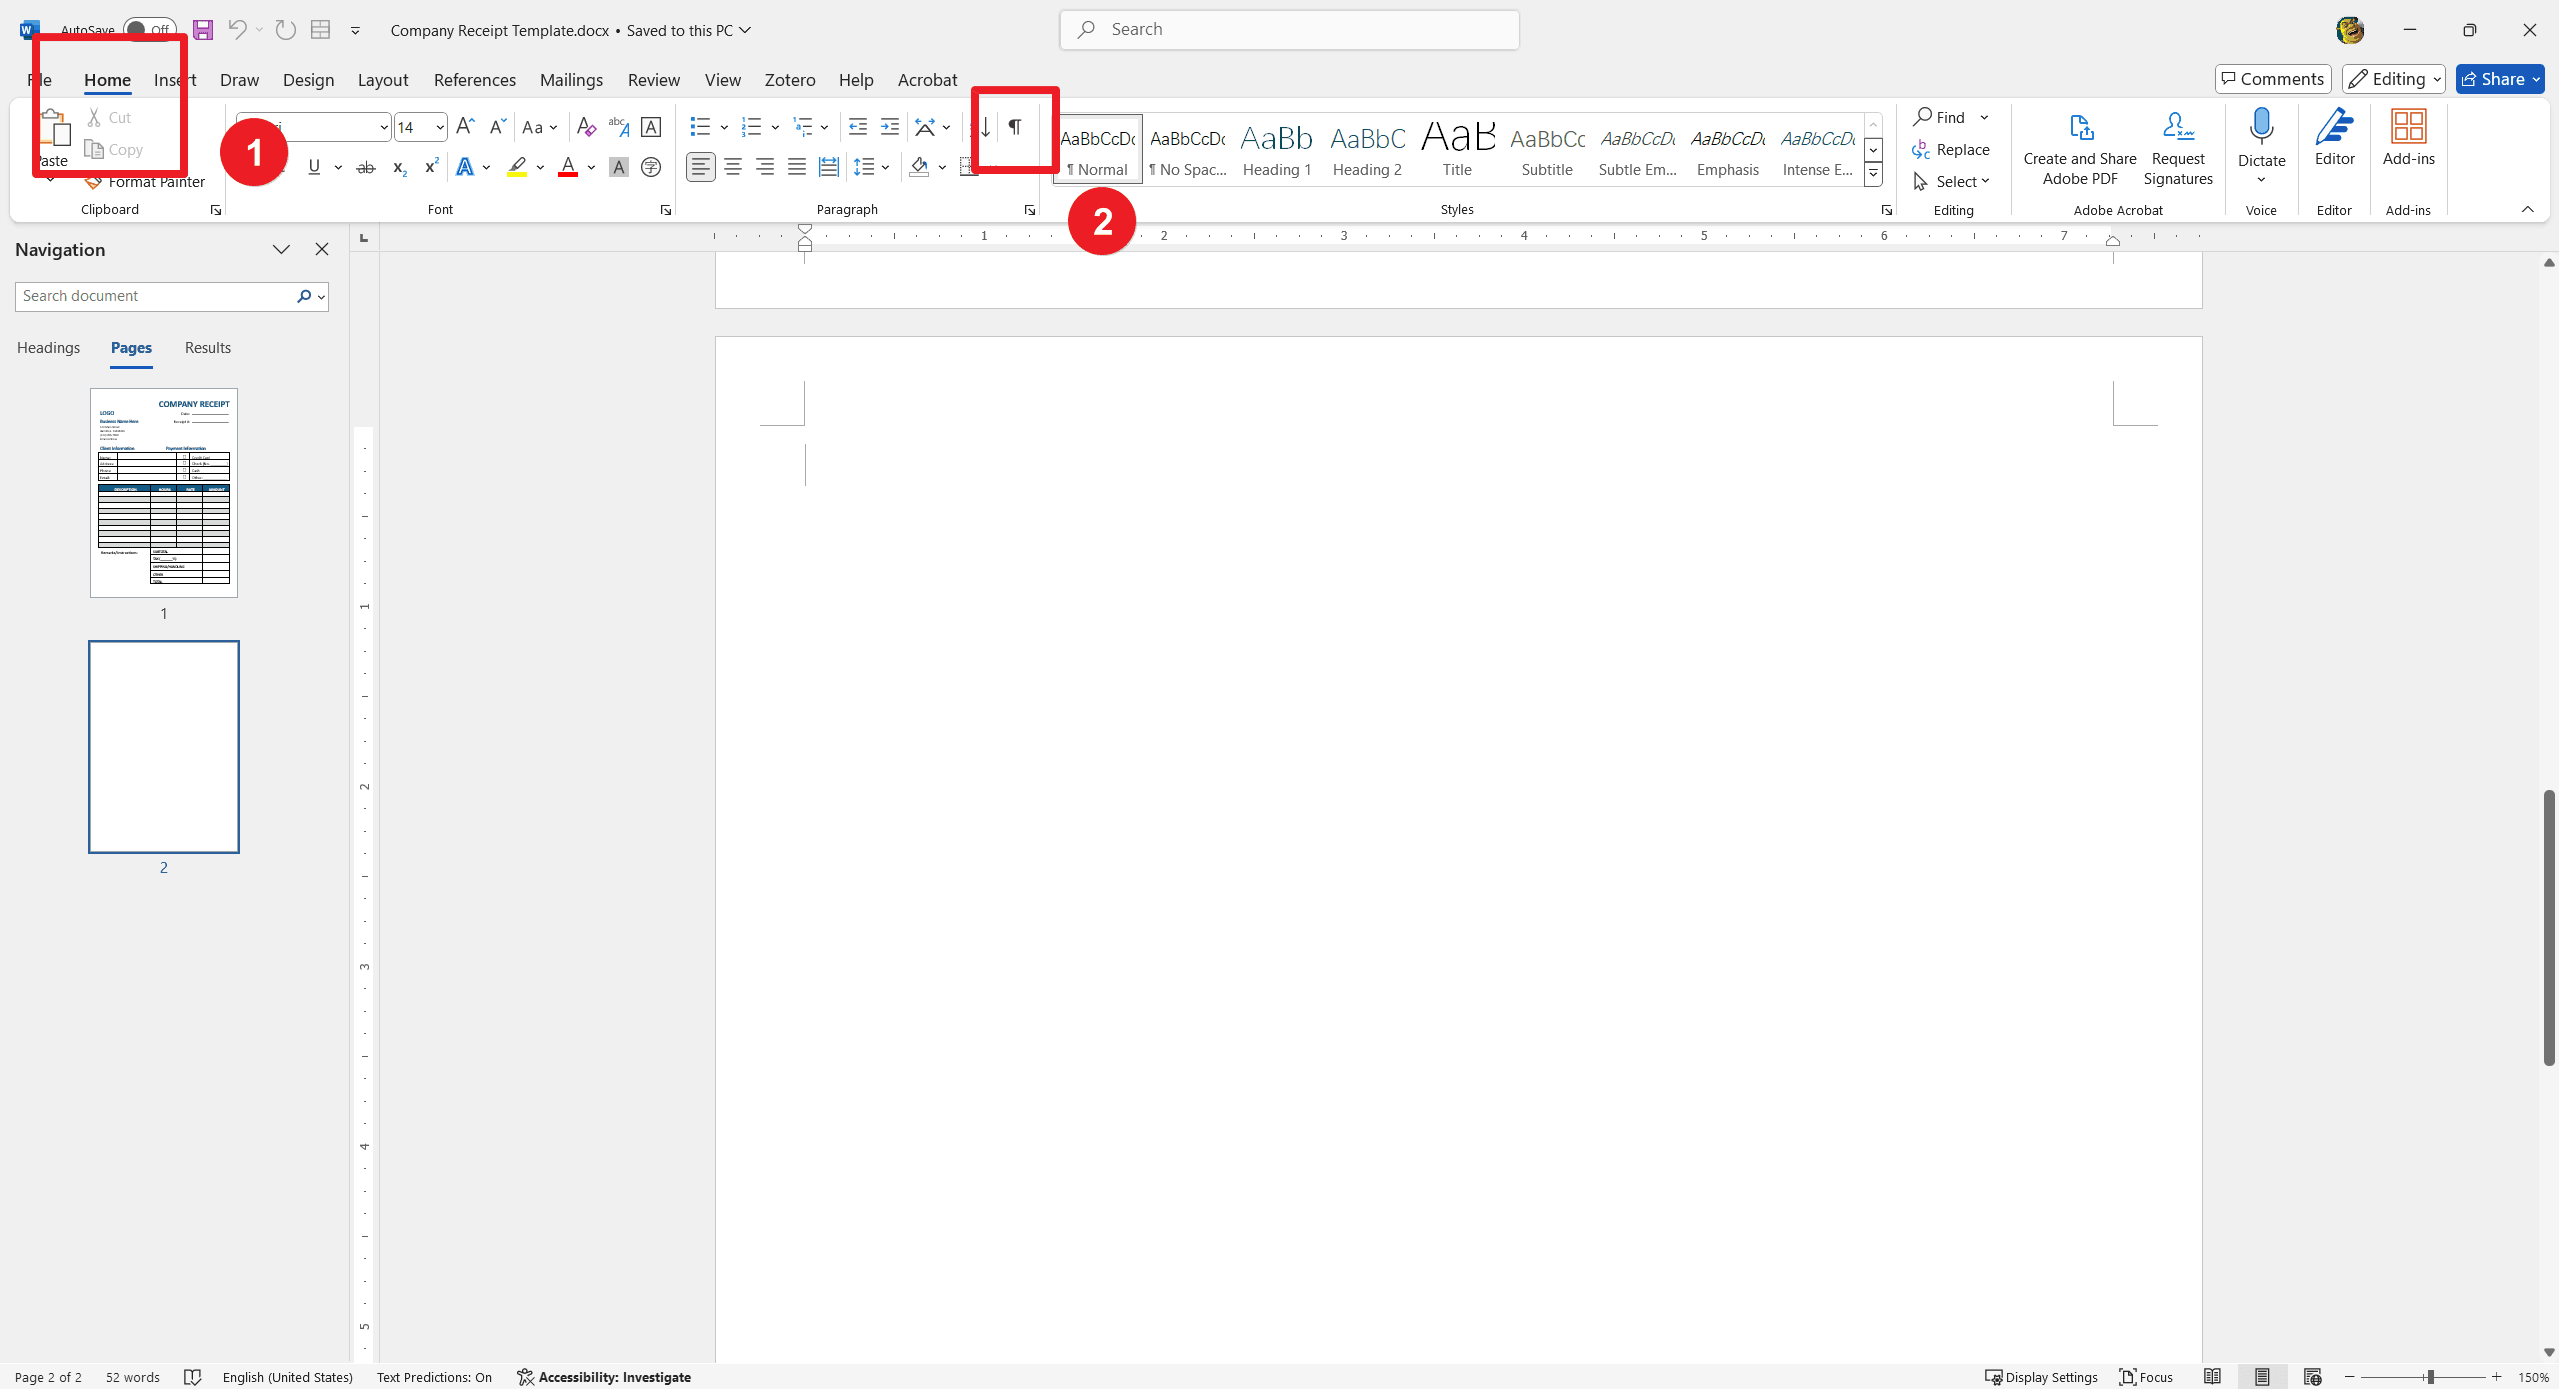
Click on the Show/Hide tab under Paragraph on the Home tab. And then, click on the Show/Hide tab under Paragraph on the Home tab.
Method 6: Extra Blank Page to Be Deleted at End of the Document
Go to this last blank page.
Check for stray paragraph marks or manual breaks as in the previous steps above.
Delete these items until your document returns to the form you want it to be in.
Method 7: Using Online Tools
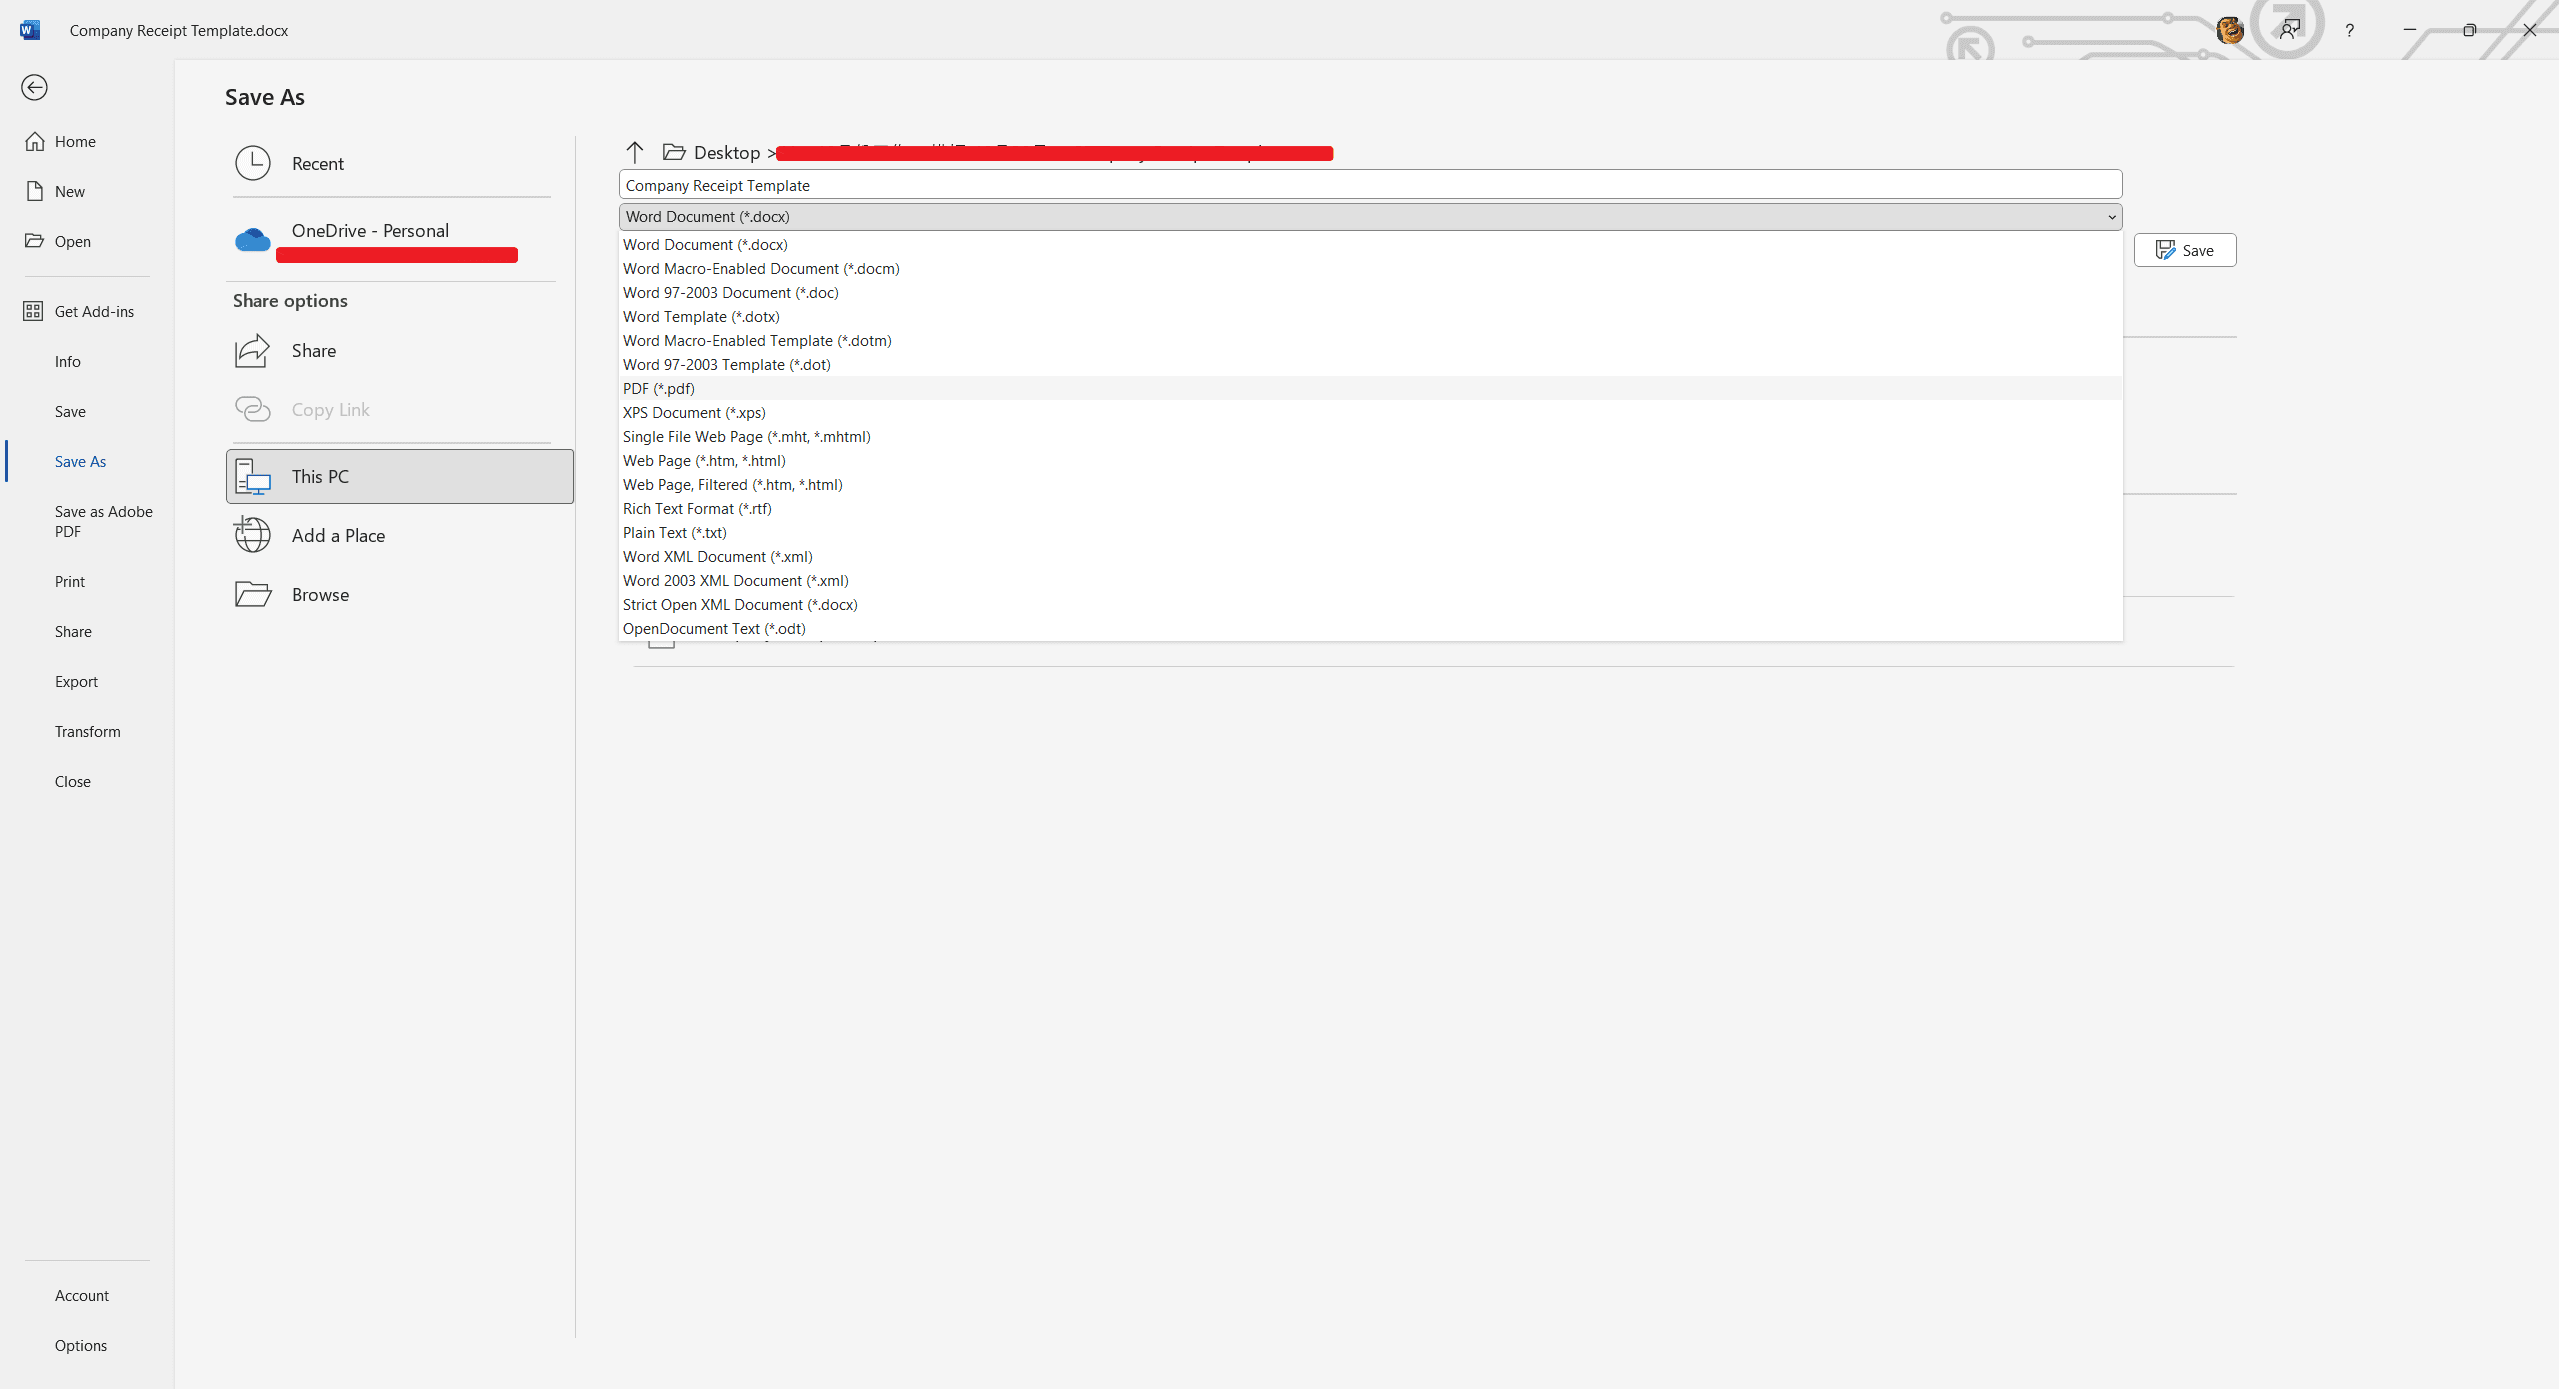
If you work online or completely totally have no idea how to delete blank or unnecessary pages. You can utilize some PDF tools. Here I would like to take PDF Agile as example.
First, save your Word document as a PDF.
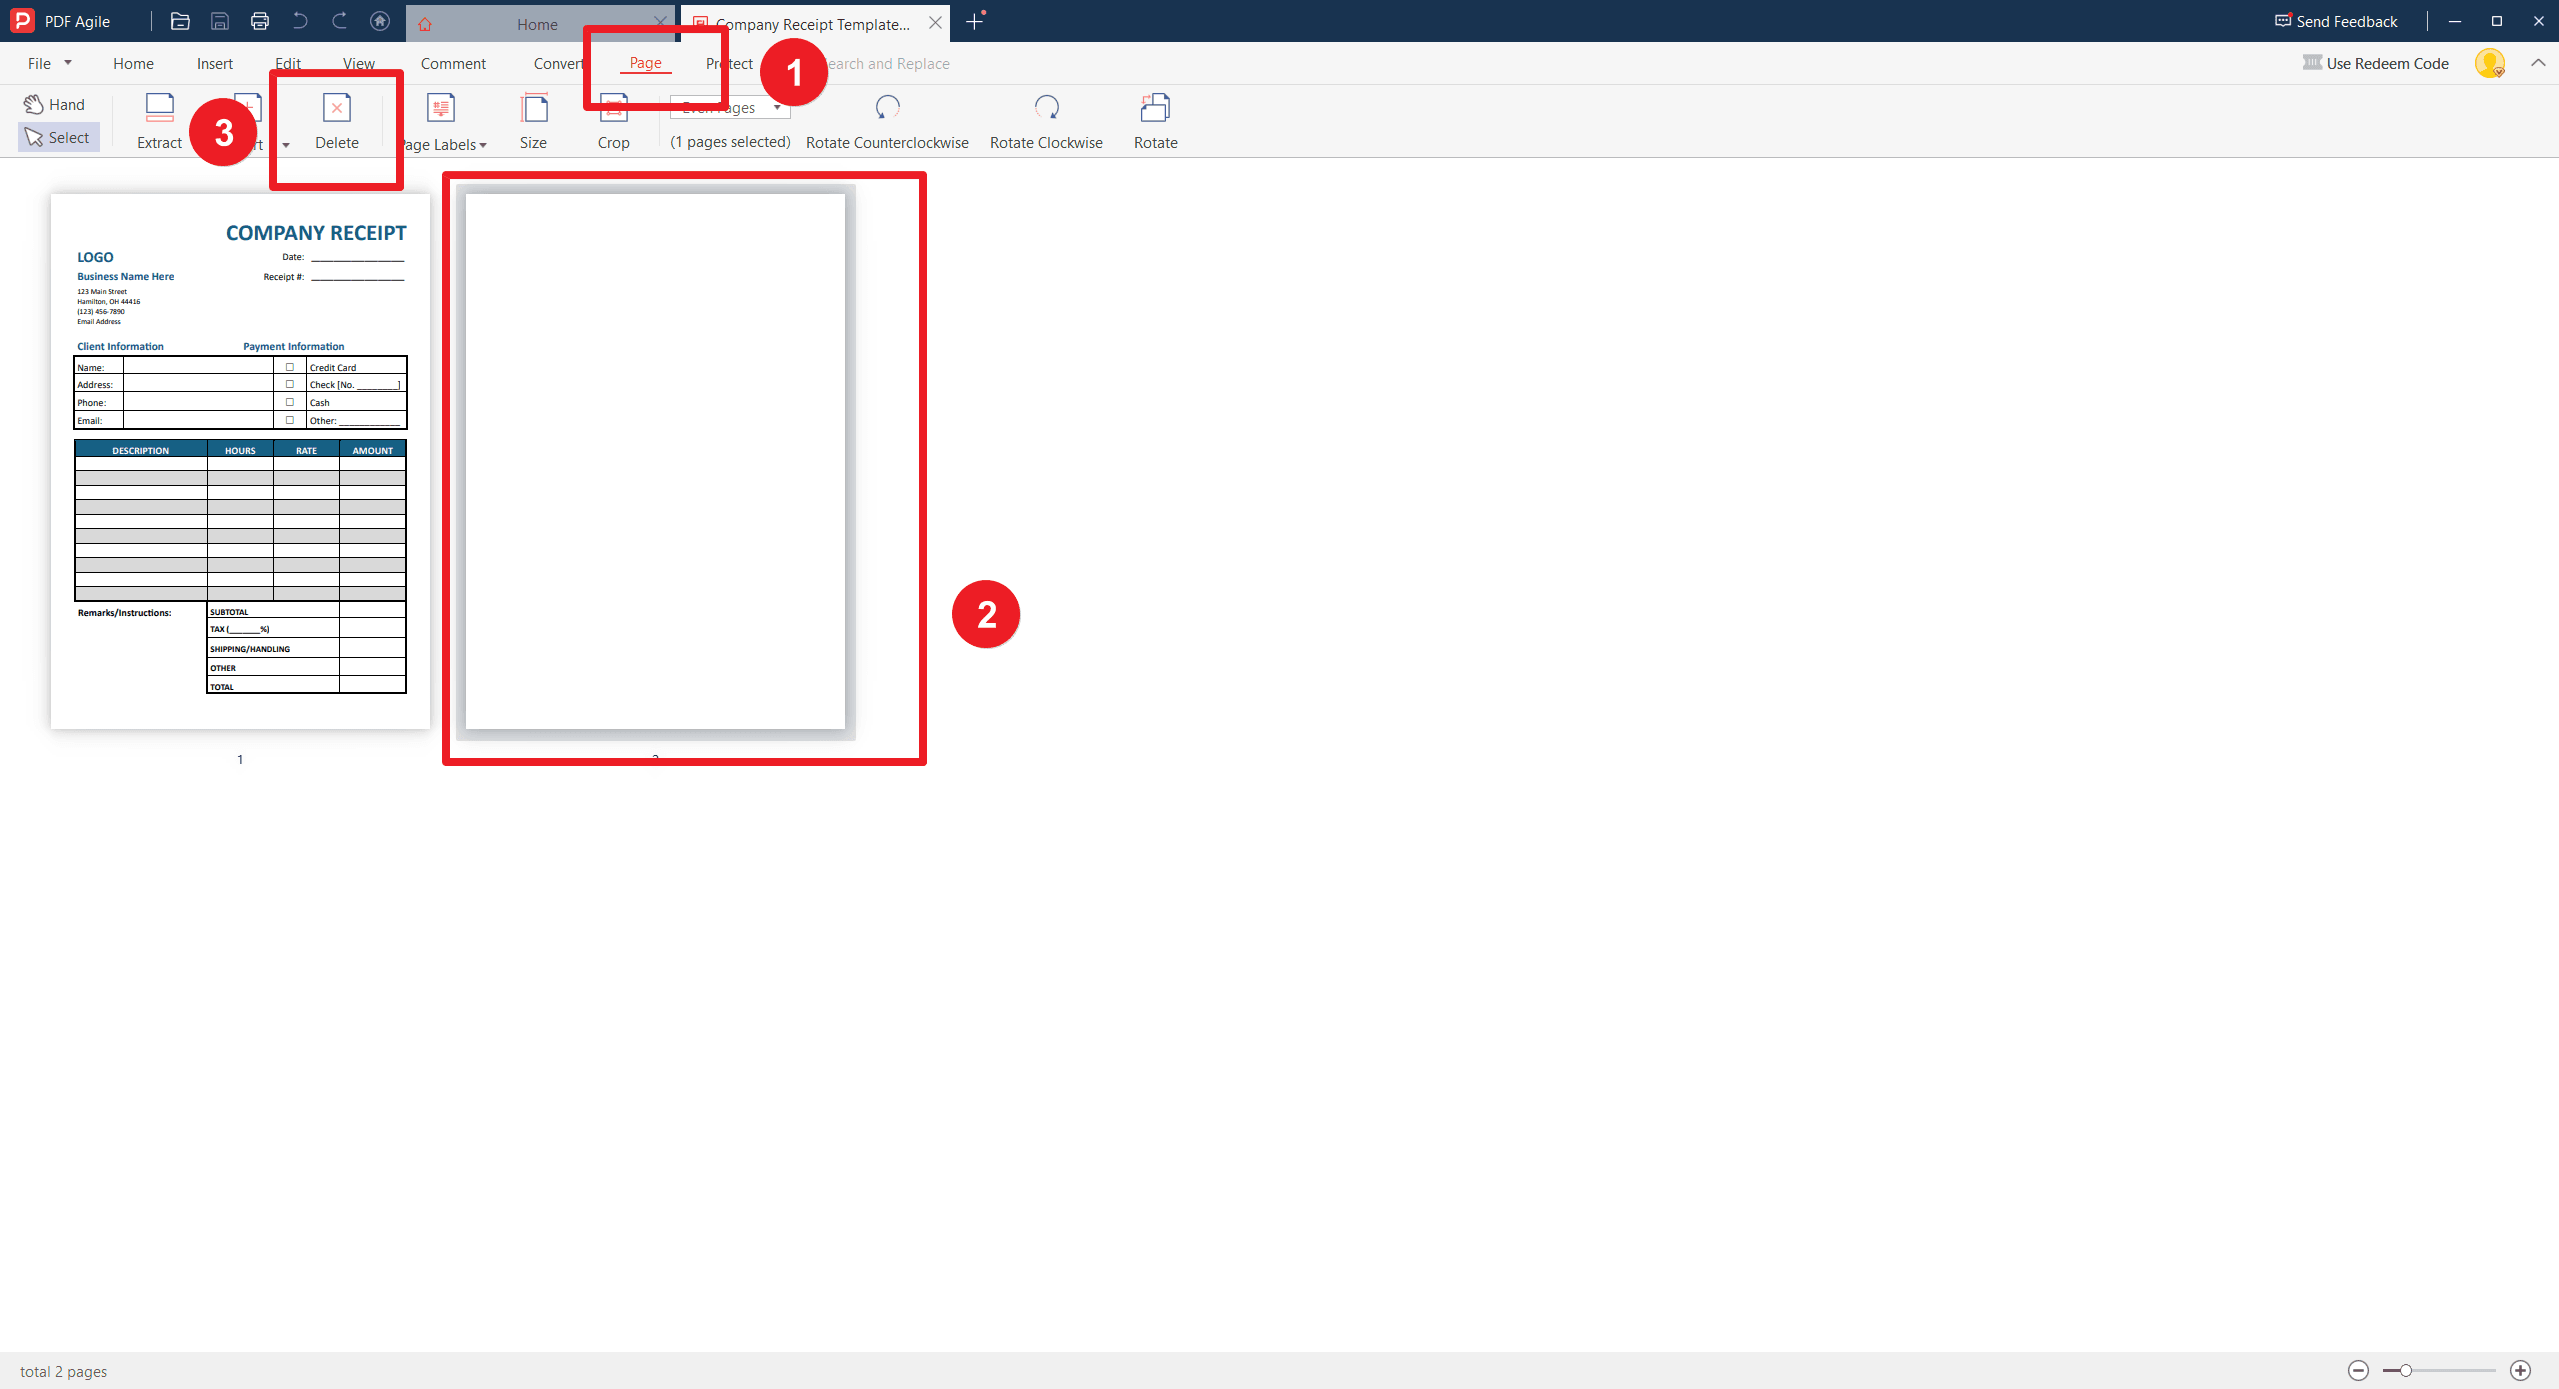
You would upload your PDF to PDF Agile, remove unwanted pages, and then save it back out as a Word document.
Conclusion
You would have learned how to delete pages in Microsoft Word from the content provided above. You would have also learned about how to do it on both macOS and Windows. The information is simplified adequately to ensure that every reader can grasp the process. You can delete pages in Microsoft Word by various means depending on what your situation involves; some of the methods we described above include how to handle blank pages, delete unwanted content, or fix the formatting issues created by breaks or paragraphs. Each of the techniques we discussed up there will help you make sure that your documents are free from interruptions that could be caused by rogue pages.
Whether it is a long report or just a simple letter, mastering these techniques or methods already discussed will make you more efficient in document management with Microsoft Word on both macOS and Windows.

