In the world of professional writing and document formatting, mastering the art of hanging indents can transform your text from ordinary to polished. Whether you're crafting a bibliography, creating a list, or formatting a legal document, hanging indents are essential for maintaining clarity and readability. This tutorial is designed to empower you with the knowledge and skills to effortlessly create hanging indents in Microsoft Word.
We'll explore multiple methods—from using the ruler to leveraging the paragraph dialog box and even employing keyboard shortcuts—each accompanied by clear visual instructions. By the end of this guide, you'll not only understand how to implement hanging indents but also appreciate their versatility and importance in enhancing your documents.
Method 1: Using the Ruler
Using the ruler is a quick and visual way to set a hanging indent in Word. Follow these steps:
Step 1: Open Your Word and Display the Ruler
Launch Microsoft Word and open the document where you want to apply the hanging indent. If the ruler is not visible, you can enable it by going to the View tab and checking the Ruler box.

Step 2: Set the Hanging Indent
Click and drag the Hanging Indent Marker (the small triangle below the ruler) to the desired position. This marker is usually located at the bottom of the ruler.

Step 3: Verify the Hanging Indent
Type or paste your text to see the hanging indent in action. The first line of the paragraph will remain at the left margin, while subsequent lines will be indented. Ps. Place the mouse cursor at the beginning of the segment you want to change the indent. Drag the top triangle to change the first indent of the segment and drag the bottom triangle to change the entire segment.

Method 2: Using the Paragraph Dialog Box
Step 1: Open the Paragraph Dialog Box
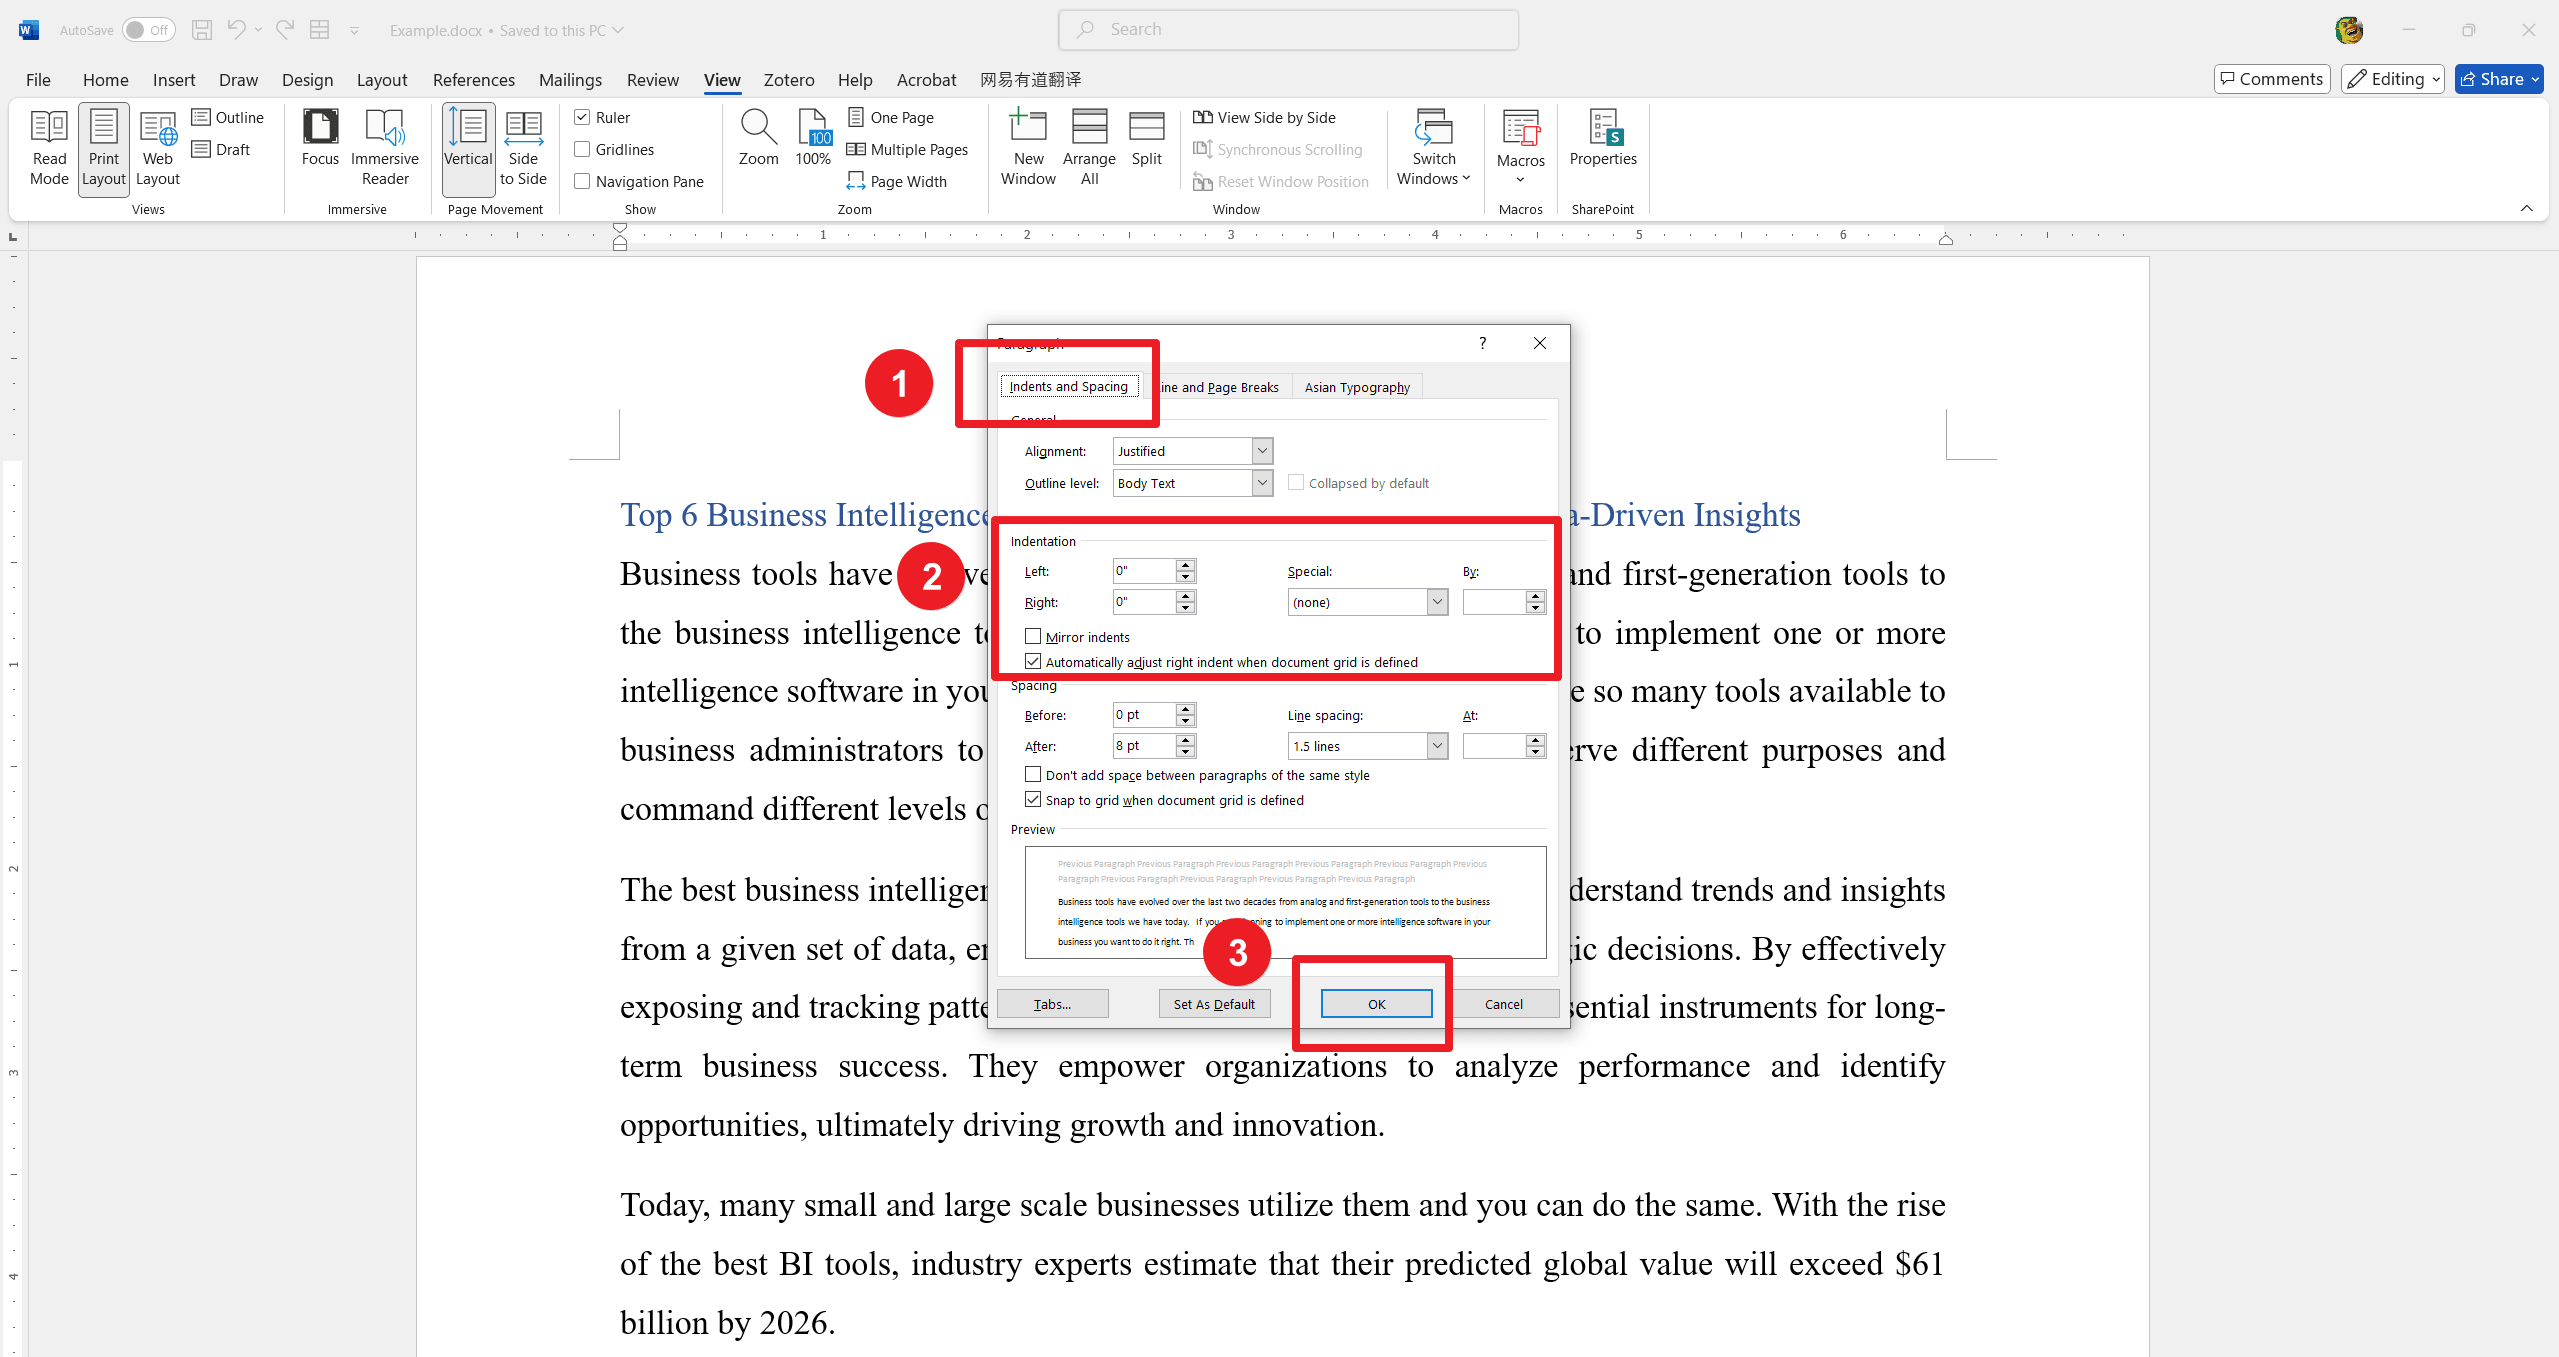
Select the text where you want to apply the hanging indent. And then, right-click on the selected text and choose "Paragraph..." from the context menu.
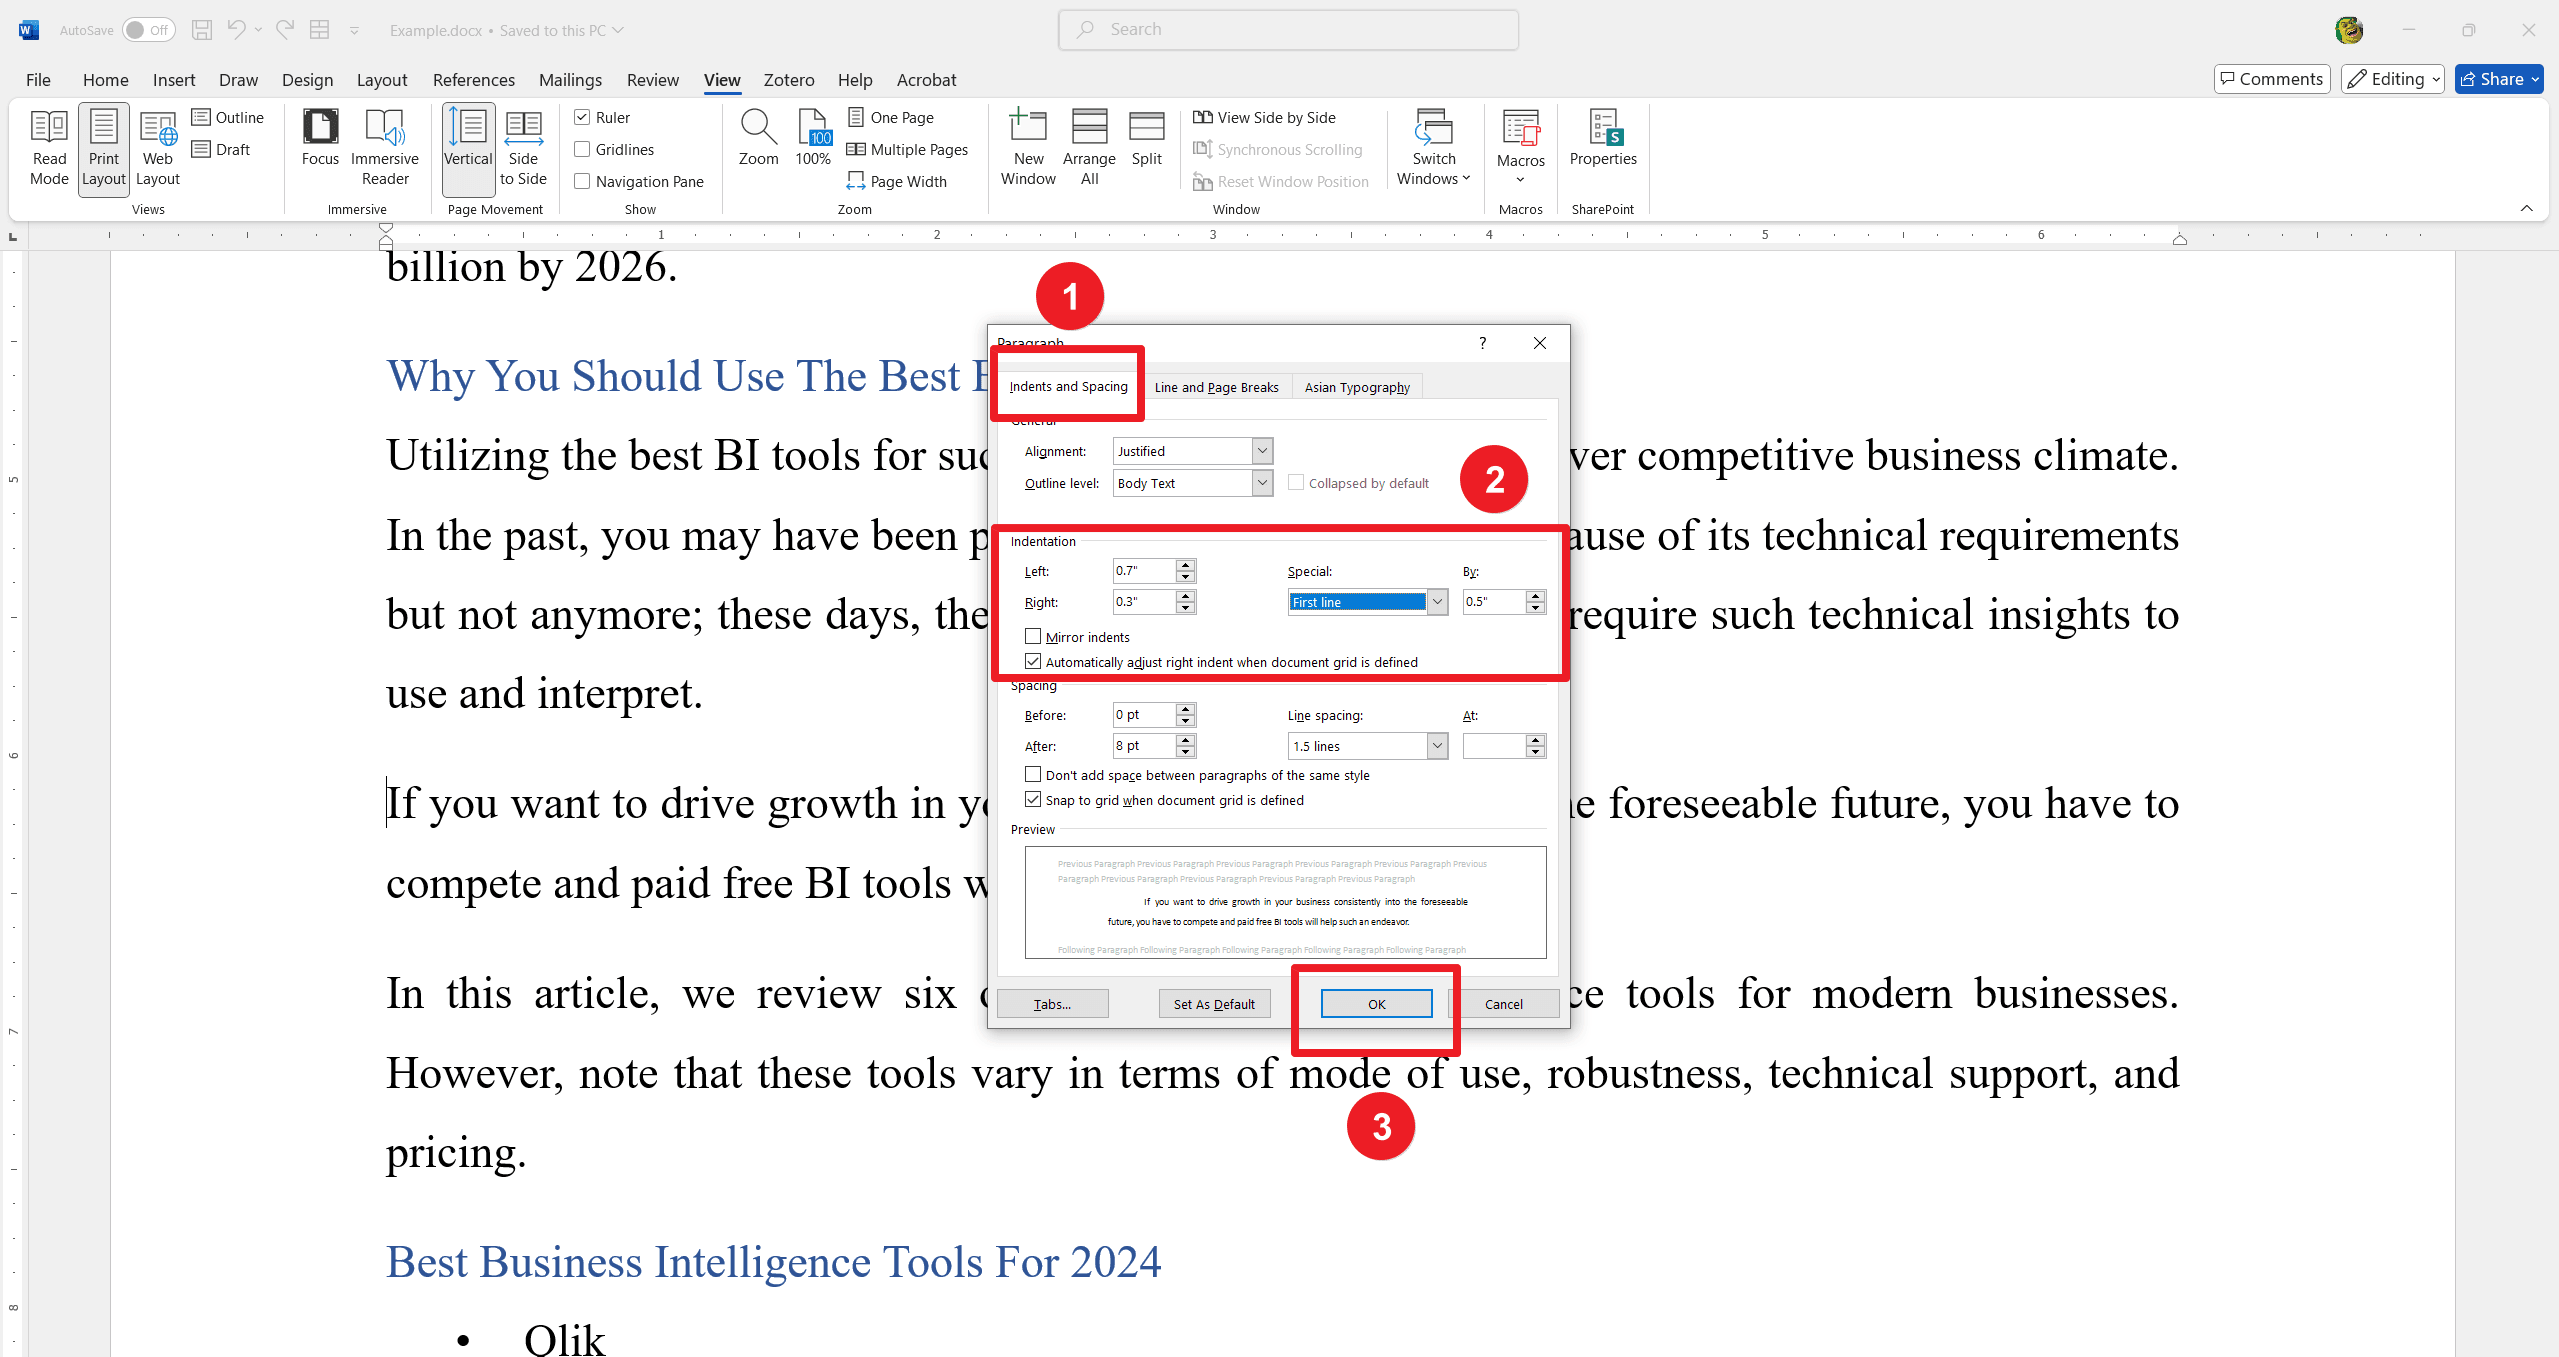
Step 2: Navigate to the Indents and Spacing Tab
In the Paragraph dialog box, go to the "Indents and Spacing" tab. Under the "Indentation" section, find the "Special" dropdown menu. Select "Hanging" from the dropdown menu. Optionally, you can adjust the "By" field to specify the size of the hanging indent. Click "OK" to apply the hanging indent to the selected text.
Method 3: Using Keyboard Shortcuts
Using keyboard shortcuts is a quick and efficient way to apply a hanging indent. Follow these steps:
Step 1: Use the Keyboard Shortcut
Highlight the paragraph or text where you want to apply the hanging indent. And then, press Ctrl + T (Windows) or Command + T (Mac) to apply a hanging indent.
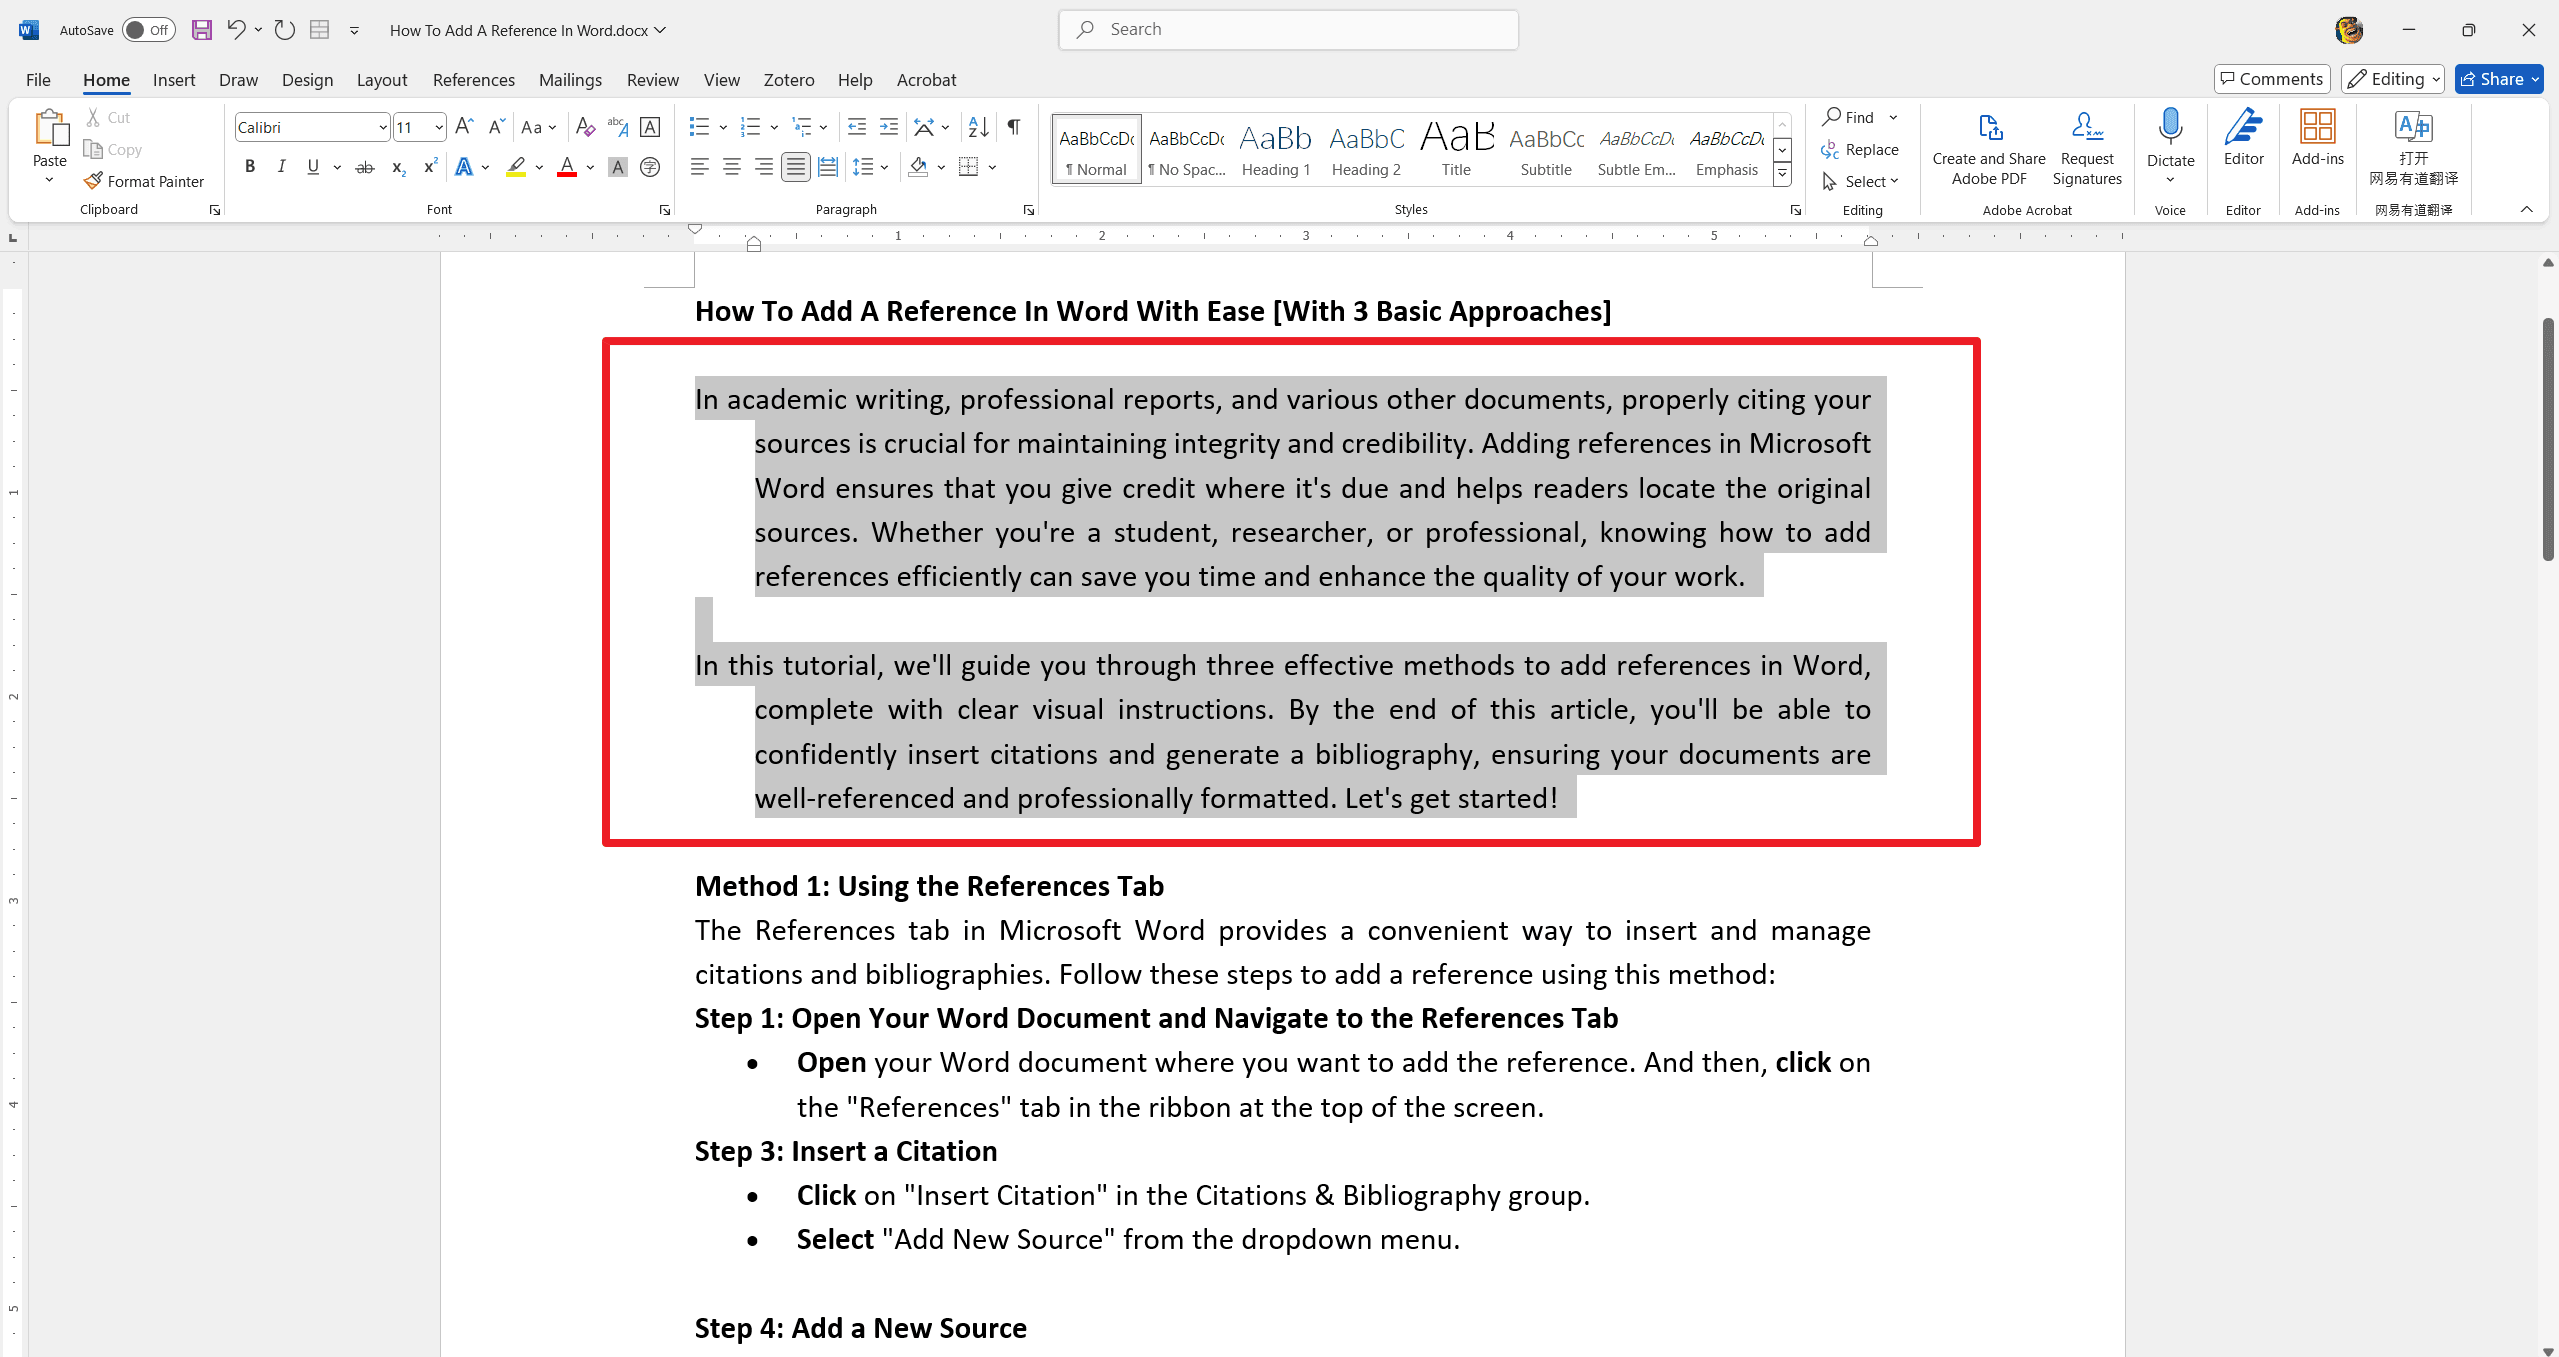
Step 2: Verify the Hanging Indent
Check that the first line of the selected text is now indented, with the subsequent lines aligned to the left margin.
Tip: If you need to remove the hanging indent, simply press Ctrl + Shift + T (Windows) or Command + Shift + T (Mac).
Additional Tips and Tricks
1. Adjusting Indent Size
- Quick Adjustment: You can easily adjust the size of your hanging indent by dragging the hanging indent marker on the ruler.
- Precise Adjustment: For precise control, use the Paragraph dialog box to set the exact measurement.
- Screenshot: Example of adjusting the indent size using the ruler and the Paragraph dialog box.
2. Removing Hanging Indents
- Using the Ruler: Simply drag the hanging indent marker back to the left margin.
- Using the Paragraph Dialog Box: Set the "Special" indent to "None" in the Indents and Spacing tab.
- Screenshot: Example of removing a hanging indent using both methods.
3. Applying Hanging Indents to Multiple Paragraphs
- Select Multiple Paragraphs: Highlight the paragraphs you want to apply the hanging indent to.
- Apply Indent: Use any of the methods described (ruler, Paragraph dialog box, or keyboard shortcut) to apply the hanging indent to all selected paragraphs.
- Screenshot: Example of applying a hanging indent to multiple paragraphs.
4. Consistent Formatting
- Use Styles: For consistent formatting across your document, consider using Word's built-in styles and modifying them to include hanging indents.
- Screenshot: Example of modifying a style to include a hanging indent.
5. Keyboard Shortcuts for Efficiency
- Ctrl + T: Quickly apply a hanging indent using this keyboard shortcut.
- Ctrl + Shift + T: Remove a hanging indent with this shortcut.
- Screenshot: Visual representation of using keyboard shortcuts for efficiency.
Troubleshooting Common Issues
1. The hanging indent does not appear after following the steps
Solution:
- Check Ruler Visibility: Ensure the ruler is visible. If not, go to the "View" tab and check "Ruler."
- Verify Indent Settings: Make sure the hanging indent marker on the ruler is correctly set. It should be positioned to the right of the first line indent marker.
- Paragraph Settings: Double-check the settings in the Paragraph dialog box. Ensure the "Hanging" option is selected under "Special."
2. The hanging indent is not consistent across multiple paragraphs.
Solution:
- Select All Paragraphs: Ensure all paragraphs are selected before applying the hanging indent.
- Uniform Settings: Verify that the indent settings are uniform across all selected paragraphs.
- Use Styles: Consider using Word's built-in styles to apply consistent formatting, including hanging indents.
3. Applying a hanging indent causes other formatting changes.
Solution:
- Undo and Redo: Use the "Undo" (Ctrl + Z) and "Redo" (Ctrl + Y) functions to revert and reapply changes carefully.
- Isolate Formatting: Apply the hanging indent to a single paragraph first to ensure it works as expected before applying it to the entire document.
- Clear Formatting: If necessary, clear existing formatting by selecting the text and using the "Clear All Formatting" option (found in the "Home" tab under "Styles").
Conclusion
In this tutorial, we've explored three effective methods to create a hanging indent in Microsoft Word: using the ruler, the Paragraph dialog box, and keyboard shortcuts. Each method offers a straightforward approach, allowing you to choose the one that best suits your workflow.
By following the step-by-step instructions and utilizing the clear visual aids provided, you should now be able to confidently apply hanging indents to your documents. Whether you're formatting a bibliography, creating a list, or enhancing the readability of your text, mastering hanging indents can significantly improve the professionalism of your work.
Remember, practice makes perfect. Don't hesitate to experiment with the different methods and adjust the settings to fit your specific needs. If you encounter any issues, refer back to the troubleshooting tips for quick solutions. We hope this guide has been helpful.

![How To Do A Hanging Indent On Word [With Clear Visual Instructions]](https://cms-cdn.pdfagile.com/How_To_Do_A_Hanging_Indent_On_Word_With_Clear_Visual_Instructions_0c19938d10.png)
